
BMW X5: Replacing Timing Chain (N52K)
Special tools required:
- 00 9 140
- 11 0 300
- 11 4 280
- 11 4 281
- 11 4 282
- 11 4 283
- 11 4 360
- 11 4 362
- 11 5 200
- 11 9 280
Necessary preliminary tasks:
- Remove cylinder head cover
- Remove all spark plugs
- Remove chain tensioner, see 11 31 090 Installing and removing/replacing chain tensioner piston (N52K)
- Remove crankshaft radial seal at front, see 11 14 005 Replacing front crankshaft radial seal (N52K)
- Remove drive belt tensioner
- Remove vibration damper
Remove fastener (1) in direction of arrow.
Installation:
Install fastener (1) with bore facing outwards.

Fig. 181: Fastener
Rotate crankshaft at central bolt into TDC position.
Slide special tool 11 0 300 in direction of arrow into special tool bore and secure crankshaft.
IMPORTANT: On vehicles with optional extra SA205 (automatic transmission), there is a large bore for the TDC position shortly before the special tool bore. This bore can be confused with the special tool bore.
If the flywheel is secured in the correct special tool bore with special tool 11 0 300 , the engine can no longer be moved at the central bolt.
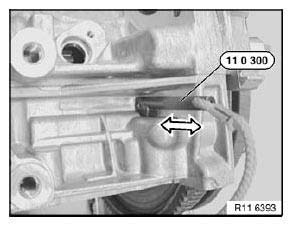
Fig. 182: Securing Crankshaft Using Special Tool (11 0 300)
IMPORTANT: Do not remove special tool 11 0 300 to release central bolt (1).
Employ a second person for gripping when releasing central bolt (1).
Screw special tool 11 9 280 onto hub of vibration damper.
Release central bolt (1).
Tightening torque: 11 21 1AZ.
Remove hub towards front.
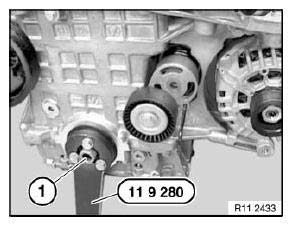
Fig. 183: Central Bolt With Special Tool (11 9 280)
Open plug (1).
Tightening torque: 11 31 7AZ.
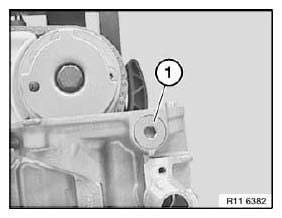
Fig. 184: Plug
Open plug (1).
Tightening torque: 11 11 7AZ.
Installation:
Replace aluminium screws.
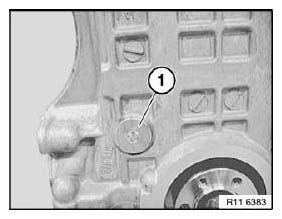
Fig. 185: Plug
Release bearing pin (1) from timing chain module on cylinder head.
Tightening torque: 11 31 5AZ.
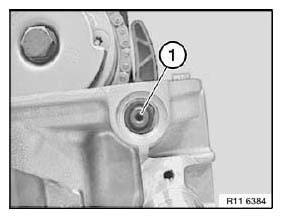
Fig. 186: Bearing Pin
Release bearing pin (1) from timing chain module on crankcase.
Tightening torque: 11 31 4AZ.
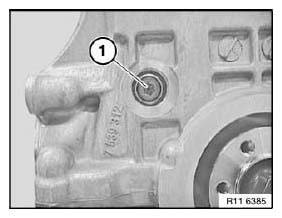
Fig. 187: Bearing Pin
IMPORTANT: Install special tool 11 4 280 to release the central bolts on the inlet and exhaust adjustment units.
Secure special tool 11 4 283 to cylinder head with bolts (1).
NOTE: Fit special tool 11 4 282 underneath on side of inlet camshaft.
Mount special tool 11 4 281 on inlet and exhaust camshafts.
Do not remove special tool 11 4 280.
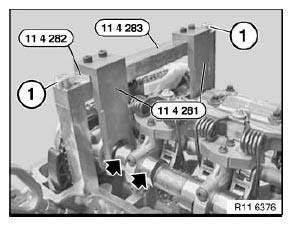
Fig. 188: Cylinder Head Bolts And Special Tools (11 4 282) And (11 4 281)
Remove inlet and exhaust adjustment unit.
Release bolts (1) from timing chain module on cylinder head.
Tightening torque: 11 31 3AZ.
Remove chain module with timing chain and sprocket wheel upwards in direction of arrow.
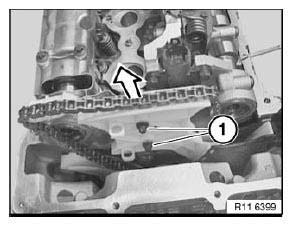
Fig. 189: Removing Timing Chain Module Bolts
IMPORTANT: Note installation direction of sprocket wheel (2).
Collar (see arrow) on sprocket wheel (2) points to engine.
Incorrect assembly will result in engine damage.
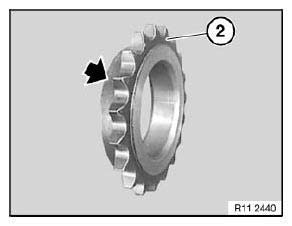
Fig. 190: Collar On Sprocket Wheel
Pull timing chain (1) upwards until sprocket wheel (2) engages chain guide (3).
Install timing chain (1) and sprocket wheel (2) in this position.
Installation:
Always hold timing chain (1) under tension. Timing chain (1) may jam on chain guide (3).
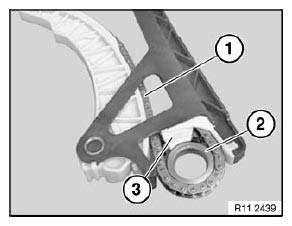
Fig. 191: Timing Chain, Sprocket Wheel And Chain Guide
Install hub with central bolt.
Tighten down special tool 11 5 200 with screws (1) to hub.
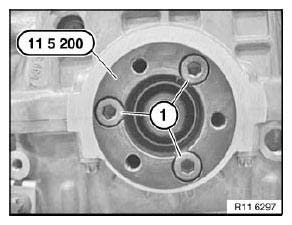
Fig. 192: Screws With Special Tool (11 5 200)
Remove tensioner for drive belt.
Screw in special tool 11 4 362 from special tool kit 11 4 360.
Mount special tool 11 9 280 on 11 5 200.
Support special tool 11 9 280 on special tool 11 4 362.
Special tool 11 0 300 secures crankshaft.
Tighten central bolt to jointing torque.
Tightening torque: 11 21 1AZ.
Mark central bolt and hub with paint.

Fig. 193: Special Tools (11 9 280), (11 0 300), (11 4 360) And (11 5 200)
Mark special tools with colored line (1).
See picture.
IMPORTANT: Do not remove the special tool while tightening the central bolt to torsion angle.
Risk of damage!
If necessary, tighten central bolt to torsion angle with special tool 00 9 140.
Tightening torque: 11 21 1AZ.
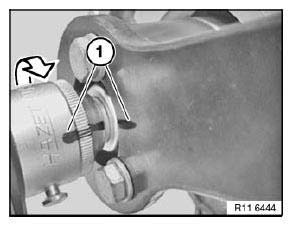
Fig. 194: Marking Special Tools With Colored Line
Tighten central bolt with a second person helping.
Tightening torque: 11 21 1AZ.
Install inlet and exhaust adjustment units.
Install chain tensioner.

Fig. 195: Special Tools (11 9 280), (11 0 300), (11 4 360) And (11 5 200)
Crank engine twice.
Check timing, see 11 31 005 Checking timing of camshaft(s) (N52K).
If necessary, adjust valve timing.
Assemble engine.
INSTALLING AND REMOVING/REPLACING CHAIN TENSIONER PISTON (N52K)
Release chain tensioner (1).
Tightening torque: 11 31 6AZ.
IMPORTANT: Have a cleaning cloth ready. A small quantity of engine oil will emerge after the screw connection has been released.
Make sure no engine oil runs onto belt drive.
Installation:
No sealing ring is fitted during series-production assembly.
A sealing ring must be fitted by service personnel when the chain tensioner is fitted.
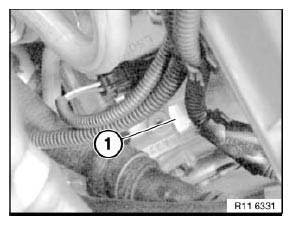
Fig. 196: Chain Tensioner
If the chain tensioner is reused, its oil chamber must be drained. Place chain tensioner on a level working surface and slowly compress.
Repeat procedure twice.
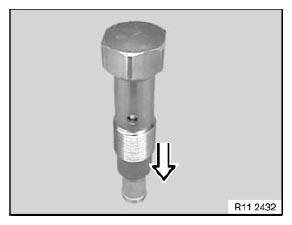
Fig. 197: Compressing Chain Tensioner On A Level Working Surface
Assemble engine.
READ NEXT:
 Adjusting Timing Of Camshaft(s) (N52K)
Special tools required:
00 9 120 TORQUE ANGLE MEASURING DIAL
00 9 250 TORSION ANGLE WRENCH WITH FLEXIBLE EXTENSION
11 0 300
11 4 280
11 4 281
11 4 282
11 4 283
11 4 290
11 9 340
Necessary p
Rocker Arm With Bearing Mount
REMOVING AND INSTALLING/REPLACING ALL CAM FOLLOWERS (N52K)
Special tools required:
11 4 480
Necessary preliminary tasks:
Remove cylinder head cover
Remove intermediate lever
Remove exhaust cams
Valves With Springs
REMOVING AND INSTALLING/REPLACING ALL VALVES (N52K)
Special tools required:
11 4 480
Necessary preliminary tasks:
Remove cylinder head
Remove intermediate lever
Remove eccentric shaft
Remove i
SEE MORE:
Connecting Rod With Bearing
REPLACING ALL CONNECTING ROD BEARING SHELLS (N52K)
Special tools required:
00 2 590 PLASTIGAGE (5)
00 9 120 TORQUE ANGLE MEASURING DIAL
IMPORTANT: All crank pins are connected with the crankshaft.
Modified procedure: The colors of the connecting rod bearing shells are the
same at the top and bo
Replacing Rear Left Or Right Thrust Bearing For Spring Strut/Shock
Absorber
Necessary preliminary tasks:
Remove rear shock absorber.
Unscrew nut (1).
Remove joint disc (2), support bearing upper section (3) and support bearing
flange (4).
Installation:
Insert support bearing upper section (3) correctly in support bearing flange
(4).
Replace self-locking nut.
Tighten
