
BMW X5: Valves With Springs
REMOVING AND INSTALLING/REPLACING ALL VALVES (N52K)
Special tools required:
- 11 4 480
Necessary preliminary tasks:
- Remove cylinder head
- Remove intermediate lever
- Remove eccentric shaft
- Remove inlet camshaft
- Remove exhaust camshaft
- Remove cam followers
- Remove valve springs
- Remove valve stem seals
- Valve
- Valve stem seal with lower spring plate
- Valve spring
- Upper spring plate
- Valve tapers
If the valves are to be reused, they must be placed in neat order in special tool 11 4 480.

Fig. 209: Upper Spring Plate, Valve Tapers And Spring
Assemble engine.
Check function of DME; if necessary, readjust uniform mixture distribution.
REPLACING ALL VALVE STEM SEALS (N52K)
Special tools required:
- 11 1 480
- 11 6 380
Necessary preliminary tasks:
- Remove cylinder head
- Remove intermediate lever
- Remove eccentric shaft
- Remove inlet camshaft
- Remove exhaust camshaft
- Remove cam followers
Firmly press special tool 11 1 480 onto old valve stem seals.
Detach valve stem seal from valve stem by turning and simultaneously pulling special tool 11 1 480.
Installation:
Insert all valves.
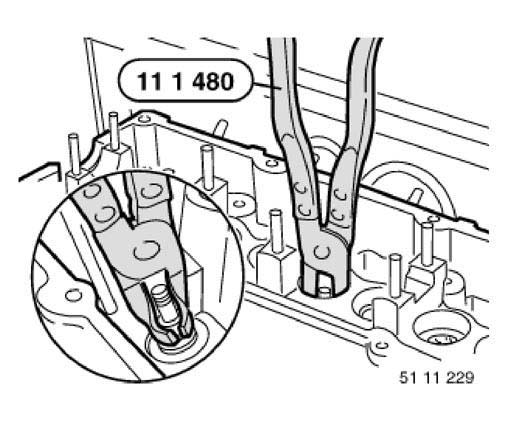
Fig. 210: Special Tool (11 1 480)
NOTE: For use on the N52K engine, special tool 11 6 380 must be remachined according to the picture with a 10 mm dia. drill bit to a depth of B = approx. 23 mm.
This modification has already been taken into account for reordering.
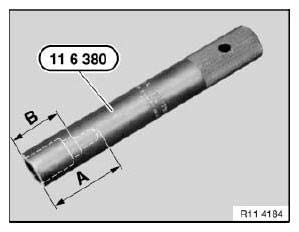
Fig. 211: Special Tool (11 6 380) With Dimensions
IMPORTANT: Different diameters at valve stem.
All valve stem seals are color-coded.
For 5 mm dia. valves, the valve stem seal is marked red or brown.
For 6 mm dia. valves, the valve stem seal is marked green or light green.
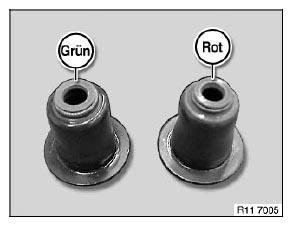
Fig. 212: Valve Stem Seals Color-Coded, Green(Grun), and Red(Rot)
Installation:
Fit the mounting sleeves (plastic sleeves) contained in the delivery specification on the valve stem end.
Lubricate mounting sleeve.
Press on valve stem seal by hand with special tool 11 6 380 as far as it will go.
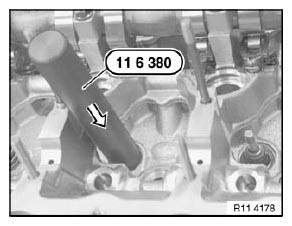
Fig. 213: Special Tool (11 6 380)
Assemble engine.
REPLACING ALL VALVE SPRINGS (N52K)
Special tools required:
- 11 0 346
- 11 4 480
- 11 9 000
- 11 9 017
Necessary preliminary tasks:
- Remove cylinder head
- Remove exhaust camshaft
- Remove intermediate lever
- Remove inlet camshaft
- Remove cam followers
Place cylinder head on special tool 11 9 000.
Press down inlet valves with special tool 11 9 017.
Press down exhaust valves with special tool 11 0 346.
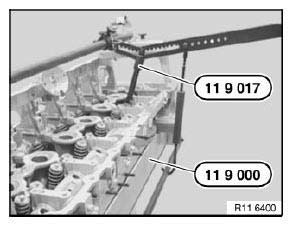
Fig. 214: Special Tool (11 9 017) And (11 9 000)
Remove valve cotters with a magnet.
Remove valve spring with spring plates.
If the individual components are to be reused, they must be placed in neat order in special tool 11 4 480.
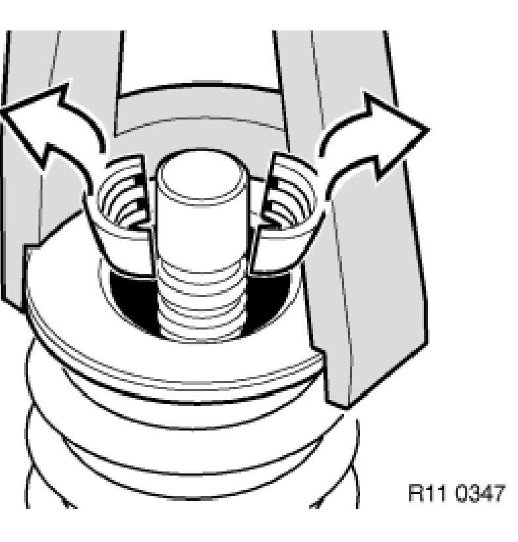
Fig. 215: Removing Valve Cotters With Magnet
IMPORTANT: Incorrect installation possible.
Incorrect installation will result in valve spring breakage.
Risk of mixing up the valve springs for the inlet and exhaust valves.
The valve spring is color-coded (1) at the lower end.
Install the valve spring so that the larger diameter points to the lower spring plate.
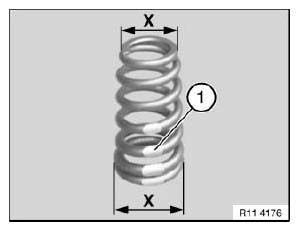
Fig. 216: Valve Spring Color-Coded
Arrangement:
- Valve
- Valve stem seal with lower spring plate
- Valve spring
- Upper spring plate
- Valve tapers
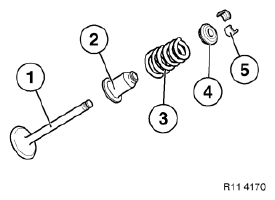
Fig. 217: Upper Spring Plate, Valve Tapers And Spring
Assemble engine.
Check function of DME; if necessary, readjust uniform mixture distribution.
READ NEXT:
 Removing And Installing/Replacing Eccentric Shaft (N52K)
Special tools required:
11 4 481
Necessary preliminary tasks:
Remove cylinder head cover
Remove intermediate lever
If necessary, move eccentric shaft (1) on twin surface to minimum lift (2).
F
Removing And Installing/Replacing Intermediate Levers (N52K)
Special tools required:
11 4 270
11 4 450
11 4 481
IMPORTANT: Aluminium screws/bolts must be replaced each time they
are released.
The end faces of aluminium screws/bolts are painted blue for t
SEE MORE:
Removing And Installing / Replacing Control Unit For Transfer Box (ATC
700)
IMPORTANT: Read and comply with notes on protection against
electrostatic damage (ESD
protection).
Replacement:
Before and after replacement, execute the "Repair" service function with
the BMW diagnosis system.
Necessary preliminary tasks:
Raise luggage compartment floor trim
Release screws
Refueling
Follow the following when
refueling
General information
Follow the fuel recommendation prior to refueling.
When refueling, insert the filler nozzle completely
into the filler pipe. Lifting up the filler nozzle during
refueling causes:
Premature switching off.
Reduced return of the fuel vapors.
