
BMW X5: Rocker Arm With Bearing Mount
REMOVING AND INSTALLING/REPLACING ALL CAM FOLLOWERS (N52K)
Special tools required:
- 11 4 480
Necessary preliminary tasks:
- Remove cylinder head cover
- Remove intermediate lever
- Remove exhaust camshaft
IMPORTANT: Rocker arms (1) are divided into bearing categories.
The tolerance classes are marked according to the picture in numbers from 1 to 5.
Already used rocker arms (1) may only be reused in the same position.
Detach cam followers (1) from HVCA element and remove.
Set down all cam followers (1) in neat order in special tool 11 4 480.
Installation:
Before installing exhaust camshaft or intermediate levers, make sure cam followers (1) are correctly seated.
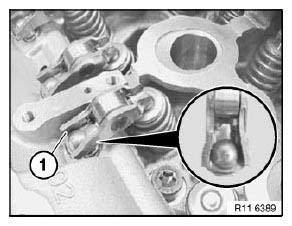
Fig. 207: Cam Follower Seat
Remove HVCA element (1) in direction of arrow.
Installation:
If the HVCA elements (1) are reused, they must be placed together with the cam followers in neat order in special tool 11 4 480.
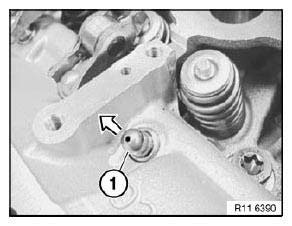
Fig. 208: Removing HVCA Element
Assemble engine.
Check function of DME; if necessary, readjust uniform mixture distribution.
READ NEXT:
 Valves With Springs
REMOVING AND INSTALLING/REPLACING ALL VALVES (N52K)
Special tools required:
11 4 480
Necessary preliminary tasks:
Remove cylinder head
Remove intermediate lever
Remove eccentric shaft
Remove i
Removing And Installing/Replacing Eccentric Shaft (N52K)
Special tools required:
11 4 481
Necessary preliminary tasks:
Remove cylinder head cover
Remove intermediate lever
If necessary, move eccentric shaft (1) on twin surface to minimum lift (2).
F
SEE MORE:
Removing And Installing/Replacing Both Front Brake Discs
Special tools required:
34 1 280.
Necessary preliminary tasks:
Remove front wheels.
Remove and clean brake pads.
After completing work, read and comply with notes on braking in new brake
discs / brake pads.
Check minimum brake disc thickness:
Position special tool 34 1 280 at three measu
Principle - BMW Intelligent Personal
Assistant
Principle
The BMW Intelligent Personal Assistant is a personal
assistant that enables natural voice operation
of various vehicle functions. The Personal
Assistant simplifies the operation of the vehicle
with the automation of processes and habits.
General information
BMW Intelligent Personal Assis
