
BMW X5: Throttle And Operation
BMW X5 (G05) 2019-2026 Service & Repair Manual / Engine / Fuel System (6-Cylinder) / Throttle And Operation
REMOVING AND INSTALLING/SEALING THROTTLE VALVE ASSEMBLY (N52 / N52K / N51 / N53)
Read and comply with notes on protection against electrostatic damage (ESD protection).
Necessary preliminary tasks:
- Switch off ignition
- Remove air intake hose.
Unlock plug (1) and remove.
Release screws.
Remove throttle assembly (2).
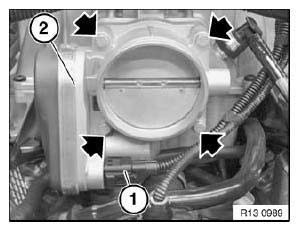
Fig. 3: Locating Screws And Throttle Assembly
Installation:
Replace sealing ring (1) of throttle assembly (2).
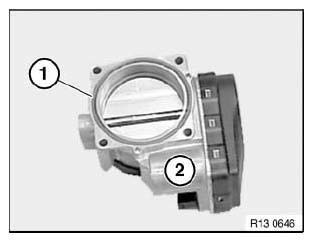
Fig. 4: Identifying Sealing Ring And Throttle Assembly
Installation:
Check stored fault messages.
Now clear the fault memory.
REPLACING INTAKE HOSE (N52K)
Necessary preliminary tasks:
- Switch off ignition
- Remove intake filter housing
Remove wiring harness (1) from holder and place to one side. Unfasten clip.
Tightening torque 13 71 1AZ.
Detach air-mass flow sensor (2) from throttle valve assembly.
READ NEXT:
 Sensor For Control Unit
REMOVING AND INSTALLING/REPLACING DIFFERENTIAL PRESSURE SENSOR
(N52 / N52K / N51)
Necessary preliminary tasks:
E90 / E91 / E92 / E93 / E87:
Remove lower section of microfilter housing.
E85 / E86 E
Intake Silencer
REMOVING AND INSTALLING/REPLACING INTAKE FILTER HOUSING (N52K)
Necessary preliminary tasks:
Switch off ignition
Lever out expansion rivets (1).
Press lock (2) and raise intake duct (3).
Detach int
Fuel System (N62TU)
Fuel Pump With Drive And Line
NOTES ON FUEL PRESSURE CHECK (REFERENCE PRESSURE: ENVIRONMENT)
Feature of this version with ambient pressure:
The connection for the vacuum hose of the fuel pressure regu
SEE MORE:
Replacing Rear Left Side Panel (Partial Replacement Before
Longitudinal Member Cover)
Read contents of Body, General.
Spot-weld bonding is used on this vehicle. Observe specific procedure.
Use only approved spot-welding apparatus for repairs!
Remove or cover those vehicle components in the repair area which are
susceptible to heat or dust.
Following new body parts are required:
Antilock Braking System
ABS
The Antilock Braking System (ABS) prevents
locking of the wheels during braking.
The vehicle maintains its steerability even during
emergency braking, which increases the active
driving safety.
ABS is operational every time you start the engine.
Brake assistant
The Brake Assistant effects maximum
© 2019-2026 Copyright www.bmwx5info.com
