
BMW X5: Replacing Level Switch For Dynamic Drive Fluid Reservoir
BMW X5 (G05) 2019-2026 Service & Repair Manual / Engine / General Electrical System / Switch / Replacing Level Switch For Dynamic Drive Fluid Reservoir
Unscrew nuts.
Remove shims.
Installation:
Replace self-locking nuts.
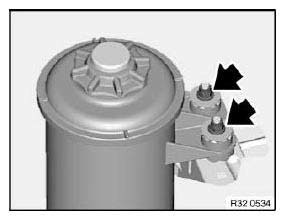
Fig. 162: Locating Nuts
NOTE: Raise and/or turn fluid reservoir in order to gain better access to plug connection.
Disconnect plug connection (1).
Turn level switch (2) through approx. 45º and remove towards bottom.
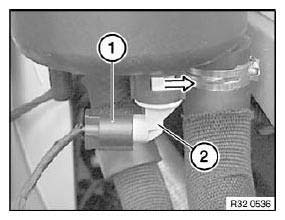
Fig. 163: Turning Level Switch
OVERVIEW OF SWITCHES
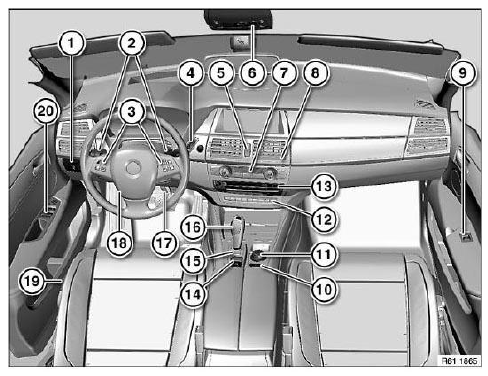
Fig. 164: Overview Of Switches
- Light operating unit
- Steering column switch cluster
- Multifunction steering wheel switch
- Start/Stop switch
- Switch for hazard warning system/central locking
- Roof switch centre
- Control panel for heater/air conditioner
- Switch for unlocking glovebox
- Power window switch
- Button unit
- Controller
- Centre console switch cluster
- Car Communication Computer
- Switch for electromechanical parking brake
- Switch for Electronic Damper Control
- Gear selector switch
- Brake-light switch
- Steering column adjustment switch
- Switch combination for seat adjustment
- Power window switch
READ NEXT:
 Removing And Installing Or Replacing Steering Column Switch Cluster
WARNING: Move wheels into straight-ahead position and do not alter this
position
during the repair work.
With steering wheel removed, do not under any circumstances turn/twist
fixture for steering c
Removing And Installing/Replacing Light Control Unit
Necessary preliminary tasks:
Remove left fresh-air grille.
Press out light control unit (1) from inside.
Fig. 175: Pressing Out Light Control Unit
Disconnect plug connection (1).
Remove light con
Removing And Installing/Replacing Aux Connection Socket
Special tools required:
00 9 323
Necessary preliminary tasks:
Open storage box
Unclip trim (1) with special tool 00 9 323 at retaining points (2).
Disconnect associated plug connections.
Fig.
SEE MORE:
Removing And Installing/Replacing Left Eccentric Shaft (N62
From 9/03 And N62TU)
(cylinder bank 5 to 8)
Necessary preliminary tasks:
Remove servomotor for left eccentric shaft.
Remove ignition coils on cylinder bank 5 to 8.
Remove spark plugs on cylinder bank 5 to 8.
Remove left cylinder head cover.
Remove left inlet and exhaust adjustment units.
Remove left inlet cams
Opening and closing
Buttons on the vehicle key
Unlocking
Locking
To open the tailgate
Panic mode, pathway lighting
Unlocking the vehicle
Press the button on the vehicle
key.
Depending on the settings, either only the driver's
door or all vehicle access points are unlocked.
If only the driver's door is unlocke
© 2019-2026 Copyright www.bmwx5info.com
