
BMW X5: Removing And Installing/Replacing Switch For Unlocking Glovebox
Necessary preliminary tasks:
- Remove decorative strip from middle fresh-air grille.
Unlock catches (1).
Press switch (2) out of decorative strip.
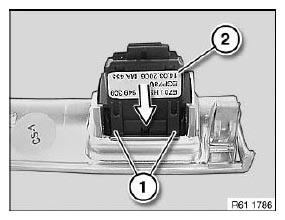
Fig. 212: Pressing Switch Out Of Decorative Strip
REMOVING AND INSTALLING OR REPLACING GRIP TRIM FOR GEAR SELECTOR SWITCH
Special tools required:
- 64 1 030
Turn end ring (1) in direction of ring and lower.
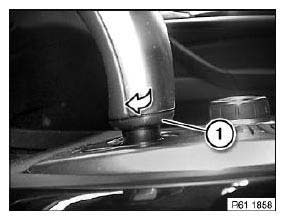
Fig. 213: Turning End Ring In Direction Of Ring
Insert special tool 64 1 030 from below into trim (1) and carefully pull off trim (1).
Remove symbol plate (2).
Installation:
To facilitate fitting, secure pushbutton (3) with adhesive tape on trim (1).
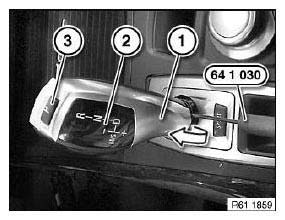
Fig. 214: Removing Trim
REMOVING AND INSTALLING/REPLACING TRIM FOR GEAR SELECTOR SWITCH
Necessary preliminary tasks:
- Remove center console trim.
Release screws (1).
Tightening torque.
Unclip parking brake with trim (2) towards top.
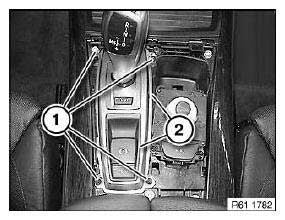
Fig. 215: Identifying Trim
Disconnect plug connection (1).
Replacement:
Release screws (2).
Remove parking brake button (3) from trim.
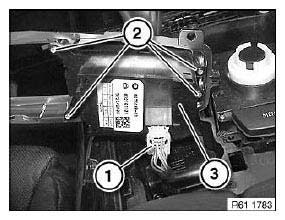
Fig. 216: Identifying Plug Connection And Parking Brake Button
REMOVING AND INSTALLING/REPLACING GEAR SELECTOR SWITCH
Necessary preliminary tasks:
- Remove center console trim.
Release screws (1).
Tightening torque.
Raise gear selector switch carrier (2) a little.
Disconnect associated plug connections.
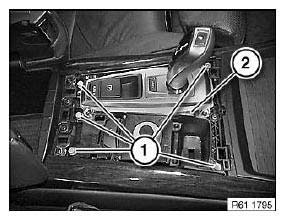
Fig. 217: Identifying Gear Selector Switch Carrier
Remove gear selector switch trim.
Release screws (1).
Tightening torque.
Feed gear selector switch (2) out of carrier.
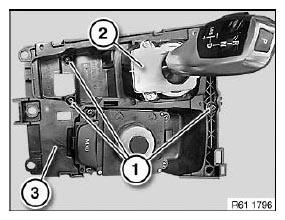
Fig. 218: Identifying Gear Selector Switch
Replacement:
Carry out programming/coding.
REPLACING COOLANT LEVEL SWITCH
Turn coolant level switch (1) and pull downwards out of coolant expansion tank (2).
Disconnect plug connection from coolant level switch.
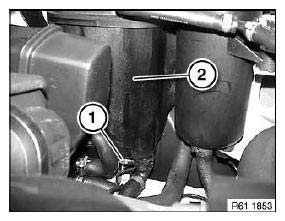
Fig. 219: Identifying Coolant Level Switch And Coolant Expansion Tank
NOTE: For purposes of clarity, illustration shows coolant expansion tank (2) removed.
Turn coolant level switch (1) in direction of arrow, pull out of expansion tank (2) and remove.
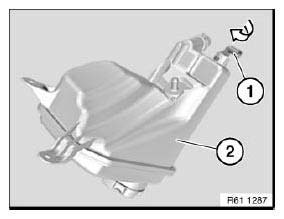
Fig. 220: Turning Coolant Level Switch
REPLACING LEVEL SWITCH FOR WINDSCREEN WASHER SYSTEM
Necessary preliminary tasks:
- Remove trim from wheel arch at front right.
- Partially detach rear section of wheel arch cover at front and pull forwards.
Disconnect plug connection (1).
Turn level switch for windscreen washer system (2) in direction of arrow and remove towards bottom from fluid reservoir for windscreen washer system (3).
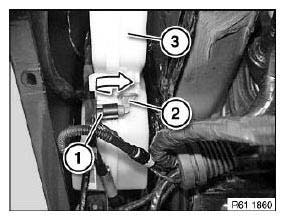
Fig. 221: Turning Level Switch For Windscreen Washer System
CARRY OUT STEERING ANGLE SENSOR ADJUSTMENT
IMPORTANT: In vehicles with active front steering, steering angle sensor adjustment is integrated in the service function "Initial operation/adjustment for active front steering " and must not be carried out separately!
NOTE: Steering angle sensor adjustment must be carried out:
- after adjustment work on the front axle/steering
- after all mechanical work on the steering system
- after replacement / coding / programming of the following
components:
- Fixture for switches of steering column / switch cluster / steering angle sensor
- Dynamic Stability Control (DSC) control unit
- Control unit active anti-roll stabilization (ARS)
Connect vehicle to BMW diagnosis system or Software Service Station.
Select and carry out steering angle sensor adjustment under Service functions.
REMOVING AND INSTALLING/REPLACING POWER SOCKET IN STORAGE COMPARTMENT
Necessary preliminary tasks:
- Remove rear center console trim.
Unlock plug connection (1) and remove.
Press switch trim (2) out of rear center console trim (3).
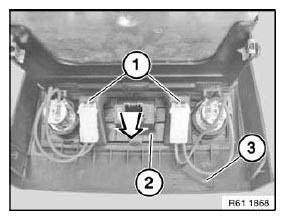
Fig. 222: Pressing Switch Trim Out Of Rear Centre Console Trim
Press power sockets (1) out of switch trim (2).
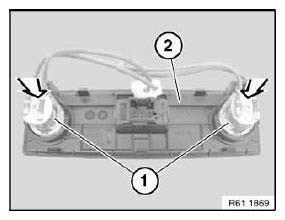
Fig. 223: Pressing Power Sockets Out Of Switch Trim
READ NEXT:
 Horn
Horn
REMOVING AND INSTALLING/REPLACING LEFT FANFARE HORN
Necessary preliminary tasks:
Remove front bumper trim.
Release nut (1) and feed out holder (2) with fanfare horn.
Tightening torque.
Disconnect
Insert Holder For CIGA
REMOVING AND INSTALLING/REPLACING POWER SOCKET IN STORAGE
COMPARTMENT
Necessary preliminary tasks:
Remove rear center console trim.
Unlock plug connection (1) and remove.
Press switch trim (2) out
SEE MORE:
Steering Assistant
Principle
The Steering Assistant helps keep the vehicle in
the lane. For this purpose, the system executes
supporting steering movements, for instance
when driving in a curve.
General information
Depending on the speed, the system orients itself
according to the lane markings or vehicles in
front.
Checking Front And Rear Wheel For Face And Radial Runout
Special tools required:
36 1 030
Necessary preliminary tasks:
Check wheel bearings
Lift vehicle.
Check wheel with special tool 36 1 030 (measuring fixture) for lateral runout.
If applicable, remove balance weights.
Check lateral runout of rim with special tool 36 1 030 (measuring fixture).
