
BMW X5: Horn
REMOVING AND INSTALLING/REPLACING LEFT FANFARE HORN
Necessary preliminary tasks:
- Remove front bumper trim.
Release nut (1) and feed out holder (2) with fanfare horn.
Tightening torque.
Disconnect associated plug connection.
Remove fanfare horn (2).
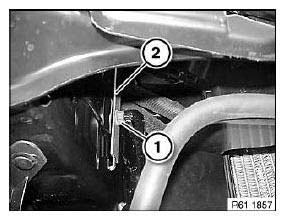
Fig. 224: Identifying Fanfare Horn And Holder
REMOVING AND INSTALLING/REPLACING RIGHT FANFARE HORN
Necessary preliminary tasks:
- Remove grille in bumper trim on right.
WARNING: Risk of injury
Tape off edges (1) of bumper trim.
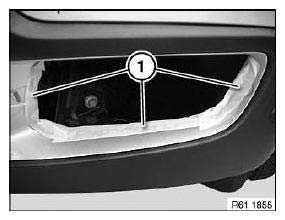
Fig. 225: Identifying Edges Of Bumper Trim
Release nut (1) and feed out holder (2) with fanfare horn.
Tightening torque.
Disconnect associated plug connection.
Remove fanfare horn (2).
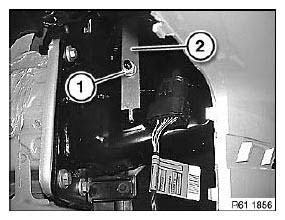
Fig. 226: Identifying Fanfare Horn And Holder
READ NEXT:
 Insert Holder For CIGA
REMOVING AND INSTALLING/REPLACING POWER SOCKET IN STORAGE
COMPARTMENT
Necessary preliminary tasks:
Remove rear center console trim.
Unlock plug connection (1) and remove.
Press switch trim (2) out
Removing And Installing/Replacing Control Unit For Active Front Steering
IMPORTANT: Read and comply with notes on protection against
electrostatic damage (ESD
protection)
Necessary preliminary tasks:
Disconnect battery negative lead.
Remove front left wheel arch cover
SEE MORE:
Shift lights
Principle
The Shift lights in the instrument cluster indicate
the maximum shift point at which the best possible
acceleration can be achieved.
General information
Depending on the equipment and national-market
version, the Shift lights are active in the M
manual mode of the Steptronic Sport transmis
Ignition Wires, Spark
REPLACING ALL SPARK PLUGS (N42, N40, N46, N45, N52, N52K, N51)
Special tools required:
12 1 171
12 1 200
Necessary preliminary tasks:
Switch off ignition
Remove ignition coils.
Unscrew spark plugs with special tool 12 1 171.
Installation:
Tighten down spark plugs with special tool 12 1 171an
© 2019-2026 Copyright www.bmwx5info.com
