
BMW X5: Rear Window Wiper
OVERVIEW OF WINDSCREEN WIPER, WINDSCREEN WASHER AND HEADLIGHT WASHER SYSTEMS
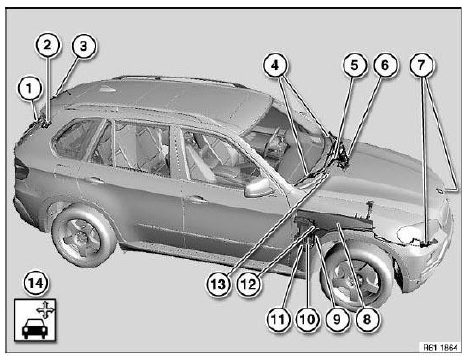
Fig. 273: Overview Of Windscreen Wiper, Windscreen Washer And Headlight
Washer Systems
- Rear window wiper blade
Wiper arm rear window wiper - Rear window wiper motor
- Spray nozzle for rear window washer system
- Wiper blades
- Windscreen wiper arms
- Mounting bracket for windscreen washer system
- High-pressure nozzles for headlight washer system
- Fluid reservoir for windscreen washer system
- Level switch for windscreen washer system
- Windscreen washer pump
- Windscreen washer pump for rear window wiper
- Washer pump for headlight washer system
- Spray nozzle for windscreen washer system
- Checking and adjustment work
REMOVING AND INSTALLING/REPLACING REAR WINDOW WIPER BLADE
Fold wiper arm (1) away from rear window.
Pull off window wiper blade (2) in direction of arrow.
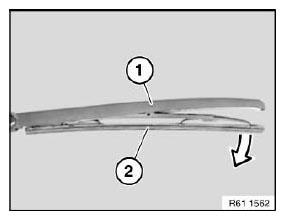
Fig. 274: Pulling Off Window Wiper Blade
Installation:
Make sure guide (1) is correctly seated in wiper blade (2).
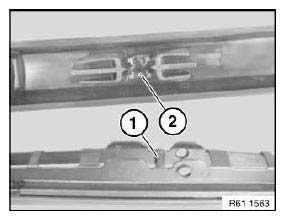
Fig. 275: Identifying Guide And Wiper Blade
REMOVING AND INSTALLING/REPLACING WIPER ARM ON REAR WINDOW
Special tools required:
- 61 6 060
Fold up cover cap (1) in direction of arrow.
Release nut underneath.
Tightening torque.
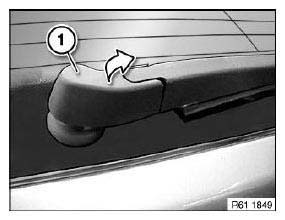
Fig. 276: Folding Up Cover Cap
Press off wiper arm (1) with special tool 61 6 060 and remove.

Fig. 277: Identifying Wiper Arm And Special Tool 61 6 060
Installation:
Before fitting wiper arm, allow wiping system to run two wipe cycles into park position.
Adjust measurement (A) between wiper arm and rear window edge.
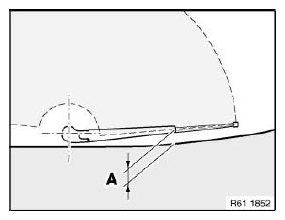
Fig. 278: Identifying Measurement Between Wiper Arm And Rear Window Edge
REMOVING AND INSTALLING/REPLACING REAR WINDOW WIPER MOTOR
Necessary preliminary tasks:
- Remove wiper arm for rear window wiper.
- Remove trim for rear lid at bottom.
Disconnect plug connector (1).
Release bolts (2).
Tightening torque.
Pull rear window wiper motor out of rear window grommet.
Installation:
Check wiper shaft grommet for signs of damage.
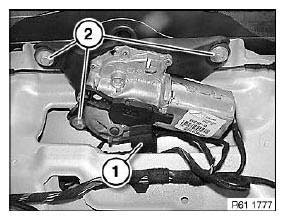
Fig. 279: Identifying Plug Connector
REPLACING SPRAY NOZZLE FOR REAR WINDOW WASHER UNIT
Necessary preliminary tasks:
- Remove auxiliary brake light
Disconnect hose connection (1).
Expand catch (2) and pull spray nozzle (3) out of auxiliary brake light.
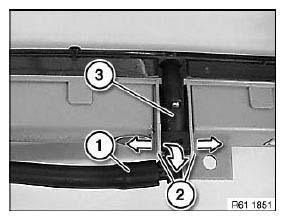
Fig. 280: Pulling Spray Nozzle Out Of Auxiliary Brake Light
REMOVING AND INSTALLING/REPLACING WINDOW WASHER PUMP FOR REAR WINDOW WASHER SYSTEM
Necessary preliminary tasks:
- Remove trim panel for cover on frame side member on right.
- Remove wheel arch trim at front right.
- Drain fluid reservoir for windscreen washer system.
Release screws.
Press off side panel slightly.
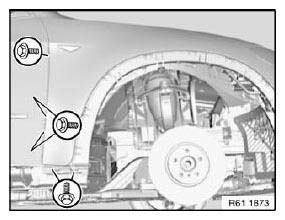
Fig. 281: Identifying Screws
NOTE: Side panel shown removed for purposes of clarity.
Disconnect plug connection (1).
Pull windscreen washer pump (2) in direction of arrow out of fluid reservoir for windscreen washer system.
Disconnect hose plug connection (3) from windscreen washer pump (2).
Installation:
Coat sealing ring (4) of windscreen washer pump (2) with antiseize agent.
Ensure hose is laid without kinks.
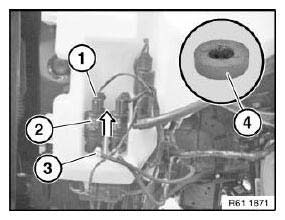
Fig. 282: Pulling Windscreen Washer Pump Out Of Windscreen Washer System
Fluid Reservoir
READ NEXT:
 Headlight Washer System
OVERVIEW OF WINDSCREEN WIPER, WINDSCREEN WASHER AND HEADLIGHT
WASHER SYSTEMS
Fig. 283: Overview Of Windscreen Wiper, Windscreen Washer And Headlight
Washer Systems
Rear window wiper blade
Wiper a
Window Washer System
OVERVIEW OF WINDSCREEN WIPER, WINDSCREEN WASHER AND HEADLIGHT
WASHER SYSTEMS
Fig. 289: Overview Of Windscreen Wiper, Windscreen Washer And Headlight
Washer Systems
Rear window wiper blade
Wiper a
SEE MORE:
Vacuum Supply All Models
Fig. 2: Identifying Air Brakes Vacuum Supply Models
INTRODUCTION
Vacuum is principally used for the brake booster.
The vacuum in the inlet pipe depends on the varying engine load.
Diesel engines do not normally have any vacuum in the inlet pipe. Vacuum on
diesel engines is provided by a
pump tha
Air quality, Automatic climate control
Air quality
General information
The air quality in the interior is improved by the
following components:
Emission tested passenger compartment.
Interior filter.
Air conditioning system to control the temperature,
air flow and recirculated-air mode.
Pre-ventilation.
Ionizer.
Fragrancing.
Aut
