
BMW X5: Headlight Washer System
OVERVIEW OF WINDSCREEN WIPER, WINDSCREEN WASHER AND HEADLIGHT WASHER SYSTEMS
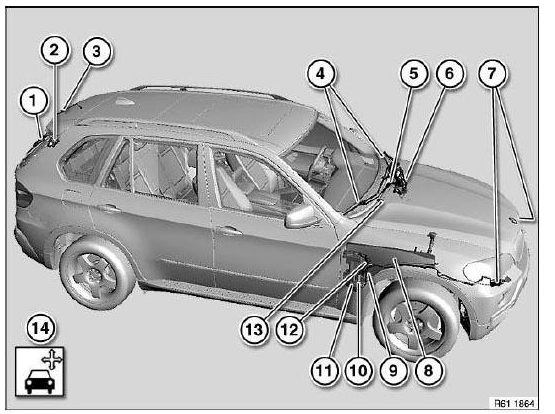
Fig. 283: Overview Of Windscreen Wiper, Windscreen Washer And Headlight
Washer Systems
- Rear window wiper blade
Wiper arm for rear window wiper - Rear window wiper motor
- Spray nozzle for rear window washer system
- Wiper blades
- Windscreen wiper arms
- Mounting bracket for windscreen washer system complete
- High-pressure nozzles for headlight washer system
- Fluid reservoir for windscreen washer system
- Level switch for windscreen washer system
- Windscreen washer pump
- Windscreen washer pump for rear window wiper
- Washer pump for headlight washer system
- Spray nozzle for windscreen washer system
- Checking and adjustment work
REMOVING AND INSTALLING/REPLACING WASHER PUMP OF HEADLIGHT WASHER SYSTEM
Necessary preliminary tasks:
- Remove trim panel for cover on frame side member on right.
- Remove wheel arch trim at front right.
- Drain fluid reservoir for windscreen washer system.
Release bolts.
Press off side panel slightly.
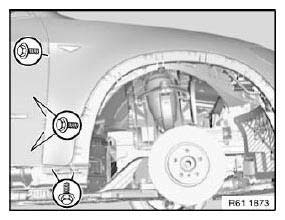
Fig. 284: Identifying Screws
NOTE: Side panel shown removed for purposes of clarity.
Disconnect plug connection (1).
Pull washer pump (2) in direction of arrow out of fluid reservoir for windscreen washer system.
Disconnect hose plug connection (3) from washer pump (2).
Installation:
Coat sealing ring (4) of washer pump (2) with antiseize agent.
Ensure hose is laid without kinks.
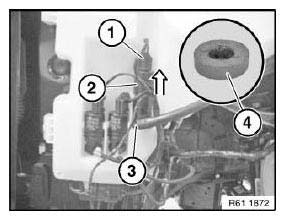
Fig. 285: Pulling Washer Pump Out Of Windscreen Washer System Fluid Reservoir
REMOVING AND INSTALLING/REPLACING HIGH - PRESSURE NOZZLE OF HEADLIGHT WASHER SYSTEM ON LEFT (OR RIGHT)
Special tools required:
- 00 9 340
Necessary preliminary tasks:
- Remove front bumper trim.
Lever out cover (1) with special tool 00 9 340.
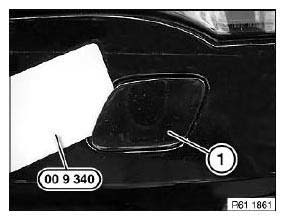
Fig. 286: Identifying Cover And Special Tool 00 9 340
Slowly pull out spray nozzle (1) by cover (2).
Unclip cover (2) and remove.
Allow nozzle (1) to slide back slowly.
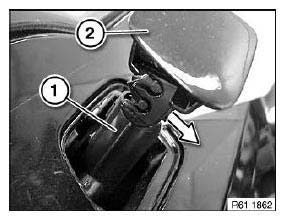
Fig. 287: Pulling Out Spray Nozzle
Pull back clasp (1) and disconnect plug connection (2).
Unlock catch (3) in direction of arrow.
Pull out high-pressure nozzle (4) towards rear.
Installation:
Make sure retaining lugs (3) engage correctly.
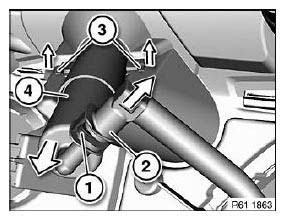
Fig. 288: Unlocking Catch
READ NEXT:
 Window Washer System
OVERVIEW OF WINDSCREEN WIPER, WINDSCREEN WASHER AND HEADLIGHT
WASHER SYSTEMS
Fig. 289: Overview Of Windscreen Wiper, Windscreen Washer And Headlight
Washer Systems
Rear window wiper blade
Wiper a
Air Conditioner Refrigerant
FREON
The refrigerant Freon R12 is used in most BMW automobiles with an air
conditioner up through the 1992
model year. It has a boiling point of - 29.8ºC (sea level), at which the
refrigerant is t
SEE MORE:
Electrical Components
REPLACING A BRAKE PAD SENSOR (FRONT)
IMPORTANT: The brake pad wear sensor must be replaced once it has been
removed (brake pad wear sensor loses its retention capability in the brake pad).
If a brake lining sensor that has already been ground has to be replaced even
though the minimum brake lining
Procedure After Airbag Triggering As Result Of An Accident
Check and/or replace following components after airbag triggering:
Satellites (control unit + sensor)
Components
Satellite, A-/B-pillar, left/right
Satellite, front door
Satellite, rear seat
Satellite, driver's/front passenger seat
Satellite, vehicle center
Procedure
Read out faul
