
BMW X5: Initializing Telestart Hand Transmitter
BMW X5 (G05) 2019-2026 Service & Repair Manual / Heating And Air Conditioning / Auxiliary Heater / Initializing Telestart Hand Transmitter
NOTE: The Telestart hand transmitter must be initialized when:
- Hand transmitter is replaced
- Car Access System control unit is replaced
The independent heating is switched on under an outside temperature of approx. 15 ºC with the hand transmitter and at a preselected switch-on time.
Direct activation is possible at any outside temperature via the "Climate" menu item in the i-Drive, but not in driving mode.
To initialize a new hand transmitter, perform the following operations from inside the vehicle:
- Close all vehicle doors
- Within 5 seconds: Switch ignition lock from terminal "0" to terminal "R" and then back to terminal "0"
- Within 5 seconds: Press OFF button (1) on hand transmitter and with OFF button (1) held down press ON button (2) three times quickly
- Release both buttons. LED (3) on hand transmitter flashes
NOTE: The vehicle's central locking closes and opens automatically on successful initialization.
The initialization process must be repeated if there is no check back signal from the central locking system.
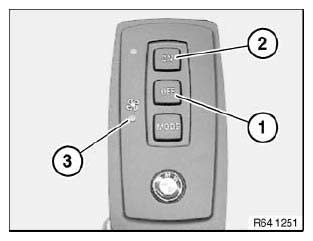
Fig. 44: Identifying Telestart Hand Transmitter
READ NEXT:
 Removing And Installing Or Replacing Muffler/Silencer
WARNING: Scalding hazard!
Work on independent heating may only be carried out when it has cooled
down.
Necessary preliminary tasks:
Remove left underbody panelling.
Slacken clamp (1).
Release scre
Removing And Installing Or Replacing Fuel Pump
Special tools required:
13 3 010
Necessary preliminary tasks:
Remove left underbody panelling.
Seal off water hoses at fuel pump with special tool 13 3 010
Fig. 54: Identifying Special Tool (1
Nozzles And Outlets
REMOVING AND INSTALLING/REPLACING LEFT OR RIGHT B-PILLAR AIR VENT
Necessary preliminary tasks:
Remove B-pillar trim.
Unclip retaining clip (1) and feed out air vent (2) in upward direction.
Instal
SEE MORE:
Replacing Front Left Wheel Arch
Read contents of Body, General.
The steel-aluminum mixed construction is used on the vehicle.
Observe specific procedure.
Remove or cover those vehicle components in the repair area which are
susceptible to heat or dust.
Use only approved spot-welding apparatus for repairs.
Place vehicle on st
Crankshaft With Bearings
REPLACING CRANKSHAFT (N62/N62TU)
REFERENCE CHART
Operation
Remove engine.
Remove cylinder head (cylinder bank 1 to 4).
Remove cylinder head (cylinder bank 5 to 8).
Remove hub for vibration damper.
Removing lower timing case cover.
Removing oil pan.
Remove oil pump.
Removing piston.
Remove
© 2019-2026 Copyright www.bmwx5info.com
