
BMW X5: Nozzles And Outlets
REMOVING AND INSTALLING/REPLACING LEFT OR RIGHT B-PILLAR AIR VENT
Necessary preliminary tasks:
- Remove B-pillar trim.
Unclip retaining clip (1) and feed out air vent (2) in upward direction.
Installation:
Replace damaged retaining clips (1).
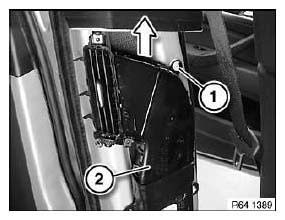
Fig. 61: Identifying Air Vent Upward Positions
REMOVING AND INSTALLING/REPLACING LEFT/RIGHT FRESH-AIR GRILLE
Special tools required:
64 1 030
Necessary preliminary tasks:
- Remove decorative strip from fresh-air grille.
Release screw (1).

Fig. 62: Identifying Air Grille Screw
Insert special tool 64 1 030 on both sides into guide holes (1).
Pull out fresh-air grille (2) with special tool 64 1 030.
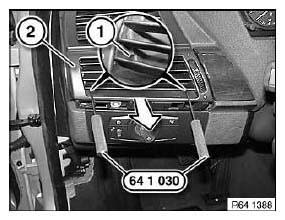
Fig. 63: Pulling Out Fresh-Air Grille With Special Tool (64 1 030)
REMOVING AND INSTALLING/REPLACING MIDDLE FRESH-AIR GRILLE
Special tools required:
- 64 1 030
Lever out fresh-air grille (1) with special tool 64 1 030 towards top and feed out.
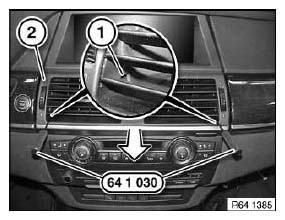
Fig. 64: Pulling Out Fresh-Air Grille With Special Tool (64 1 030)
Disconnect plug connections (1) and remove fresh-air grille (2).

Fig. 65: Identifying Plug Connections And Fresh-Air Grille
Replacement:
- Modify decorative trim on middle fresh-air grille.
REMOVING AND INSTALLING/REPLACING REAR CABIN FRESH-AIR GRILLE
Necessary preliminary tasks:
- Remove rear center console trim.
- If necessary, remove trim for rear cabin monitor at rear.
Unclip catches (1) on both sides.
Carefully lift out fresh-air grille (2).
NOTE: Trim grille must not be detached from air duct!
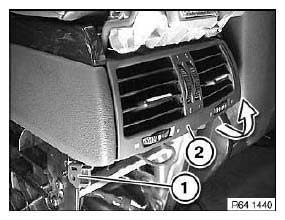
Fig. 66: Lifting Out Fresh-Air Grille
REMOVING AND INSTALLING/REPLACING A/C SYSTEM COMPRESSOR (N62TU)
WARNING: Avoid contact with refrigerant and refrigerant oil.
Follow safety instructions for handling refrigerant R 134a.
Follow safety instructions for handling refrigerant oil.
IMPORTANT: Risk of damage Restart engine only when A/C system has been correctly filled.
Read and comply with notes on replacing compressor.
Follow instructions for opening and replacing parts in refrigerant circuit!
If A/C system is opened for more than 24 hours: Replacing drier insert for A/C system.
Necessary preliminary tasks:
- Drawing off, evacuating and filling the A/C system are not included in the time value given for this work operation.
- Remove A/C compressor drive belt.
- Remove front underbody protection.
- Remove steering gear cover at top right.
Release screws (1) and remove both refrigerant lines.
Tightening torque.
Replace sealing rings and moisten with refrigerant oil.
Disconnect plug connection (2).
Release screws (3).
Tightening torque.
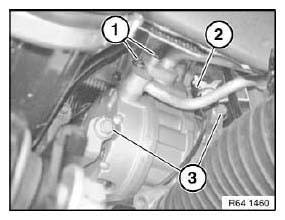
Fig. 67: Identifying Plug Connection With Screws
Release screw (1).
Tightening torque.
Lower vehicle.
NOTE: Secure compressor (2) against falling out.
Release screw (1) from above and feed out compressor (2) in upward direction.
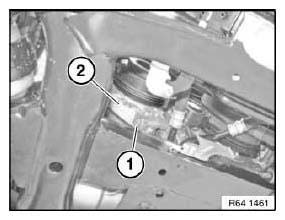
Fig. 68: Identifying Compressor
After installation:
- Evacuate and fill A/C system.
READ NEXT:
 Microfilter
REPLACING MICROFILTER FOR INTERIOR VENTILATION
Necessary preliminary tasks:
Remove microfilter housing.
Unclip catches (1) and remove microfilter (2).
Installation:
Reset Condition Based Service d
Air Conditioner Test (R 134A)
Before A/C efficiency test, satisfy following conditions:
1. Provide a MoDiC or DIS. Safeguard electrical system integrity by checking
the fault memory (no faults
in the fault memory).
2. Provide a t
SEE MORE:
Turbocharger Diagnosis
There are three "Golden Rules" to adhere to when diagnosing concerns on the
N54 engine:
1. When diagnosing cases of smoke from the exhaust, it is important to avoid
unnecessary replacement of
the turbochargers. Smoke can be caused by oil consumption such as the crankcase
ventilation system.
Alwa
In the vicinity of the steering wheel
Window safety
switch
Power windows
Exterior mirror adjustment button
Central locking system
Unlocking
Locking
Seating comfort features
Front passenger seat
functionality
Memory function
Massage function
Opening and closing the
tailgate
Steering column stalk, left
Turn
