
BMW X5: Removing And Installing Or Replacing Fuel Pump
Special tools required:
- 13 3 010
Necessary preliminary tasks:
- Remove left underbody panelling.
Seal off water hoses at fuel pump with special tool 13 3 010

Fig. 54: Identifying Special Tool (13 3 010) On Water Hoses
Recycling
Fuel escapes when fuel lines are detached. Have a suitable collecting container ready.
Catch and dispose of escaping fuel.
Observe country-specific waste-disposal regulations.
Disconnect plug connection (1).
Release hose clamps (2) and detach fuel hoses.
NOTE: Secure fuel pump (4) against falling out.
Disengage rubber retainers (3).
Installation:
Observe direction of flow of fuel pump (4).
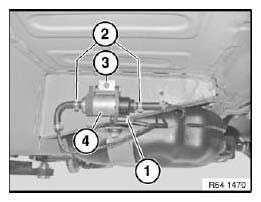
Fig. 55: Identifying Plug Connection And Hose Clamps With Rubber Retainers
REPLACING FRONT ELECTRIC AUXILIARY HEATER
Necessary preliminary tasks:
- Remove carrier for instrument panel.
NOTE: For purposes of clarity, the following graphics show the heater/air conditioner removed.
Disconnect plug connection (1).
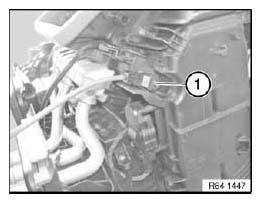
Fig. 56: Identifying Plug Connection
Release screws (1).
Lay servomotor (2) to one side.
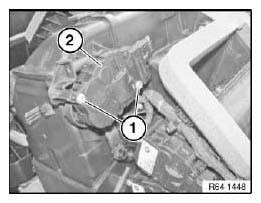
Fig. 57: Identifying Servomotor With Screws
Release screws (1).
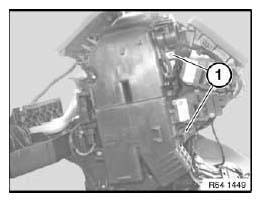
Fig. 58: Identifying Screws
Release screws (2) and remove housing side section (2).
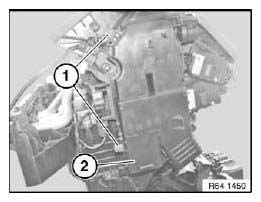
Fig. 59: Identifying Auxiliary Heater Housing
Disconnect plug connection (1).
Release screw (2).
Pull out electric auxiliary heater (3) and detach associated ground cable (4).
Installation:
Make sure ground cable (4) is securely seated.
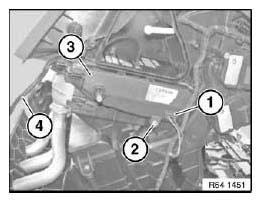
Fig. 60: Identifying Plug Connection And Electric Auxiliary Heater
READ NEXT:
 Nozzles And Outlets
REMOVING AND INSTALLING/REPLACING LEFT OR RIGHT B-PILLAR AIR VENT
Necessary preliminary tasks:
Remove B-pillar trim.
Unclip retaining clip (1) and feed out air vent (2) in upward direction.
Instal
Microfilter
REPLACING MICROFILTER FOR INTERIOR VENTILATION
Necessary preliminary tasks:
Remove microfilter housing.
Unclip catches (1) and remove microfilter (2).
Installation:
Reset Condition Based Service d
SEE MORE:
Loading
Safety information
Warning
High gross weight can overheat the tires, damage
them internally and cause a sudden tire
pressure loss. Driving characteristics may be
negatively impacted, reducing lane stability,
lengthening the braking distances and changing
the steering response. There is a risk of acc
Mounting Engine On Assembly Stand (N52K)
Special tools required:
00 1 450 ASSEMBLY STAND
11 3 370
11 4 440
11 9 261
11 9 265
IMPORTANT: Aluminium screws/bolts must be replaced each time they are
released.
The end faces of aluminium screws/bolts are painted blue for the purposes of
reliable identification.
Jointing torque and angl
