
BMW X5: Windscreen Wipers
OVERVIEW OF WINDSCREEN WIPER, WINDSCREEN WASHER AND HEADLIGHT WASHER SYSTEMS
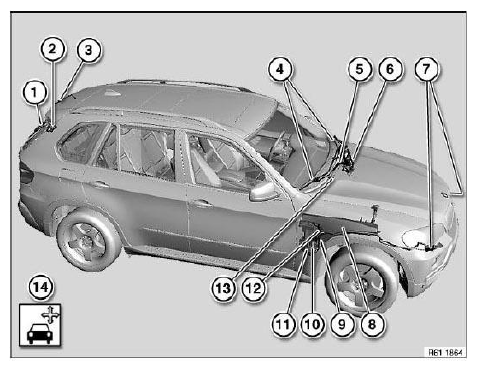
Fig. 262: Overview Of Windscreen Wiper, Windscreen Washer And Headlight
Washer Systems
- Rear window wiper blade
Wiper arm for rear window wiper - Rear window wiper motor
- Spray nozzle for rear window washer system
- Wiper blades
- Windscreen wiper arms
- Mounting bracket for windscreen wiper system
- High-pressure nozzles for headlight washer system
- Fluid reservoir for windscreen washer system
- Level switch for windscreen washer system
- Windscreen washer pump
- Windscreen washer pump for rear window wiper
- Washer pump for headlight washer system
- Spray nozzle for windscreen washer system
- Checking and adjustment work
ADJUSTING LEFT OR RIGHT WINDSCREEN WIPER
Special tools required:
- 61 6 100
Correctly adjusting the contact angle of the wiper arms on the windscreen increases wiping quality. For adjustment, refer to the vehicle-specific repair instruction.
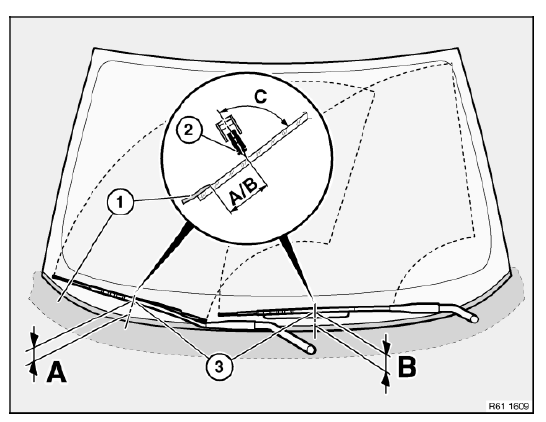
Fig. 263: Identifying Distance Between Windscreen Wiper Blade And Trim Panel
On Cowl Panel
A/B = Distance between windscreen wiper blade (2) and trim panel on cowl panel (1)
NOTE: Measurement is taken at the height of the locators (3) for the windscreen wiper arms
C= Contact angle between wiper blade center plane and windscreen
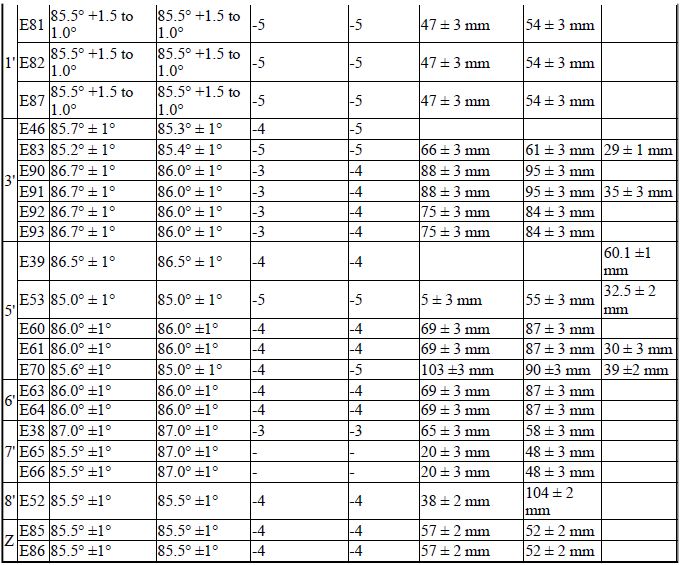
When adjusting with special tool 61 6 100, set the scale value in accordance with the following table.
For RHD cars, change the preceding sign of the scale values.
- LHD cars, scale range 0 to-10
- RHD cars, scale range 0 to +10
WINDSCREEN WIPER ADJUSTING VALUE

CHECKING/ADJUSTING CONTACT ANGLE OF WINDSCREEN WIPER ARMS ON WINDSCREEN
Special tools required:
- 00 9 220
- 61 6 100
NOTE: Wiping quality is increased if the approach angle of the windscreen wiper arms is precisely adjusted.
Adjusting dimensions of wiper arms.
Reference points (A, B) are the mountings of the wiper blades on the wiper arms to the sealing lip (1) of the cowl panel.
Contact angle (C) is the angle between wiper blade center plane (2) and windscreen.

Fig. 264: Identifying Angle Between Wiper Blade Centre Plane And Windscreen
Remove wiper blade (1) from wiper arm (2).
Pin (3) is locator for special tool 61 6 100.
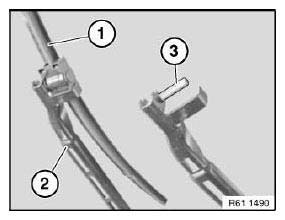
Fig. 265: Identifying Wiper Blade, Wiper Arm And Pin
Slide special tool 61 6 100 onto pin (1).
Place special tool 61 6 100 on windscreen (2) and read off value in degrees on scale.
NOTE: LHD vehicles are covered by the scale range of 0 to-10 and RHD vehicles by the scale range of 0 to +10.

Fig. 266: Identifying Special Tool 61 6 100 On Windscreen
If the specified number in degrees is not correct, the wiper arm (1) must be bent with special tool 00 9 220 at the point shown.
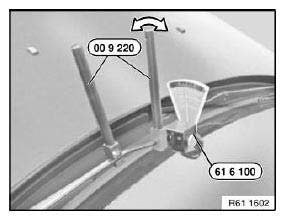
Fig. 267: Identifying Special Tool 00 9 220
REPLACING BOTH WINDSCREEN WIPER BLADES
IMPORTANT: Make sure the wiper arm does not contact the windscreen without its wiper blade.
Fold wiper arm (1) away from windscreen.
Turn windscreen wiper blade (2) at an angle of 90º and remove from windscreen wiper arm (1).

Fig. 268: Removing Windscreen Wiper Blade From Windscreen Wiper Arm
REMOVING AND INSTALLING/REPLACING LEFT OR RIGHT WINDSCREEN WIPER ARM
Special tools required:
- 61 6 060
IMPORTANT: Do not damage wiper arms when removing (risk of breakage).
Remove wiper arm cover caps (1) towards top.
Release nut underneath.
Tightening torque.
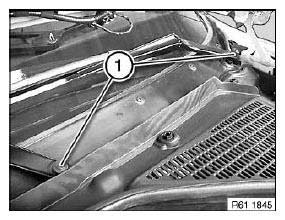
Fig. 269: Identifying Wiper Arm Cover Caps
Detach wiper arm (1) with special tool 61 6 060.
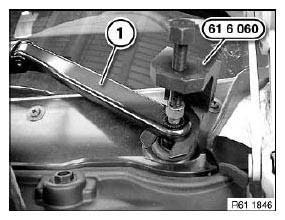
Fig. 270: Identifying Wiper Arm And Special Tool 61 6 060
Installation:
Adjust position of wiper arm in question in rest position (measured between wiper lip and top edge of cowl panel cover).
Then tighten down wiper arm and check adjustment dimensions of relevant wiper arm again.
Reference points (A, B) are the mountings of the wiper blades on the wiper arms to the sealing lip (1) of the cowl panel.
Contact angle (C) is the angle between wiper blade center plane (2) and windscreen.
Tightening torque.
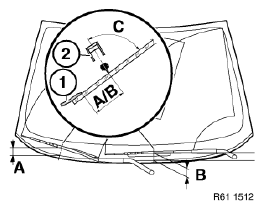
Fig. 271: Identifying Angle Between Wiper Blade Centre Plane And Windscreen
REMOVING AND INSTALLING BRACKET FOR WINDSCREEN WIPER SYSTEM COMPLETELY WITH MOTOR
Necessary preliminary tasks:
- Remove cover for cowl panel.
Release screws (1).
Tightening torque.
Disconnect plug connection (2).
Feed out bracket for windscreen wiper system (3) in upward direction.
Installation:
Rubber guide (4) must be correctly seated in guide (5).
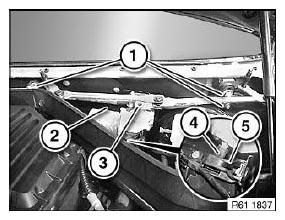
Fig. 272: Identifying Plug Connection, Windscreen Wiper System And Guides
Installation:
Before installing wiper arms, allow wiper motor to return to its rest position.
To ensure the wiper system works properly, check and correct the contact angle of the wiper arms.
READ NEXT:
 Rear Window Wiper
OVERVIEW OF WINDSCREEN WIPER, WINDSCREEN WASHER AND HEADLIGHT
WASHER SYSTEMS
Fig. 273: Overview Of Windscreen Wiper, Windscreen Washer And Headlight
Washer Systems
Rear window wiper blade
Wiper a
Headlight Washer System
OVERVIEW OF WINDSCREEN WIPER, WINDSCREEN WASHER AND HEADLIGHT
WASHER SYSTEMS
Fig. 283: Overview Of Windscreen Wiper, Windscreen Washer And Headlight
Washer Systems
Rear window wiper blade
Wiper a
Window Washer System
OVERVIEW OF WINDSCREEN WIPER, WINDSCREEN WASHER AND HEADLIGHT
WASHER SYSTEMS
Fig. 289: Overview Of Windscreen Wiper, Windscreen Washer And Headlight
Washer Systems
Rear window wiper blade
Wiper a
SEE MORE:
Replacing Complete Rear Left Wheel Arch (Rear Left Side Panel
Removed)
Read contents of Body, General.
Spot-weld bonding is used on this vehicle. Observe specific procedure.
Remove or cover those vehicle components in the repair area which are
susceptible to heat or dust.
Use only approved spot-welding apparatus for repairs!
Place vehicle on straightening bench.
F
Pressing Output Shaft Out Of Drive Flange (Wheel Hub) And Drawing In
Special tools required:
33 2 111
33 2 115
33 2 116
33 2 117
33 2 118
33 2 160
33 2 201
33 2 202
33 2 203
33 2 205
33 2 207
33 2 208
33 5 070
WARNING: Risk of injury!
It is not permitted to use the impact screwdriver to press out and draw in
the output shaft.
IMPORTANT: Risk of damage!
