
BMW X5: Battery Vapor Separator
REPLACING BATTERY NEGATIVE LEAD
WARNING: Observe safety instructions for handling vehicle battery.
Follow instructions for disconnecting and connecting battery.
IMPORTANT: Do not under any circumstances use force to pull/lever off Intelligent Battery Sensor (IBS).
Necessary preliminary tasks:
- Raise luggage compartment floor trim
Release screws (1).
Remove battery cover (2) upwards.

Fig. 157: Identifying Battery Cover
Loosen nut (1).
Tightening torque.
Remove battery negative lead with IBS.
Disconnect plug connection (2).
Unscrew nut (3).
Tightening torque.
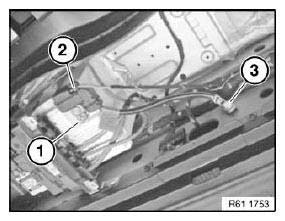
Fig. 158: Identifying Plug Connection
DISCONNECTING AND CONNECTING BATTERY NEGATIVE LEAD
WARNING: Observe safety instructions for handling vehicle battery.
Follow instructions for disconnecting and connecting battery.
IMPORTANT: Do not under any circumstances use force to pull/lever off Intelligent Battery Sensor (IBS).
Necessary preliminary tasks:
- Raise luggage compartment floor trim
Release screws (1).
Remove battery cover (2) upwards.
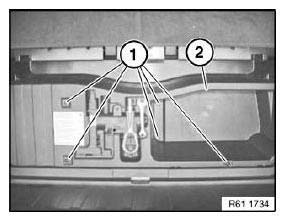
Fig. 159: Identifying Battery Cover
Loosen nut (1).
Tightening torque.
Disconnect battery negative lead (2) with IBS and secure at side.
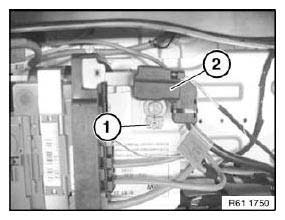
Fig. 160: Identifying Battery Negative Lead
PERFORMING BATTERY "POWER RESET" (FOR PROGRAMMING/CODING CONTROL UNIT(S) )
IMPORTANT: Observe safety instructions for handling vehicle battery.
The following steps must be carried out for a "power reset":
- Switch off and disconnect battery charger
- Switch off ignition
Cars with ignition key: Turn ignition key to 0 position
Cars with identification sensor: Remove identification sensor from slot
Cars with comfort access system: Make sure terminal is in 0 position - Disconnect battery negative terminal
- Reconnect battery negative terminal (to ensure bus activity)
- Waiting time (5-10 seconds)
- Disconnect battery negative terminal
- Waiting time (1 minute)
- Connect battery negative terminal and tighten, tightening torque.
Tightening torque. - Connect and switch on battery charger
- Switch ignition on
REMOVING AND INSTALLING/REPLACING BATTERY
WARNING: Observe safety instructions for handling vehicle battery.
Notes and instructions on Intelligent Battery Sensor IBS.
IMPORTANT: Do not under any circumstances pull/lever safety battery terminal off by force.
Necessary preliminary tasks:
- Disconnect negative battery cable.
- Remove distribution box.
Detach vent (1) in direction of arrow.
Unlock positive terminal cover (2).
Slacken nut (3) of safety battery terminal.
Tightening torque.
Detach safety battery terminal towards top, lay to one side and secure.
Release threaded pin (4).
Release screw (6) and remove holder.
Release screw (5) and remove holder.
Lift out battery.
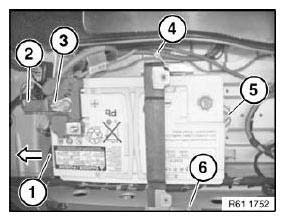
Fig. 161: Detaching Vent
Installation:
Make sure battery is correctly seated in associated fixture.
Replacement:
Version with Intelligent Battery Sensor:
- Carry out programming/coding. Code Car Access System (CAS) and delete fault memory entries relating to battery replacement in engine control unit.
READ NEXT:
 Replacing Level Switch For Dynamic Drive Fluid Reservoir
Unscrew nuts.
Remove shims.
Installation:
Replace self-locking nuts.
Fig. 162: Locating Nuts
NOTE: Raise and/or turn fluid reservoir in order to gain better access
to plug
connection.
Disconnect pl
Removing And Installing Or Replacing Steering Column Switch Cluster
WARNING: Move wheels into straight-ahead position and do not alter this
position
during the repair work.
With steering wheel removed, do not under any circumstances turn/twist
fixture for steering c
SEE MORE:
Safety At Work
1.1 Working with aluminum dust:
Wear a fine dust mask.
E52 only: Use an explosion-proof extractor system.
Note national regulations.
1.2 Removing sealing materials
Hydrochloric acid is created when PVC sealing material is heated to
temperatures in excess of 180º
C.
Remove PVC sealing mat
Touchless unlocking and locking
of the vehicle - Comfort Access
Touchless unlocking and locking
of the vehicle
Principle
The vehicle will be unlocked when the driver approaches
the locked vehicle with the vehicle key.
When the driver walks away from the unlocked
vehicle with the vehicle key, the vehicle will be
locked.
General information
The vehicle will be un
