
BMW X5: Removing And Installing/Replacing Inlet Camshaft (N52K)
Special tools required:
- 11 4 281
- 11 4 481
IMPORTANT: Aluminium screws/bolts must be replaced each time they are released.
The end faces of aluminium screws/bolts are painted blue for the purposes of reliable identification.
Jointing torque and angle of rotation must be observed without fail (risk of damage).
Necessary preliminary tasks:
- Remove cylinder head cover
- Remove inlet adjustment unit
- Remove intermediate lever
- Adjust valve timing
NOTE: All bearing caps (1 and 2) are marked with numbers from 1 to 6.
Bearing cap (1) is a thrust bearing.
Release screws on bearing caps 1 to 6 (1 and 2).
Tightening torque: 11 31 2AZ.
Set all bearing caps down in special tool 11 4 481 in a tidy and orderly fashion.
.png)
Fig. 162: Bearing Caps
Remove inlet camshaft (2) towards top.
Installation:
Clean all bearing points and lubricate with oil.
Check plain compression rings (1) for damage and replace if necessary.
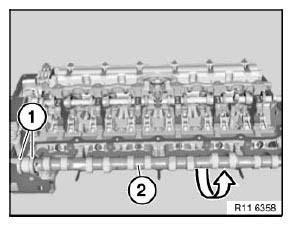
Fig. 163: Removing Inlet Camshaft
Plain compression rings (1) are engaged at joint.
Press plain compression rings (1) apart upwards and downwards and removed towards front.
IMPORTANT: Plain compression rings (1) can easily break.
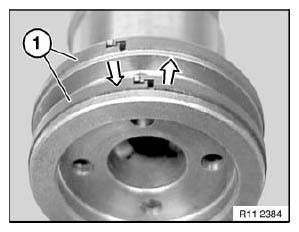
Fig. 164: Removing Plain Compression Rings
IMPORTANT: Markings of inlet and exhaust camshafts are different.
Mixing up the inlet and exhaust camshaft will result in engine damage.
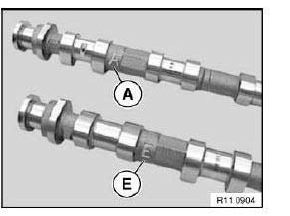
Fig. 165: Markings Of Inlet And Exhaust Camshafts
- Exhaust camshaft
- Inlet camshaft
Insert inlet camshaft (1) so that part number on twin surface points upwards.
Position inlet camshaft (1) so that cams point upwards at an angle.
Attach special tool 11 4 281 to twin surface.
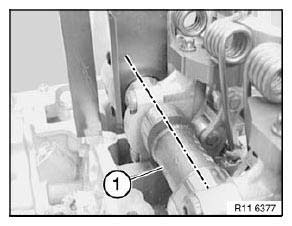
Fig. 166: Inlet Camshaft
Assemble engine.
READ NEXT:
 Removing And Installing/Replacing Exhaust Camshaft (N52K)
Special tools required:
00 9 120
11 4 350
11 4 461
11 4 462
11 4 463
11 9 000
IMPORTANT: It is absolutely essential to follow an exact procedure for
removing and
installing the exhaust camsha
Replacing Timing Chain (N52K)
Special tools required:
00 9 140
11 0 300
11 4 280
11 4 281
11 4 282
11 4 283
11 4 360
11 4 362
11 5 200
11 9 280
Necessary preliminary tasks:
Remove cylinder head cover
Remove all spar
Adjusting Timing Of Camshaft(s) (N52K)
Special tools required:
00 9 120 TORQUE ANGLE MEASURING DIAL
00 9 250 TORSION ANGLE WRENCH WITH FLEXIBLE EXTENSION
11 0 300
11 4 280
11 4 281
11 4 282
11 4 283
11 4 290
11 9 340
Necessary p
SEE MORE:
Removing/Replacing Knock Sensors (N52, N52K, N51)
IMPORTANT: Aluminum-magnesium materials.
No steel screws/bolts may be used due to the threat of electrochemical
corrosion.
A magnesium crankcase requires aluminum screws/bolts exclusively.
Aluminum screws/bolts must be replaced each time they are released.
The end faces of aluminum screws/bolts
Wheel Bearings And STU
REMOVING AND INSTALLING/REPLACING LEFT OR RIGHT SWIVEL BEARING
Necessary preliminary tasks:
Remove wheel bearing.
IMPORTANT: Secure swivel bearing against falling out.
Replacement only: Remove brake anchor plate/brake guard plate.
Remove stabilizer link from swivel bearing.
Remove upper control a
