
BMW X5: Relays
RELAY CARRIER
Place special tool 61 1 153 on relay carrier (1) and carefully pull in direction of arrow until retaining lugs (2) on relay carrier are raised.

Fig. 257: Pulling Relay Carrier
Pull relay carrier (2) in direction of arrow into first catch (3).
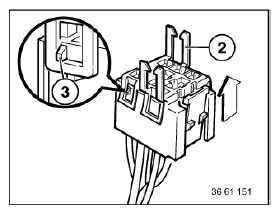
Fig. 258: Pulling Relay Carrier Into First Catch
Press down arrester hook (4) of appropriate contact and pull out cable with contact.
Press out double flat spring contact with special tool 61 1 136 or 61 1 137 (ejector).
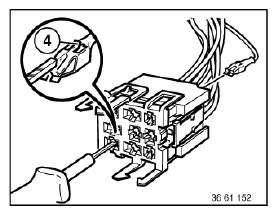
Fig. 259: Pressing Down Arrester Hook Of Appropriate Contact
REMOVING AND INSTALLING/REPLACING AIR SUPPLY UNIT RELAY
After completing work:
- Clear fault memory
Necessary preliminary tasks:
- Remove ignition key.
- Remove trim panel for instrument panel at bottom right.
Release screw (1) and fold down fuse box.
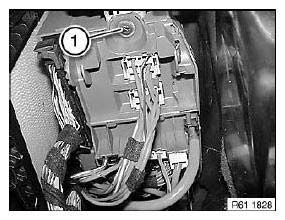
Fig. 260: Identifying Screw
Pull relay (1) from fuse box.
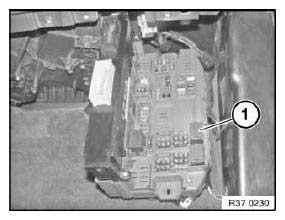
Fig. 261: Identifying Relay
READ NEXT:
 Windscreen Wipers
OVERVIEW OF WINDSCREEN WIPER, WINDSCREEN WASHER AND HEADLIGHT
WASHER SYSTEMS
Fig. 262: Overview Of Windscreen Wiper, Windscreen Washer And Headlight
Washer Systems
Rear window wiper blade
Wiper a
Rear Window Wiper
OVERVIEW OF WINDSCREEN WIPER, WINDSCREEN WASHER AND HEADLIGHT
WASHER SYSTEMS
Fig. 273: Overview Of Windscreen Wiper, Windscreen Washer And Headlight
Washer Systems
Rear window wiper blade
Wiper a
Headlight Washer System
OVERVIEW OF WINDSCREEN WIPER, WINDSCREEN WASHER AND HEADLIGHT
WASHER SYSTEMS
Fig. 283: Overview Of Windscreen Wiper, Windscreen Washer And Headlight
Washer Systems
Rear window wiper blade
Wiper a
SEE MORE:
Corrosion Protection
NOTE: Following repairs, the corrosion protection work already begins
with the correct
removal of the PVC undercoating, antinoise compound and seam seals.
1.0 Removing sealing materials:
IMPORTANT:
Do not burn off PVC material with a gas burner or similar or heat
to
temperatures above 180ºC.
Handle For Drifts
Minimum set: Mechanical tools
In conjunction with: 11 2 030
Series: E12, E21, E23, E24, E28, E30, E30/C, E30tou, E31, E32, E32/3, E34,
E34tou, E36, E36/2, E36/3,
E36/5, E36/7, E36/C, E36tou, E38, E38/3, E39, E39PL, E39tou, E46, E46/16, E46/2,
E46/3, E46/5, E46/C,
E52, E53, E60, E61, E63, E64, E65,
