
BMW X5: Regulator
REPLACING VOLTAGE REGULATOR
Necessary preliminary tasks:
- Switch off ignition.
- Disconnect battery negative lead.
- Notes on removing and installing electronic control units.
- Remove alternator.
Bosch:
Release protective caps (1).
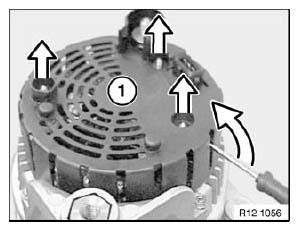
Fig. 40: Inserting Screwdriver Between Cover And Threaded Pin
Bosch:
Release screw (1) and nuts (2), remove cover.
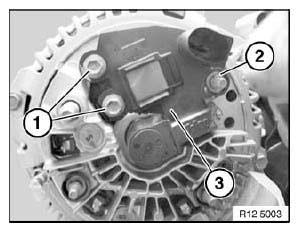
Fig. 41: Identifying Controller Switch And Contact Screws
Bosch:
Release screw (1) and nuts (2), remove cover.
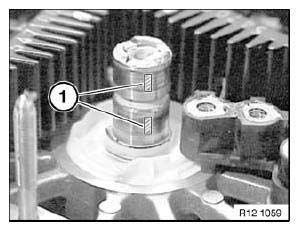
Fig. 42: Identifying Contact Surfaces Of Slip Rings
Bosch:
Release screws and remove regulator switch (1) in direction of arrow.
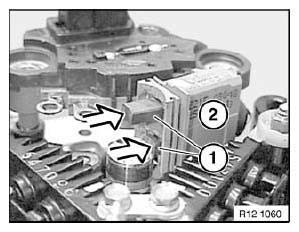
Fig. 43: Installing Controller Switch
Valeo:
Slacken nut (1).
Slacken nut (2).
Release screws (3).
Release cover (4).

Fig. 44: Identifying Controller Switch And Contact Screws
Valeo:
Release screws
Remove regulator switch (1) towards top.
Valeo:
Installation:
Clean contact surfaces and check pretension of contact spring, replace regulator switch if necessary.
Measurement A = min. 5 mm.
Check collector ring for wear and recondition if necessary.
Installation:
Fit new regulator (1) with attached mounting sleeve (2) or locked carbon brush.
Pull off mounting sleeve (2) and replace with cover (3).
READ NEXT:
 Starter With Mounting
REMOVING AND INSTALLING/REPLACING STARTER MOTOR (N52, N52K, N51, N53,
N54)
IMPORTANT: Aluminum-magnesium materials.
No steel screws/bolts may be used due to the threat of electrochemical
corrosion.
Starter Lead
REMOVING AND INSTALLING OR REPLACING BATTERY POSITIVE LEAD
(BETWEEN STARTER, ALTERNATOR AND BATTERY POSITIVE TERMINAL)
Necessary preliminary tasks:
Read out fault memory of DME control unit; if nece
Engine Wiring Loom
REPLACING WIRING HARNESS SECTION FOR ENGINE (N52K)
Special tools required:
24 2 390.
IMPORTANT: Read and comply with notes on protection against
electrostatic damage (ESD
protection)!
Necessary pr
SEE MORE:
Display key battery - BMW display key
Display key battery
General information
Follow the following information:
If the charge state of the display key battery
declines, the display is switched off automatically.
The battery must be recharged so that
the display can be switched back on. The operability
of the standard buttons is re
Replacing Fastener For Wind Deflector On Left Or Right
Special tools required:
51 3 057
Fig. 27: Identifying Special Tools (51 3 057)
Insert special tool 51 3 057 in spring (1). See 51 3 050 TOOL.
Using a suitable tool (2), unlock catch (3) of fastener for wind deflector (4).
Slide fastener for wind deflector (4) and spring (1) with special tool 5
