
BMW X5: Starter With Mounting
REMOVING AND INSTALLING/REPLACING STARTER MOTOR (N52, N52K, N51, N53, N54)
IMPORTANT: Aluminum-magnesium materials.
No steel screws/bolts may be used due to the threat of electrochemical corrosion.
A magnesium crankcase requires aluminum screws/bolts exclusively.
Aluminum screws/bolts must be replaced each time they are released.
The end faces of aluminum screws/bolts are painted blue for the purposes of reliable identification.
Jointing torque and angle of rotation must be observed without fail (risk of damage).
Necessary preliminary tasks:
- Switch off ignition.
- Disconnect battery negative lead.
- Remove intake air manifold.
Unlock plug (1) and remove.
Unfasten nut.
Tightening torque 12 14 3AZ.
Remove battery positive lead (2).
Release screws (1).
Installation:
Replace aluminum screws.
Tightening torque 12 14 1AZ. Release screws (2).
Replace aluminum screws.
Tightening torque 12 41 2AZ.
Remove starter motor (3).
Installation:
Check starter pinion and ring gear for damage, replace starter motor if necessary.
N53 only : In the case of a separate term. 50 lead (with disconnector socket), the term. 50 lead is laid parallel to knock sensor 2 behind the fuel line.
REPLACING SOLENOID SWITCH
Turn off ignition.
Remove starter motor.
Release nut (1).
Remove cable lug (2).
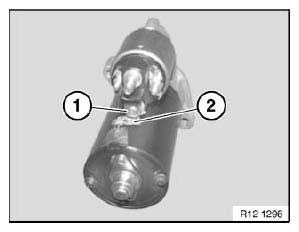
Fig. 45: Identifying Cable Lug And Nut
CAUTION: Do not turn cable lug (2) while tightening down - risk of short circuit to starter motor housing.
Tighten to specified torque.
Release screws (1).
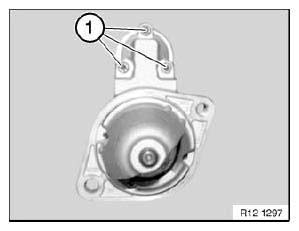
Fig. 46: Identifying Screws
Remove solenoid switch (1) and spring (2).
Unhook pin (3).
Installation:
Check pin (3) for wear and apply grease.
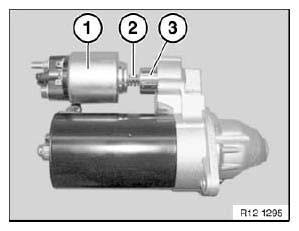
Fig. 47: Identifying Solenoid Switch And Spring
READ NEXT:
 Starter Lead
REMOVING AND INSTALLING OR REPLACING BATTERY POSITIVE LEAD
(BETWEEN STARTER, ALTERNATOR AND BATTERY POSITIVE TERMINAL)
Necessary preliminary tasks:
Read out fault memory of DME control unit; if nece
Engine Wiring Loom
REPLACING WIRING HARNESS SECTION FOR ENGINE (N52K)
Special tools required:
24 2 390.
IMPORTANT: Read and comply with notes on protection against
electrostatic damage (ESD
protection)!
Necessary pr
Oil Pressure, Oil Tempe
REMOVING AND INSTALLING/REPLACING OIL PRESSURE SENSOR (N52, N52K, N51,
N54, N53)
Necessary preliminary tasks:
Switch off ignition
N52, N52K, N51, N53 only:
Remove ignition coil cover.
N54 on
SEE MORE:
Replacing Rear Left Outer Wheel Arch Section (Rear Left Side Panel
Removed)
Read contents of Body, General.
Spot-weld bonding is used on this vehicle. Observe specific procedure.
Remove or cover those vehicle components in the repair area which are
susceptible to heat or dust.
Use only approved spot-welding apparatus for repairs!
Following new body parts are required:
R
System limits - Active Cruise Control with
Stop&Go function ACC
System limits
System limits of the sensors
Additional information:
Cameras
Radar sensors
Detection range
The detection capability of the system and the
automatic braking performance are limited.
Two-wheeled vehicles for instance might not be
detected.
Deceleration
The system does not decelerate
