
BMW X5: Leak-Testing Evaporator
Special tools required:
- 64 5 104
- 64 5 108
Necessary preliminary tasks:
- Remove expansion valve.
Replace sealing rings (1) and coat with refrigerant oil.
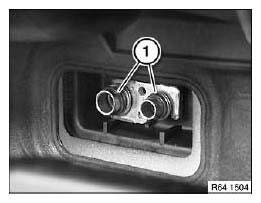
Fig. 90: Identifying Sealing Rings
Mount special tool 64 5 108 and retainer (1) with screws of expansion valve.
Tightening torque.
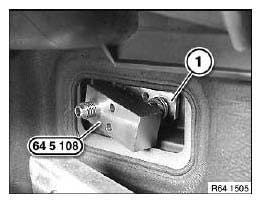
Fig. 91: Identifying Special Tool (64 5 108)
Connect special tool 64 5 104 to special tool 64 5 108.

Fig. 92: Identifying Special Tool (64 5 104 And 64 5 108)
IMPORTANT: Risk of damage: Use only nitrogen pressure bottles with pressure reducers for leak-testing.
Pressurize evaporator to 15 bar slowly only. Excessively fast pressurization and pressures in excess of 20 bar may cause damage to the evaporator.
Connect nitrogen pressure bottle with pressure reducer to pressure gauge and then connect to special tool 64 5 104 (connecting hose).
NOTE:
- Testing apparatus must be leakproof.
- Ambient temperature and temperature of vehicle must not change during the test procedure.
- Do not move the vehicle during this period.
Apply test pressure of 15 bar slowly and close nitrogen pressure bottle.
Check leak-tightness of testing apparatus and of connection to refrigerant line.
Set test pressure of 15 bar is only permitted to drop by 2 bar to 13 bar over a test period of 2 hours.
If the pressure loss is greater than 2 bar, this indicates that there is a leak in the evaporator unit.
After installation:
- Replace all sealing rings and moisten with refrigerant oil
- Evacuate and fill A/C system.
READ NEXT:
 Instructions For Opening And Replacing Parts In Refrigerant Circuit
WARNING:
Avoid contact with refrigerant and refrigerant oil.
Follow safety instructions for handling R 134a refrigerant.
Follow safety instructions for handling refrigerant oil.
CAUTION:
A
Instructions For Compressor Replacement
IMPORTANT: Compressors with plastic belt pulleys:
Avoid impacts/knocks to plastic belt pulley (caused by tools,
contact with
base).
Return faulty compressors in their original packaging only.
I
SEE MORE:
Ignition Coil
NOTES ON CHECKING IGNITION SYSTEM
Troubleshooting -> Fault in fuel injection system
-> Spark plug faults
-> Ignition coil faults
-> Further fault patterns with evaluation
-> Additional fault notes for troubleshooting.
Oscillograms -> Normal oscillogram
-> Oscillograms of ignitio
Removing And Installing/Replacing Inlet And Exhaust Adjustment Units On Left
Side (N62/N62TU)
Special tools required:
11 9 190
11 9 460
11 9 461
11 9 462
11 9 463
(cylinder bank 5 to 8)
Necessary preliminary tasks:
Read fault memory and make a documentary record.
Remove servomotor for left eccentric shaft.
Remove left cylinder head cover.
Remove all spark plugs on cylinder bank
