
BMW X5: Mono Radio
REMOVING AND INSTALLING/REPLACING CD CHANGER
Operation is identical to:
Removing and installing/replacing DVD changer.
REMOVING AND INSTALLING/REPLACING DVD CHANGER
NOTE: Follow instructions for handling optical fibers.
Open glovebox.
Release trim (1) at clips (2).
Installation:
Replace damaged clips (2):

Fig. 1: Identifying Clips
Release screws (1).
Pull out DVD changer (2) and disconnect associated plug connection.
Tightening torque.
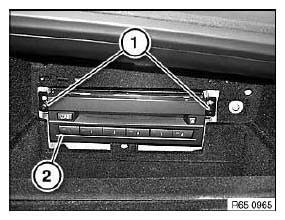
Fig. 2: Identifying DVD Changer With Screws
Replacement:
Release screws (1) on both sides and remove bracket (2).
Tightening torque.

Fig. 3: Identifying DVD Changer Bracket With Screws
REMOVING AND INSTALLING/REPLACING DVD PLAYER IN REAR CONSOLE
Necessary preliminary tasks:
- Remove rear center console trim.
Release screws (1) on both sides.
Tightening torque.
Lift out mounting (2) on both sides over catch (3) and feed out DVD player (4).
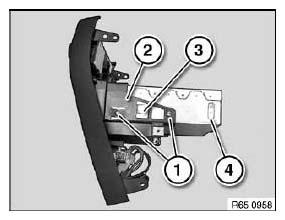
Fig. 4: Identifying DVD Player Bracket
READ NEXT:
 Stereo Radio, Amplifier
REMOVING AND INSTALLING/REPLACING LEFT OR RIGHT CENTRAL BASS
SPEAKER
Necessary preliminary tasks:
Remove front seat
Lay floor carpet in working area to one side
Release screws (1) and remove trim
Speaker And Cover
REMOVING AND INSTALLING/REPLACING SPEAKER (TWEETER, FRONT DOOR)
Necessary preliminary tasks:
Remove front door trim.
Detach cover on door window frame in front area.
NOTE: For purposes of clarity,
Aerial-Antenna
REMOVING AND INSTALLING/REPLACING EMPTY HOUSING FOR ROOF-MOUNTED
AERIAL/ANTENNA
Special tools required:
65 2 010
WARNING: Danger of injury!
Special tool has sharp edges!
Adapt working height to veh
SEE MORE:
Selection lists
Concept
Lists can be displayed and, if necessary, used for
certain functions in the instrument cluster or the
Head-up Display.
Entertainment source.
Current audio source.
List of most recent telephone calls.
If necessary, the corresponding menu will open
on the Control Display.
Display
Depend
Repairing Airbag Cables
IMPORTANT: Only repair those cables which show visible signs of damage. In
the event of
visible damage, make sure there is only one cable repair in effect after the
repair work. If no visible damage can be identified, the entire cable must be
replaced. When carrying out repairs to the airbag wiring
