
BMW X5: Water Pump With Drive
REMOVING AND INSTALLING/REPLACING WATER PUMP (N52K)
WARNING: Danger of scalding! Only perform this work after engine has cooled down.
Recycling:
Catch and dispose of drained coolant in a suitable container.
Observe country-specific waste-disposal regulations.
IMPORTANT: If a water pump that has already been operated is reused, it must be filled with coolant immediately after removal.
Mixture ratio, water : coolant = 1 : 1
Protect plug connections against coolant and contamination.
Cover plug connections with suitable materials.
IMPORTANT: Aluminium-magnesium materials.
No steel screws/bolts may be used due to the threat of electrochemical corrosion.
A magnesium crankcase requires aluminium screws/bolts exclusively.
Aluminium screws/bolts must be replaced each time they are released.
The end faces of aluminium screws/bolts are painted blue for the purposes of reliable identification Jointing torque and angle of rotation must be observed without fail (risk of damage).
Necessary preliminary tasks:
- Remove coolant thermostat
Unfasten hose clip (1).
For tightening torque refer to 11 53 5AZ.
Remove coolant hose.
Unfasten hose clip (2).
For tightening torque refer to 11 53 3AZ.
Remove coolant hose.
Disconnect plug connection (3).
Release screws (4).
For tightening torque refer to 11 51 1AZ.
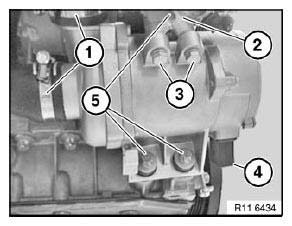
Fig. 261: Plug Connection, Screws And Hoses
Installation:
Replace aluminium screws.
Remove electric water pump (x) via x.
Installation:
If the electric water pump is reused, it must be rotated one turn due to the breakaway torque at the blade wheels.
Assemble engine.
Venting instructions must be observed without fail.
READ NEXT:
 Thermostat And Connections
REMOVING AND INSTALLING/REPLACING COOLANT THERMOSTAT (N52K)
WARNING: Danger of scalding!
Only perform this work after engine has cooled down.
Recycling
Catch and dispose of drained coolant in a suitab
Intake Manifold
REMOVING AND INSTALLING AIR INTAKE MANIFOLD (N52K)
Necessary preliminary tasks:
Remove Tension Strut
Remove Intake Filter Housing
Remove Ignition Coil Cover
Open holder (2).
Disconnect plug conn
SEE MORE:
Replacing Pressure Line For Power Steering (From Cutting Line To
Steering Gear) (N62)
WARNING: Danger to life!
Mount securing fixture for vehicle on lifting platform to prevent the
vehicle from slipping off or tilting down.
Secure engine in installation position to prevent it from falling down.
WARNING: Danger of poisoning if oil is ingested/absorbed through the
skin!
Risk of injur
Refueling
Follow the following when
refueling
General information
Follow the fuel recommendation prior to refueling.
When refueling, insert the filler nozzle completely
into the filler pipe. Lifting up the filler nozzle during
refueling causes:
Premature switching off.
Reduced return of the fuel vapors.
