
BMW X5: Replacing Evaporator
BMW X5 (G05) 2019-2026 Service & Repair Manual / Heating And Air Conditioning / AC Housing-Evaporator / Replacing Evaporator
Necessary preliminary tasks:
- Remove heater
Release screws (1).
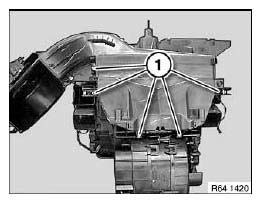
Fig. 84: Identifying Screws
Release screws (1) and remove expansion valve (2).
Installation:
Ensure that seals are correctly seated.
Replace sealing rings and moisten with refrigerant oil.
Tightening torque.
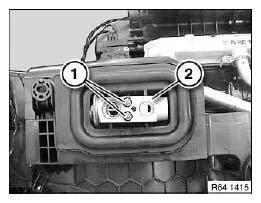
Fig. 85: Identifying Expansion Valve With Screws
Release screws (1) and carefully remove upper housing section (2).
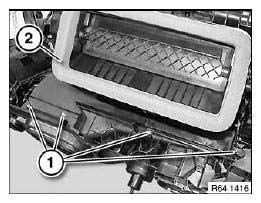
Fig. 86: Identifying Upper Housing Section
Remove evaporator (1).
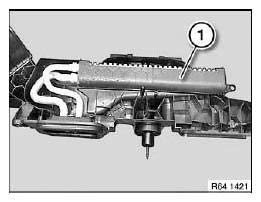
Fig. 87: Identifying Evaporator
After installation:
- Evacuate and fill A/C system.
- Fill and vent cooling system.
READ NEXT:
 Removing And Installing Or Replacing Expansion Valve
WARNING: Avoid contact with refrigerant and refrigerant oil.
Follow safety instructions for handling refrigerant R 134a.
Follow safety instructions for handling refrigerant oil.
IMPORTANT: Risk of d
Leak-Testing Evaporator
Special tools required:
64 5 104
64 5 108
Necessary preliminary tasks:
Remove expansion valve.
Replace sealing rings (1) and coat with refrigerant oil.
Fig. 90: Identifying Sealing Rings
Moun
Instructions For Opening And Replacing Parts In Refrigerant Circuit
WARNING:
Avoid contact with refrigerant and refrigerant oil.
Follow safety instructions for handling R 134a refrigerant.
Follow safety instructions for handling refrigerant oil.
CAUTION:
A
SEE MORE:
Replacing Cover For Left Or Right Front Seat
Special tools required:
52 0 050.
Necessary preliminary tasks:
Remove front seat.
Remove rear panel on front seat backrest.
Remove inner cover on front seat.
WARNING: US/CDN front passenger seat (with OC3 mat) only:
To avoid damaging the OC3 mat, it is essential to carry out the following
o
Connecting Rod With Bearing
REPLACING ALL CONROD BEARINGS (N62/N62TU)
Special tools required:
00 2 590
00 9 120
11 2 110
(piston removed)
IMPORTANT: Note grinding stages on crankshaft.
The letter (1) denotes the crankshaft construction stage.
The numbers (2) denote the bearing shell classification for the relevant bearin
© 2019-2026 Copyright www.bmwx5info.com
