
BMW X5: Universal Transmission Bracket
Special tools required:
- 00 2 030
- 23 0 132
- 23 4 050
NOTE:
- The universal transmission bracket is introduced for the E60 AWD
- Suitable for manual and automatic transmissions
IMPORTANT: Front and rear supports (1) can be laterally adjusted by means of screws (2).
Carrier (3) of rear supports (1) can be longitudinally adjusted by means of screw.
Supports must be adapted in length and width to the transmission.
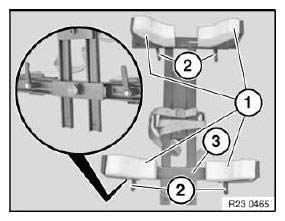
Fig. 3: Identifying Front And Rear Supports Of Screws
Supporting transmission:
Support transmission with special tools 23 4 050, 23 0 132, 00 2 030.
IMPORTANT: Transmission must be secured with tensioning strap (1).
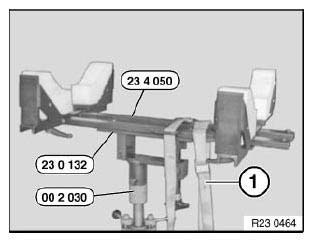
Fig. 4: Identifying Tensioning Strap And Special Tools (23 4 050, 23 0 132,
00 2 030)
UNIVERSAL TRANSMISSION RETAINING BRIDGE
Special tools required:
- 00 1 450
- 24 0 200
NOTE:
- The transmission retaining bridge 24 0 200 is suitable for both manual and automatic transmissions
IMPORTANT: Adapters and spindles must be adapted for positive locking to the transmission.
(Risk of injury)
Adapt adapters (1) and spindle with thrust piece (3) to transmission.
Adapt length with slide (2).
Screw in spindle (4).
IMPORTANT: Before mounting on assembly stand 00 1 450, check retaining bridge for secure seating.
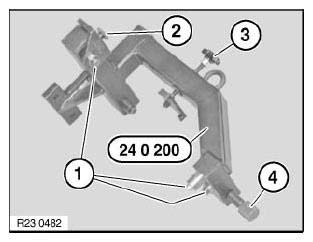
Fig. 5: Identifying Adapters, Thrust Piece And Spindle
READ NEXT:
 Removing And Installing Automatic Transmission (GA6HP26Z) N62TU
Special tools required:
00 2 030
23 0 132
23 4 050
24 1 110
24 2 390
24 4 160
23 4 161
24 4 165
IMPORTANT: After completion of work, check transmission oil level.
Use only the approved tra
Installing Replacement Transmission (GA6HP26Z)
Drain automatic transmission fluid at oil drain plug.
Tightening torque.
IMPORTANT: After completion of work, program transmission control unit.
Recycling:
Catch and dispose of escaping transmission
Transmission Case, Oil
REMOVING AND INSTALLING/SEALING OR REPLACING TRANSMISSION SUMP
(GA6HP26Z)
IMPORTANT: Remove transmission sump only after it has cooled down.
After completion of work, check transmission oil level.
U
SEE MORE:
Crimping Annular Contacts
Special tools required:
61 4 320
Crimping annular contacts:
Special tool 61 4 320
CRIMPING OPTICAL FIBERS
Special tools required:
61 4 320
To crimp optical fibers, use pliers 61 4 321 (1) in conjunction with crimping
head 61 4 323 (2) from crimping
set 61 4 320.
NOTE: Pliers (1) open automati
Safety Precautions And General Information
Safety instructions --> Safety regulations for handling airbag modules,
airbag components and pyrotechnical
seat belt tensioners.
--> Deactivation/activation pyrotechnical components.
Handling electrical and electronic equipment --> Unlocking/locking airbag
plug connections.
--> Repair
