
BMW X5: Installing Replacement Transmission (GA6HP26Z)
Drain automatic transmission fluid at oil drain plug.
Tightening torque.
IMPORTANT: After completion of work, program transmission control unit.
Recycling:
Catch and dispose of escaping transmission fluid.
Observe country-specific waste-disposal regulations.
IMPORTANT:
- Before installing replacement transmission, always flush transmission fluid cooler together with lines.
- After completion of work, check transmission fluid level.
- Use only the approved transmission fluid.
Failure to comply with this requirement will result in serious damage to the automatic transmission! Replacement transmission is supplied filled with transmission fluid.
Necessary preliminary tasks:
- Remove automatic transmission.
Convert selector lever (1).
Tightening torque. Convert holder (2) for cable.
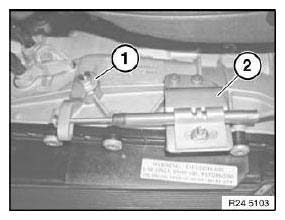
Fig. 22: Identifying Convert Selector Lever
Convert transportation lock (1).
Convert all cable holders.
Convert all seal plugs.
Convert protective cap on output shaft.
IMPORTANT: After removing transportation lock, secure torque converter against slipping out.
Transmission identification:
- refer to BMW Parts Service
- on type plate
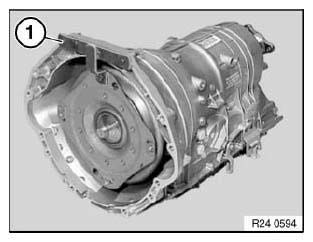
Fig. 23: Identifying Convert Transportation Lock
READ NEXT:
 Transmission Case, Oil
REMOVING AND INSTALLING/SEALING OR REPLACING TRANSMISSION SUMP
(GA6HP26Z)
IMPORTANT: Remove transmission sump only after it has cooled down.
After completion of work, check transmission oil level.
U
Torque Converter Bearing
REPLACING TORQUE CONVERTER SHAFT SEAL (GA6HP26Z)
Special tools required:
00 1 450
24 0 200
24 2 351
24 2 352
24 2 353
24 2 360
Necessary preliminary tasks:
Remove automatic transmission.
IM
Extension Housing, Bea
REPLACING OUTPUT FLANGE SHAFT SEAL (GA6HP26Z)
Special tools required:
23 0 490
24 4 310
IMPORTANT: After completion of work, check transmission fluid level.
Use only the approved transmission flui
SEE MORE:
System limits - Active Cruise Control with
Stop&Go function ACC
System limits
System limits of the sensors
Additional information:
Cameras
Radar sensors
Detection range
The detection capability of the system and the
automatic braking performance are limited.
Two-wheeled vehicles for instance might not be
detected.
Deceleration
The system does not decelerate
Information On Replacing Shock Absorbers
Facts:
When a shock absorber is faulty on one side (leaking, noises, limit values
exceeded on the shock tester), often
both shock absorbers on the axle in question are replaced.
Consequence:
This is not necessary for technical reasons and causes the manufacturer not
to recognize the unnecessarily
