
BMW X5: Turn Signal Indicator
BMW X5 (G05) 2019-2026 Service & Repair Manual / Lights / Turn Signal Indicator
REMOVING AND INSTALLING/REPLACING FRONT LEFT OR RIGHT AUXILIARY DIRECTION INDICATOR
Special tools required:
- 00 9 340.
WARNING: Follow instructions for handling light bulbs (exterior lights).
Fold out auxiliary direction indicator (1) with special tool. See DISASSEMBLY AID (2) in direction of arrow.
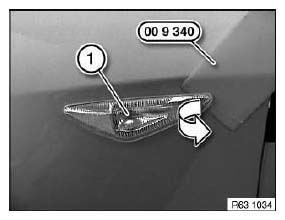
Fig. 14: Identifying Special Tool (00 9 340)
Disconnect plug connection (1).
Remove auxiliary direction indicator (2).
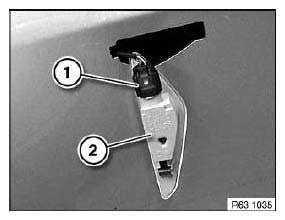
Fig. 15: Identifying Auxiliary Direction Indicator With Plug Connection
READ NEXT:
 Clearance And Side
REMOVING AND INSTALLING/REPLACING FRONT LEFT OR RIGHT SIDE MARKER
Special tools required:
00 9 323.
Necessary preliminary tasks:
Remove front wheel arch cover front section.
NOTE: Minimum object
Fog Lights, Auxiliary
REMOVING AND INSTALLING/REPLACING LEFT FRONT FOG LAMP
Necessary preliminary tasks:
Remove left grille in bumper trim.
Grasp grille through opening.
Disconnect plug connection (1).
Release screws
Rear Light Cluster
REPLACING SOCKET HOUSING FOR LEFT OR RIGHT REAR LIGHT
WARNING: Follow instructions for handling light bulbs (exterior
lights).
Rear light in side panel:
Remove flap in luggage compartment trim panel.
SEE MORE:
Replacing Radial Shaft Seal For Drive Flange (ATC 700)
Special tools required:
23 0 490
27 1 460 DRIFT
IMPORTANT: After completing work, check gear oil level, see
Replenishing /Changing
Transfer Case Oil (ATC 700) and top up if necessary.
Use only approved gear oil in this transfer box.
Necessary preliminary tasks:
Remove transfer box
Drive a h
Displays in the instrument
cluster - Active Cruise Control with
Stop&Go function ACC
Displays in the instrument
cluster
General information
Depending on the equipment version, the displays
in the instrument cluster may vary.
Display in the speedometer
Depending on the equipment, a mark in the
speedometer displays the status of the system.
Green marking: system is
active,
the ma
© 2019-2026 Copyright www.bmwx5info.com
