
BMW X5: Clearance And Side
REMOVING AND INSTALLING/REPLACING FRONT LEFT OR RIGHT SIDE MARKER
Special tools required:
- 00 9 323.
Necessary preliminary tasks:
- Remove front wheel arch cover front section.
NOTE: Minimum object temperature of side marker and side panel > or = 18 ºC.
If this temperature is not achieved, the components must be preheated.
Removing side marker:
Carefully heat side marker (1) in area (A) with hot air blower and detach with special tool.
NOTE: Side marker (1) cannot be reused.
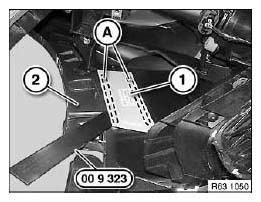
Fig. 16: Identifying Heat Side Marker In Area
Cleaning side panel:
For cleaning, use a fluff-free disposable cloth or a clean cleaning cloth.
Clean adhesive area of side panel with spirit.
Air drying time at least 1 minute.
Do not grip bonding surface.
Fitting side marker:
Pull off liner* (1) and gently press side marker (2) onto side panel.
Check position and if necessary realign.
Minimum application pressure is achieved by applying firm thumb pressure in stages over the entire joining surface (hold time approx. 1 second).
Firm thumb pressure approx. 35 N/cm2.
* Liner is the protective film on a new side marker.
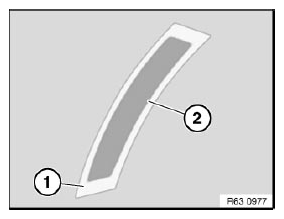
Fig. 17: Identifying Side Marker And Liner
REMOVING AND INSTALLING/REPLACING REAR REFLECTOR
Special tools required:
- 00 9 317
- 00 9 323
Unclip rear reflector (1) with special tool 00 9 323. See ASSEMBLY WEDGES (SET IN PLASTIC CASE) on right side and press inwards with special tool 00 9 317.
Remove rear reflector (1) towards rear from rear bumper trim.
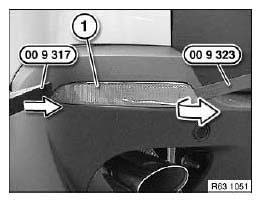
Fig. 18: Removing Rear Reflector
Installation:
Catches (1) on rear reflector must not be damaged.
If necessary, replace faulty retainer (2).
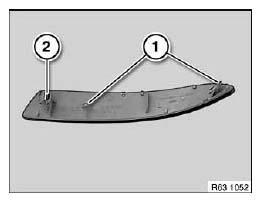
Fig. 19: Identifying Faulty Retainer And Catches
READ NEXT:
 Fog Lights, Auxiliary
REMOVING AND INSTALLING/REPLACING LEFT FRONT FOG LAMP
Necessary preliminary tasks:
Remove left grille in bumper trim.
Grasp grille through opening.
Disconnect plug connection (1).
Release screws
Rear Light Cluster
REPLACING SOCKET HOUSING FOR LEFT OR RIGHT REAR LIGHT
WARNING: Follow instructions for handling light bulbs (exterior
lights).
Rear light in side panel:
Remove flap in luggage compartment trim panel.
Brake Lights
REMOVING AND INSTALLING/REPLACING AUXILIARY BRAKE LIGHT
Necessary preliminary tasks:
Remove rear spoiler.
Release screws (1).
Lift auxiliary brake light (2) in direction of arrow from rear spoiler
SEE MORE:
Unlocking And Disconnecting Different Plug Connections
NOTE: Examples of unlocking and disconnecting different plug
connections.
Press lock and open clip in direction of arrow.
Disconnect plug connection.
Fig. 4: Pressing Lock
Press lock and open clip in direction of arrow.
Disconnect plug connection.
Fig. 5: Opening Clip
Open clip in direction of a
Lights and lighting
Switches in the vehicle
The light switch element is located next to the
steering wheel.
Night vision.
Lights off.
Daytime driving lights.
Parking lights.
Automatic headlight control.
Adaptive light functions.
Low beams.
Instrument lighting.
Right roadside parking light.
Left roadside parking ligh
