
BMW X5: Rear Light Cluster
REPLACING SOCKET HOUSING FOR LEFT OR RIGHT REAR LIGHT
WARNING: Follow instructions for handling light bulbs (exterior lights).
Rear light in side panel:
Remove flap in luggage compartment trim panel.
Turn socket housing and pull out of rear light.
NOTE:
- Bulb, adaptive brake light
- Bulb, reversing light
- Bulb, brake light
- Bulb, turn indicator light
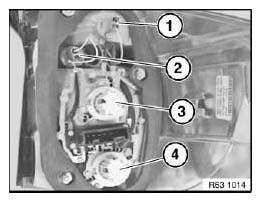
Fig. 21: Identifying Adaptive Brake Light, Reversing Light, Brake Light And
Indicator Light
Rear light in rear lid:
Remove luggage compartment light.
NOTE: For purposes of clarity, rear lid trim panel is shown removed.
Turn socket housing and pull out of rear light.
NOTE:
- Bulb, rear fog light and adaptive brake light
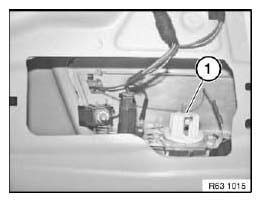
Fig. 22: Identifying Rear Fog Light
Rear light in rear lid:
Turn bulb (1) and pull out of socket housing (3).
Pull bulb (2) out of socket housing (3).
Installation:
Note type of bulb.
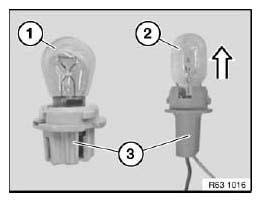
Fig. 23: Pulling Bulb Out Of Socket Housing
REPLACING SEALING FRAME FOR LEFT OR RIGHT REAR LIGHT (ON SIDE PANEL)
Necessary preliminary tasks:
- Remove rear light.
Detach seal for rear light (1) completely from rear light (2). Clean bonding surface and allow to dry.
Installation:
Make sure seal (1) is correctly bonded all round on rear light (2).
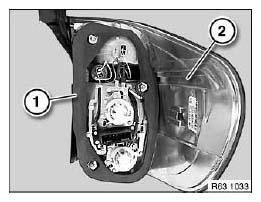
Fig. 24: Detaching Seal For Rear Light
REMOVING AND INSTALLING/REPLACING LEFT OR RIGHT REAR LIGHT (IN SIDE PANEL)
IMPORTANT: Read and comply with notes on protection against electrostatic damage (ESD protection).
Necessary preliminary tasks:
- Remove flap in luggage compartment panel.
- Remove warning triangle.
Disconnect plug connection (1).
Unscrew nuts (2).
Tightening torque 63 21 1AZ.
Remove rear light (3) in outwards direction from side panel.
Installation:
Make sure gap is uniform all round between rear light (3) and side panel.

Fig. 25: Identifying Plug Connection And Rear Light With Nut
Installation:
Make sure seal (1) is correctly seated on rear light (2).
Make sure guide (3) is correctly seated on side panel.
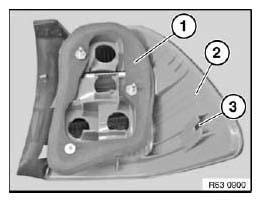
Fig. 26: Identifying Sure Seal, Sure Guide And Rear Light
Replacement:
If necessary, remove bulbs.
REMOVING AND INSTALLING/REPLACING LEFT OR RIGHT TAIL LIGHT (ON REAR LID)
Special tools required:
- 00 9 318.
IMPORTANT: Read and comply with notes on protection against electrostatic damage (ESD protection).
Necessary preliminary tasks:
- Remove luggage compartment light.
NOTE: For purposes of clarity, rear lid trim panel is shown removed.
Disconnect plug connection (1).
Release nut (2) and remove with retaining bar (3).
Tightening torque 63 21 3AZ.
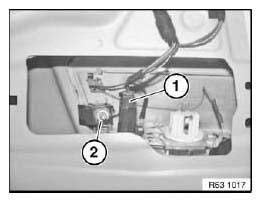
Fig. 27: Identifying Plug Connection With Nut
IMPORTANT: Risk of damage! Tape off rear lid with suitable protective film (1).
Lever off rear light with special tool. See ASSEMBLY WEDGES (SET IN PLASTIC CASE) in direction of arrow.
Installation:
Clean bonding surface and allow to dry.
Make sure gap is uniform all round between rear light (2) and rear lid.
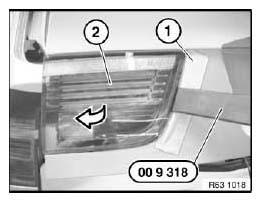
Fig. 28: Identifying Protective Film And Rear Light
Installation:
Position lugs (1) of rear light exactly over side edge of rear lid.
In case of replacement or partial detachments, lay butylene tape (2) (sourcing reference: BMW Parts Service) depending on the conditions on rear light again.

Fig. 29: Identifying Lugs Position With Butylene Tape
Replacement:
If necessary, remove bulb
READ NEXT:
 Brake Lights
REMOVING AND INSTALLING/REPLACING AUXILIARY BRAKE LIGHT
Necessary preliminary tasks:
Remove rear spoiler.
Release screws (1).
Lift auxiliary brake light (2) in direction of arrow from rear spoiler
License Plate Lights
REMOVING AND INSTALLING/REPLACING LEFT OR RIGHT NUMBER/LICENSE
PLATE LIGHT
Special tools required:
64 1 020.
WARNING: Follow instructions for handling light bulbs (exterior
lights).
Lever license
Interior Lights
OVERVIEW OF INTERIOR LIGHTS
Fig. 33: Location Of Interior Lights
Glovebox light
Footwell light (footwell)
Front ceiling light
Mirror light
Interior light
Luggage compartment light
Footwell li
SEE MORE:
Removing And Installing Outer Upper Rail Trim With Electric Anchor Fitting
Tensioner (From 04/2004)
Driver's seat only:
NOTE: Version with anchor fitting tensioner from 04/2004.
Lever trim (3) out of seat mechanism:
upwards,
slide towards rear
and feed out of anchor fitting tensioner.
Installation:
Secure plug connection with felt strip against unlocking.
Lock on plug connection to anchor fit
Replacing All Main Crankshaft Bearing Shells(N52K)
Special tools required:
00 2 590 PLASTIGAGE (5)
11 4 251
11 4 252
11 4 470
IMPORTANT: Aluminium-magnesium materials.
No steel screws/bolts may be used due to the threat of electrochemical
corrosion.
A magnesium crankcase requires aluminium screws/bolts exclusively.
Aluminium screws/bolts mu
