
BMW X5: Replacing Valve Insert For Refrigerant Line
WARNING: Avoid contact with refrigerant and refrigerant oil.
Follow safety instructions for handling refrigerant R 134a.
Follow safety instructions for handling refrigerant oil.
IMPORTANT: Risk of damage Restart engine only when A/C system has been correctly filled.
If A/C system is opened for more than 24 hours: Replacing drier insert for A/C system.
NOTE: The special tool is available under BMW order number: 81 34 0 427 679 from the BMW workshop equipment catalogue.
Necessary preliminary tasks:
- Drawing off, evacuating and filling the A/C system are not included in the time value given for this work operation.
Twist valve insert out of filler neck (2) with remover (1).
Installation:
Screw in valve insert hand-tight only.
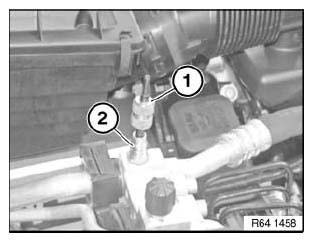
Fig. 103: Identifying Filler Neck With Remover
After installation:
- Evacuate and fill A/C system.
- Check leak-tightness of valve insert with soapy solution.
In event of leakage:
- Evacuate A/C system.
- Check sealing faces on line and valve insert for damage, replace line or valve insert if necessary.
REPLACING DESICCANT INSERT FOR A/C SYSTEM
WARNING: Avoid contact with refrigerant and refrigerant oil.
Follow safety instructions for handling refrigerant R 134a.
Follow safety instructions for handling refrigerant oil.
IMPORTANT: Risk of damage! Restart engine only when A/C system has been correctly filled.
Follow instructions for opening and replacing parts in refrigerant circuit! If A/C system is opened for more than 24 hours: Replacing drier insert for A/C system.
Necessary preliminary tasks:
- Remove condenser.
Remove cover cap (1) from condenser (2).
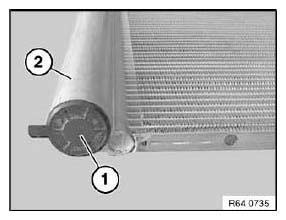
Fig. 104: Identifying Cover Cap And Condenser
Press sealing cap (1) inwards and remove circlip (2).
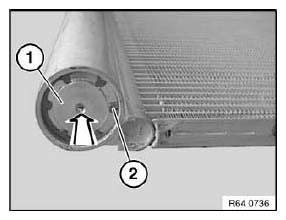
Fig. 105: Pressing Sealing Ca
With assistance of a screwed-in screw (1), remove sealing cap from condenser (3).
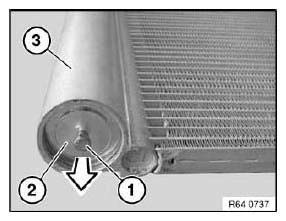
Fig. 106: Removing Sealing Cap From Condenser
Installation:
Replace sealing rings (1) of sealing cap (2) and coat with refrigerant oil.
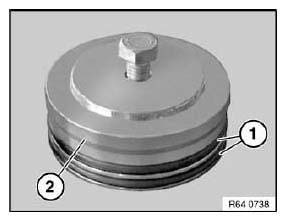
Fig. 107: Identifying Sealing Rings And Sealing Cap
IMPORTANT: Risk of damage! Removal is made more difficult if rib (2) is damaged!
Carefully pull out desiccant insert (1) with a pair of wide pliers on rib (2).
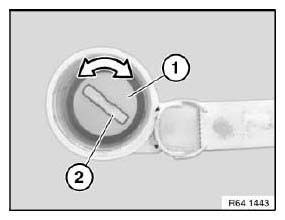
Fig. 108: Turning Rib
After installation:
- Evacuate and fill A/C system.
READ NEXT:
 Replacing Safety Pressure Switch
WARNING: Avoid contact with refrigerant and refrigerant oil.
Follow safety instructions for handling refrigerant R 134a.
Follow safety instructions for handling refrigerant oil.
IMPORTANT: Risk of da
Instrument Cluster
REMOVING AND INSTALLING (REPLACING) INSTRUMENT CLUSTER
IMPORTANT: Read and comply with notes on protection against
electrostatic damage (ESD
protection).
NOTE:
Comply with notes and instructions o
SEE MORE:
Installing Replacement Transmission (GA6HP26Z)
Drain automatic transmission fluid at oil drain plug.
Tightening torque.
IMPORTANT: After completion of work, program transmission control unit.
Recycling:
Catch and dispose of escaping transmission fluid.
Observe country-specific waste-disposal regulations.
IMPORTANT:
Before installing replace
Removing And Installing/Replacing Seat Cover For Left Or Right Front
Seat (Comfort)
Special tools required:
00 9 317.
52 0 050.
Necessary preliminary tasks:
Remove front seat.
Remove both rear panels on front seat backrest.
Remove inner cover on front seat.
Remove thigh support.
Remove switch combination for seat adjustment.
WARNING: US/CDN front passenger seat (wit
