
BMW X5: Removing And Installing/Replacing Heater
WARNING: Avoid contact with refrigerant and refrigerant oil.
Follow safety instructions for handling refrigerant R 134a.
Follow safety instructions for handling refrigerant oil.
IMPORTANT: Risk of damage Restart engine only when A/C system has been correctly filled.
If A/C system is opened for more than 24 hours: Replacing drier insert for A/C system
Necessary preliminary tasks:
- Drain off air conditioner.
- Remove carrier for instrument panel.
- Unclip wiring harness holders from heater.
Recycling
Coolant emerges when coolant lines are detached. Have a suitable collecting container ready.
Catch and dispose of escaping coolant.
Observe country-specific waste-disposal regulations.
Release screw (1) and remove refrigerant lines with cover (1) and associated seal.
Tightening torque. Replace sealing rings and moisten with refrigerant oil.
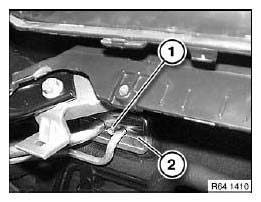
Fig. 3: Identifying Refrigerant Lines With Screw
IMPORTANT: Connections must not be mixed up! Mark connection sequence of water hoses prior to removal.
Release hose clamps (1) and detach water hoses.
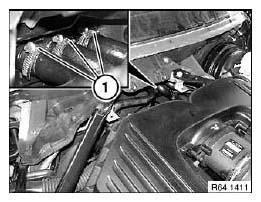
Fig. 4: Identifying Hose Clamps
Release nut (1) and nut (2) underneath.
Tightening torque.
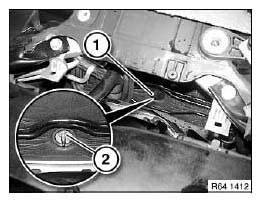
Fig. 5: Identifying Nut
Release screws (1) and remove windscreen air guide (2).
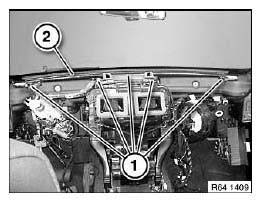
Fig. 6: Identifying Windscreen Air Guide With Screws
Release screw (1).
Tightening torque.
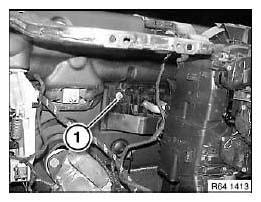
Fig. 7: Identifying Heater Screw
Release screw (1).
Tightening torque.
IMPORTANT: Cover vehicle interior with protective cover to prevent interior being fouled by escaping coolant.
Feed out heater (2).
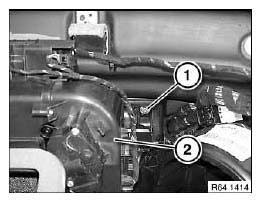
Fig. 8: Identifying Heater Screw
Replacement:
- Modify evaporator.
- Modify heater core.
- Modify expansion valve.
- Modify all servodrives.
Installation:
Water drain (1) must be inserted on both sides into outlet channel (2).
IMPORTANT: In the event of incorrect fitting, there is a risk of leakage in the passenger compartment!
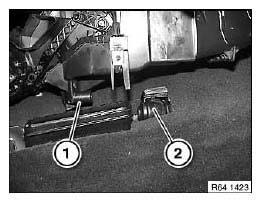
Fig. 9: Identifying Water Drain With Outlet Channel
After installation:
- Evacuate and fill A/C system.
- Fill and vent cooling system.
READ NEXT:
 Removing And Installing/Replacing Heater/Air Conditioner Fan
Necessary preliminary tasks:
Disconnect battery negative lead.
Remove lower trim from instrument panel.
Release screws (1).
Fig. 10: Identifying Heater/Air Conditioner Fan Screws
Release screws
Replacing Water Valve For Heater
WARNING: Scalding hazard!
Work on the cooling system may only be carried out when it has cooled
down.
Follow instructions for working on cooling system!
NOTE: Disconnect coolant hoses on water valve.
SEE MORE:
BMW Drive Recorder
Principle
The BMW Drive Recorder stores brief video recordings
of the vehicle surroundings, e.g., to
document surrounding traffic.
General information
There are various ways for storing video recordings:
Automatic storage of the recording.
The function allows the documentation of the
event of an
Replacing Exhaust Camshaft Pulse Generator (N52, N52K, N51, N53)
IMPORTANT: Read and comply with notes on protection against
electrostatic damage (ESD
protection).
Necessary preliminary tasks:
Read out fault memory of DME control unit; if necessary, work through
test schedules
If necessary, remove radiator cover
Unlock plug (1) and remove. Release bolt.
R
