
BMW X5: Removing And Installing/replacing A/C System Compressor (N62TU)
WARNING: Avoid contact with refrigerant and refrigerant oil.
Follow safety instructions for handling refrigerant R 134a.
Follow safety instructions for handling refrigerant oil.
IMPORTANT: Risk of damage Restart engine only when A/C system has been correctly filled.
Read and comply with notes on replacing compressor.
Follow instructions for opening and replacing parts in refrigerant circuit!
If A/C system is opened for more than 24 hours: Replacing drier insert for A/C system.
Necessary preliminary tasks:
- Drawing off, evacuating and filling the A/C system are not included in the time value given for this work operation.
- Remove A/C compressor drive belt.
- Remove front underbody protection.
- Remove steering gear cover at top right.
Release screws (1) and remove both refrigerant lines.
Tightening torque.
Replace sealing rings and moisten with refrigerant oil.
Disconnect plug connection (2).
Release screws (3).
Tightening torque.
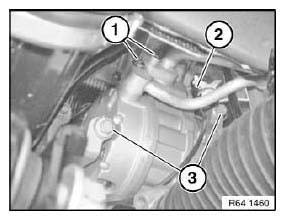
Fig. 100: Identifying Plug Connection With Screws
Release screw (1).
Tightening torque. Lower vehicle.
NOTE: Secure compressor (2) against falling out.
Release screw (1) from above and feed out compressor (2) in upward direction.
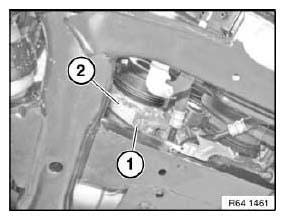
Fig. 101: Identifying Compressor
After installation:
- Evacuate and fill A/C system.
READ NEXT:
 Overview Of Heater/Air Conditioner Servomotors
Fig. 102: Identifying Heater/Air Conditioner Servomotors Components Location
Servomotor, defrosting
Servomotor, footwell, rear cabin, right
Servomotor, ventilation, front right
Servomotor, strat
Replacing Valve Insert For Refrigerant Line
WARNING: Avoid contact with refrigerant and refrigerant oil.
Follow safety instructions for handling refrigerant R 134a.
Follow safety instructions for handling refrigerant oil.
IMPORTANT: Risk of
SEE MORE:
Stabilizer Bar
REMOVING AND INSTALLING/REPLACING REAR STABILIZER
Necessary preliminary tasks:
Remove both stabilizer links from stabilizer.
Release screws (1).
Replacement only: Remove both rubber mounts from stabilizer.
Turn stabilizer (2) and remove sideways.
Installation:
Check both rubber mounts for damage
Removing And Installing Backrest Lock Adapter Plate
Necessary preliminary tasks:
Remove luggage compartment wheel arch trim on left or right.
Release screw.
Tightening torque 52 26 06AZ.
Remove adapter plate for backrest lock (1).
Fig. 144: Identifying Plate Backrest Lock
Version with 3rd seat row:
Unfasten screws.
Tightening torque 52 26 06AZ
