
BMW X5: Removing And Installing Or Replacing Expansion Valve
WARNING: Avoid contact with refrigerant and refrigerant oil.
Follow safety instructions for handling refrigerant R 134a.
Follow safety instructions for handling refrigerant oil.
IMPORTANT: Risk of damage! Restart engine only when A/C system has been correctly filled.
Follow instructions for opening and replacing parts in refrigerant circuit! If A/C system is opened for more than 24 hours: Replacing drier insert for A/C system
Necessary preliminary tasks:
- Remove double pipe.
- Drawing off, evacuating and filling the A/C system are not included in the time value given for this work operation.
Remove gasket (1).
Installation:
Observe direction arrows (2) without fail.
If necessary, replace damaged seal (1).
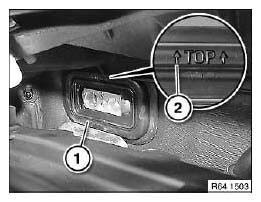
Fig. 88: Identifying Gasket Positions
Release screws (1) and carefully remove expansion valve (2).
Replace sealing rings and moisten with refrigerant oil.
Tightening torque.
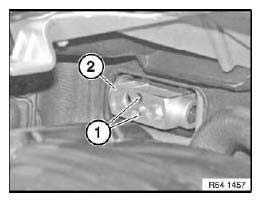
Fig. 89: Identifying Expansion Valve Screws
After installation:
- Evacuate and fill A/C system.
READ NEXT:
 Leak-Testing Evaporator
Special tools required:
64 5 104
64 5 108
Necessary preliminary tasks:
Remove expansion valve.
Replace sealing rings (1) and coat with refrigerant oil.
Fig. 90: Identifying Sealing Rings
Moun
Instructions For Opening And Replacing Parts In Refrigerant Circuit
WARNING:
Avoid contact with refrigerant and refrigerant oil.
Follow safety instructions for handling R 134a refrigerant.
Follow safety instructions for handling refrigerant oil.
CAUTION:
A
SEE MORE:
Starter With Mounting
REMOVING AND INSTALLING/REPLACING STARTER MOTOR (N62)
Necessary preliminary tasks:
Disconnect battery ground terminal.
Remove right exhaust manifold.
Release screws and nut on heat shield (1) (see arrows).
Remove heat shield (1).
Installation:
Tightening torque: 12 41 6AZ.
Fig. 61: Locating He
Manual Speed Limiter
Principle
The system can be used to set a speed limit, for
instance to prevent the vehicle from exceeding
speed limits.
General information
The system can limit the speed, starting at a
value of 20 mph/30 km/h. The vehicle can be
driven at any speed below the set speed limit.
Overview
Buttons on the
