
BMW X5: Interior Lights
OVERVIEW OF INTERIOR LIGHTS
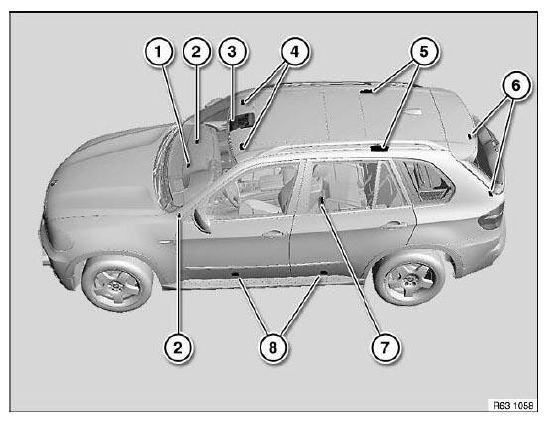
Fig. 33: Location Of Interior Lights
- Glovebox light
- Footwell light (footwell)
- Front ceiling light
- Mirror light
- Interior light
- Luggage compartment light
- Footwell light (on floor trim panel, rear)
- Footwell light (door)
REMOVING AND INSTALLING/REPLACING LEFT OR RIGHT INTERIOR LIGHT
Special tools required:
- 00 9 317.
IMPORTANT: Follow instructions for handling light bulbs (interior lights).
Lever out interior light (1) with special tool.
Disconnect plug connection underneath and remove interior light (1).
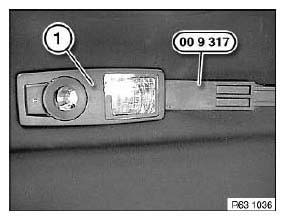
Fig. 34: Identifying Special Tool (00 9 317) On Interior Light
Replacement:
- If necessary, convert bulbs.
- Note bulb type.
REMOVING AND INSTALLING/REPLACING FOOTWELL LIGHT (DOOR)
IMPORTANT: Follow instructions for handling light bulbs (interior lights).
Lever footwell light (1) in direction of arrow out of door trim panel.
Disconnect associated plug connection and remove footwell light (1).
Replacement:
- If necessary, remove bulb.
- Note bulb type.

Fig. 35: Removing Footwell Door Light
REMOVING AND INSTALLING/REPLACING FOOTWELL LIGHT (FOOTWELL)
IMPORTANT: Follow instructions for handling light bulbs (interior lights).
Lever out footwell light (1) in direction of arrow.
Disconnect associated plug connection and remove footwell light (1).
Replacement:
- If necessary, remove bulb.
- Note bulb type.
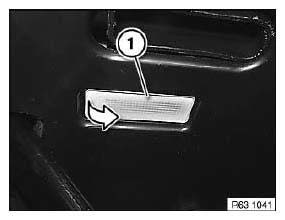
Fig. 36: Removing Footwell Light
REMOVING AND INSTALLING/REPLACING FOOTWELL LIGHT (ON FLOOR TRIM PANEL, REAR)
IMPORTANT: Follow instructions for handling light bulbs (interior lights).
Lever out footwell light (1) in direction of arrow.
Disconnect associated plug connection and remove footwell light (1).
Replacement:
- If necessary, remove bulb.
- Note bulb type.
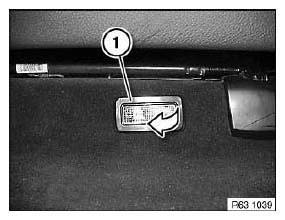
Fig. 37: Removing Footwell Light (On Floor Trim Panel, Rear)
REMOVING AND INSTALLING/REPLACING MIRROR LIGHT
Special tools required:
- 00 9 340.
IMPORTANT: Follow instructions for handling light bulbs (interior lights).
Lever out mirror light (1) with special tool 00 9 340. See DISASSEMBLY AID (2) in direction of arrow.
Disconnect plug connection underneath and remove mirror plate light (1).
Replacement:
- If necessary, remove bulb.
- Note bulb type.
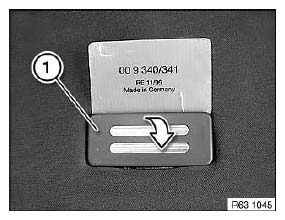
Fig. 38: Removing Mirror Plate Light
REMOVING AND INSTALLING/REPLACING LUGGAGE COMPARTMENT
IMPORTANT: Follow instructions for handling light bulbs (interior lights).
Lever out luggage compartment light (1) in direction of arrow.
Disconnect associated plug connection and remove luggage compartment light (1).
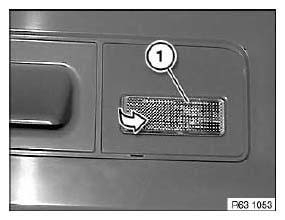
Fig. 39: Removing Luggage Compartment Light
Replacement:
- If necessary, convert bulbs.
- Note bulb type.
REMOVING AND INSTALLING/REPLACING GLOVEBOX LIGHT
IMPORTANT: Follow instructions for handling light bulbs (interior lights).
Open glovebox.
Lever out glovebox light (1) in direction of arrow.
Disconnect plug connection and remove glovebox light (1).
Replacement:
- If necessary, remove bulb.
- Note bulb type.
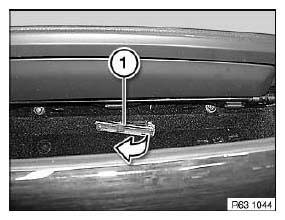
Fig. 40: Removing Glovebox Light
REPLACING LED FOR FRONT DOOR TRIM PANEL LIGHT
Necessary preliminary tasks:
- Remove front door trim panel.
Remove sheathing from wiring harness (1).
Disconnect cables.
Connect cables with butt connector and shrink-fit hoses.
Insulate wiring harness with insulating tape.
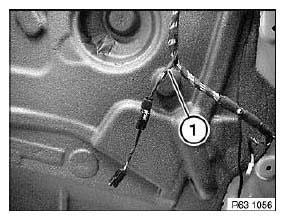
Fig. 41: Identifying Wiring Harness
REPLACING LED FOR FRONT INSIDE DOOR OPENER
Necessary preliminary tasks:
- Remove front door trim panel.
Disconnect plug connection (1).
Remove LED for inside door opener (2).
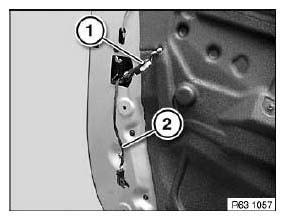
Fig. 42: Identifying Plug Connection With Door Opener
REPLACING LED FOR REAR DOOR TRIM PANEL LIGHT
Necessary preliminary tasks:
- Remove rear door trim panel.
Remove sheathing from wiring harness (1).
Disconnect cables.
Connect cables with butt connector and shrink-fit hoses.
Insulate wiring harness with insulating tape.
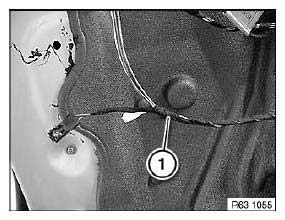
Fig. 43: Identifying Insulate Wiring Harness With Insulating Tape
REPLACING LED FOR REAR INSIDE DOOR OPENER
Necessary preliminary tasks:
- Remove rear door trim panel.
- Remove decorative strip from door trim panel at rear.
Disconnect plug connection.
Pull LED for inside door opener (1) out of decorative strip (2).
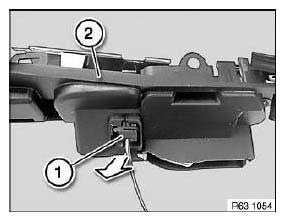
Fig. 44: Pulling LED For Inside Door Opener Out Of Decorative Strip
READ NEXT:
 Replacing Socket Housing For Left Or Right Rear Light
WARNING: Follow instructions for handling light bulbs (exterior
lights).
Rear light in side panel:
Remove flap in luggage compartment trim panel.
Turn socket housing and pull out of rear light.
NOTE:
Instructions For Handling Light Bulbs (Exterior Lights)
WARNING: Xenon headlights: Danger to life due to high voltage!
Work on the entire xenon lighting system (ignition unit, control unit and
lamp) may only be carried out by specialist personnel.
WARNING
SEE MORE:
Valvetrain
The valvetrain on the N52 introduced in 2006, used 5 mm valve stems on both
the intake and exhaust. To
increase durability, the exhaust valve stems were increased to 6 mm from 6/06
production.
All of the new NG6 engine have adopted the 6 mm valve stem for the exhaust, the
intake stem remains at
Instructions On Starting Aid
Do not start the engine with help of starting sprays.
Preparation:
Conform with the following when starting engine with starting cable.
Ensure that jump lead wires are to appropriate cross-section size.
Only use fuse-protected jump leads.
Check whether the current supplying battery has 12 V volt
