
BMW X5: License Plate Lights
BMW X5 (G05) 2019-2026 Service & Repair Manual / Lights / License Plate Lights
REMOVING AND INSTALLING/REPLACING LEFT OR RIGHT NUMBER/LICENSE PLATE LIGHT
Special tools required:
- 64 1 020.
WARNING: Follow instructions for handling light bulbs (exterior lights).
Lever license plate light (1) with special tool. See RELEASE HOOK out of rear bumper trim (2).
Unlock plug connection underneath and disconnect.
Remove license plate light (1).
Replacement:
- If necessary, remove bulb.
- Note bulb type.
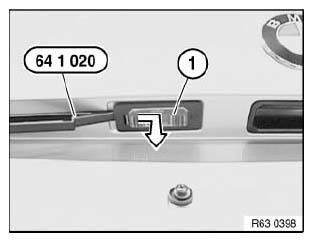
Fig. 32: Removing License Plate Light
READ NEXT:
 Interior Lights
OVERVIEW OF INTERIOR LIGHTS
Fig. 33: Location Of Interior Lights
Glovebox light
Footwell light (footwell)
Front ceiling light
Mirror light
Interior light
Luggage compartment light
Footwell li
Replacing Socket Housing For Left Or Right Rear Light
WARNING: Follow instructions for handling light bulbs (exterior
lights).
Rear light in side panel:
Remove flap in luggage compartment trim panel.
Turn socket housing and pull out of rear light.
NOTE:
SEE MORE:
Throttle And Operation
REMOVING AND INSTALLING/SEALING THROTTLE VALVE ASSEMBLY (N52 /
N52K / N51 / N53)
Read and comply with notes on protection against electrostatic damage (ESD
protection).
Necessary preliminary tasks:
Switch off ignition
Remove air intake hose.
Unlock plug (1) and remove.
Release screws.
Remove
Replacing Padding For Left Or Right Front Seat (Comfort)
WARNING: US/CDN front passenger seat (with OC3 mat) only:
The padding can only be removed in conjunction with the OC3 mat.
If padding is defective, both parts may only be replaced together. After fitting
new padding, enable OC3 mat with BMW diagnosis system.
The operation for removing the padding
© 2019-2026 Copyright www.bmwx5info.com
