
BMW X5: Cleaning Evaporator
Special tools required:
- 64 1 300
WARNING: When handling cleaning agent, observe following protection measures: Wear protective rubber gloves and protective goggles.
If cleaning agent comes into contact with eyes or skin, wash immediately with lots of water.
IMPORTANT: To avoid dirtying vehicle interior:
- Close all air vents
- Heater - A/C system must be switched to recirculated-air mode
- Cover carpet in work area
Recycling:
Carry out the cleaning operation in a suitable washing bay as the emerging cleaning agent escapes through the drain openings in the transmission tunnel.
After completing cleaning, allow car to drip-dry for approx. 5 minutes.
Necessary preliminary tasks:
- Remove rear underbody protection.
- Move steering column in "top" and "extended" position.
- Remove evaporator temperature sensor.
NOTE: Direction arrows on special tool 64 1 300 must point in direction of travel.
Insert guide lug (1) of special tool 64 1 300 into opening of evaporator temperature sensor.
Guide lug (1) must be firmly seated in opening of evaporator temperature sensor.
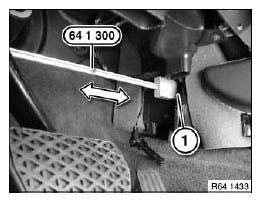
Fig. 81: Inserting Guide Lug
Connect special tool 64 1 300 to spray apparatus.
Move special tool 64 1 300 inwards.
Release clamping screw (2) and pull out guide wire (1) in order to position the folding spray element vertically.
Apply cleaning agent uniformly to evaporator by carefully moving special tool 64 1 300 back and forth.
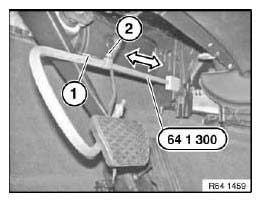
Fig. 82: Connecting Special Tool (64 1 300)
NOTE: For purposes of clarity, the cleaning procedure is shown on the removed heater/air conditioner.
Set up spray element (1) by pulling out guide wire and carefully move lance (2) back and forth.
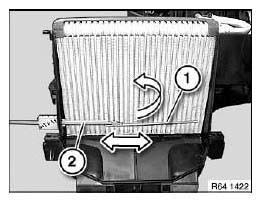
Fig. 83: Pulling Out Guide Wire
NOTE: Set heating - A/C system to footwell ventilation and fresh-air mode. Open windows/doors.
Start car and run heating - A/C system at max. fan power for approx. 5 minutes in order to dry evaporator.
In order to eliminate the last remnants of cleaning agent, repeat this procedure shortly before handing over to the customer.
READ NEXT:
 Replacing Evaporator
Necessary preliminary tasks:
Remove heater
Release screws (1).
Fig. 84: Identifying Screws
Release screws (1) and remove expansion valve (2).
Installation:
Ensure that seals are correctly seated.
Removing And Installing Or Replacing Expansion Valve
WARNING: Avoid contact with refrigerant and refrigerant oil.
Follow safety instructions for handling refrigerant R 134a.
Follow safety instructions for handling refrigerant oil.
IMPORTANT: Risk of d
Leak-Testing Evaporator
Special tools required:
64 5 104
64 5 108
Necessary preliminary tasks:
Remove expansion valve.
Replace sealing rings (1) and coat with refrigerant oil.
Fig. 90: Identifying Sealing Rings
Moun
SEE MORE:
Operation via touchscreen
General information
The Control Display is equipped with a touchscreen.
You can tap on menu items and widgets. Touch
the touchscreen with your fingers. Do not use
any objects.
Opening the main menu
Tap
on the icon.
The main menu is displayed.
Adjusting widgets
The widgets can be adjusted in the
General Information
The brake system is one of the most important safety systems on any motor
vehicle. It is therefore essential to
act with utmost care when working on the brake system and to follow the
instructions below.
General:
Ensure cleanliness and only use rags which do not lose lint.
Wash away or vacuum u
