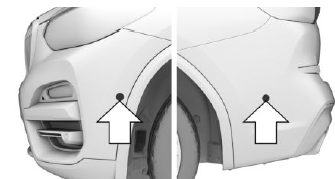
BMW X5: Ultrasound sensors
Ultrasound sensors in the front/ rear bumpers
 The ultrasound sensors of the
Park Distance Control PDC are located
in the bumpers.
Ultrasonic sensors, side

The ultrasound sensors of the Automatic Parking Assistant are located on the side of the vehicle.
System limits of the ultrasonic sensors
The detection of objects with ultrasonic measurements can run into physical limits, e.g., in the following situations:
- In case of dirty sensors.
- In case of covered sensors, such as due to labels.
- If the sensor is not aligned correctly, for instance due to parking damage.
- After improper paint work on the vehicle in the area of the sensors.
- For small children and animals.
- For persons with certain clothing, for instance jacket.
- In case of external interference of the ultrasound, for instance from passing vehicles, loud machines or other ultrasonic sources.
- Under certain weather conditions, e.g., high relative atmospheric humidity, wet conditions, snowfall, cold, extreme heat, or strong wind.
- With tow bars and trailer couplings of other vehicles.
- With thin or wedge-shaped objects.
- With moving objects.
- With elevated, protruding objects such as ledges.
- With objects with corners, edges, and smooth surfaces.
- With objects with a fine surface structure such as fences.
- For objects with porous surfaces.
- With small and low objects, for instance boxes.
- With soft obstacles or obstacles covered in foam material.
- With plants and bushes.
- In automatic car washes.
- On uneven surfaces, such as speed bumps.
- Due to heavy exhaust.
- Cargo that extends beyond the perimeter of the vehicle is not taken into account by the ultrasonic sensors.
- When the trailer hitch cover is not on straight.
If applicable, a Check Control message will be displayed when the system limits are reached.
READ NEXT:
 General information
Depending on the situation, the vehicle is in one
of the three states:
Idle state.
Standby state.
Drive-ready state.
Idle state
Principle
When the vehicle is in idle state, it is switched
off.
Ge
 Drive readiness
Principle
Turning on drive-ready state corresponds to
starting the engine.
General information
Some functions, such as DSC Dynamic Stability
Control, can only be used with drive-ready state
switched o
SEE MORE:
 Removing And Installing/Replacing Dynamic Drive Control Unit
IMPORTANT: Read and comply with notes on protection against
electrostatic damage (ESD
protection).
Necessary preliminary tasks:
Disconnect battery negative lead.
Remove side cover on instrument panel.
Disconnect plug connection (1).
Release screw (2).
Tightening torque 37 14 8AZ, see 37 14 E
 General driving notes
Closing the tailgate
Safety information
Warning
An open tailgate protrudes from the vehicle and
can endanger occupants and other road users
or damage the vehicle in the event of an accident,
braking or evasive maneuvers. In addition,
exhaust fumes may enter the vehicle interior.
There is a risk of
© 2019-2026 Copyright www.bmwx5info.com

