
BMW X5: Speaker And Cover
REMOVING AND INSTALLING/REPLACING SPEAKER (TWEETER, FRONT DOOR)
Necessary preliminary tasks:
- Remove front door trim.
- Detach cover on door window frame in front area.
NOTE: For purposes of clarity, illustration shows cover removed on door window frame.
Remove foam wedge (1) from cover on door window frame (2).
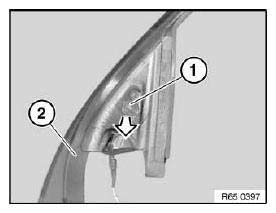
Fig. 12: Removing Foam Wedge From Cover
Unlock catches (1) and remove speaker (2) from cover on door window frame (3).
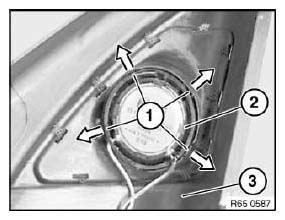
Fig. 13: Removing Speaker From Cover On Door
REMOVING AND INSTALLING/REPLACING FRONT SPEAKER CARRIER (INSTRUMENT PANEL)
Special tools required:
- 00 9 317
Unclip trim (1) with special tool 00 9 317 from catches.
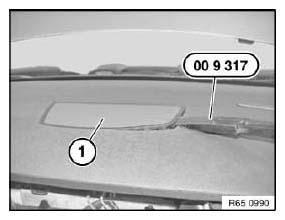
Fig. 14: Identifying Special Tool (00 9 317) On Trim
Disconnect plug connection (1).
Remove speaker carrier and disconnect associated plug connection.

Fig. 15: Identifying Plug Connection
Installation:
Retaining lugs (1) must not be damaged

Fig. 16: Identifying Retaining Lugs
Replacement:
Disconnect plug connection (1) and feed out speaker (2).
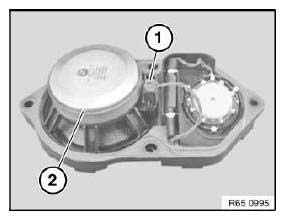
Fig. 17: Identifying Plug Connection And Speaker
REMOVING AND INSTALLING/REPLACING SPEAKER (MID-RANGE SPEAKER IN DOOR TRIM PANEL AT FRONT)
Necessary preliminary tasks:
- Remove front door trim.
Release screws (1) and mid-range speaker.
Tightening torque.
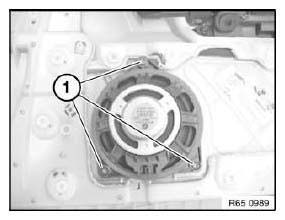
Fig. 18: Identifying Speaker Screws
REMOVING AND INSTALLING/REPLACING REAR TWEETER (IN DOOR TRIM PANEL)
Necessary preliminary tasks:
- Remove rear door trim panel.
Unclip speaker (1) from retaining lugs (2) and remove.
Disconnect associated plug connection.
Installation:
Retaining lugs (2) must not be damaged Make sure speaker (1) is securely seated.
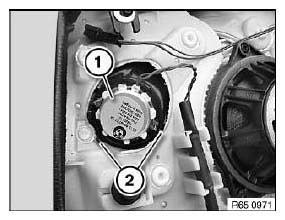
Fig. 19: Identifying Speaker And Retaining Lugs
REMOVING AND INSTALLING/REPLACING SPEAKER (MID-RANGE SPEAKER, DOOR AT REAR)
Necessary preliminary tasks:
- Remove rear door trim.
Disconnect plug connection (1) and release screws (2).
Tightening torque.
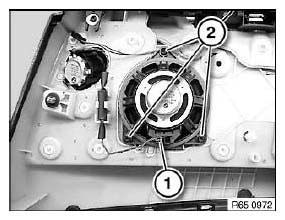
Fig. 20: Identifying Speaker And Screws
REMOVING AND INSTALLING/REPLACING SPEAKER (MID-RANGE SPEAKER IN D-PILLAR)
Necessary preliminary tasks:
- Remove rear speaker carrier.
Disconnect plug connection (1).
Release screws (2) and remove speaker (3).
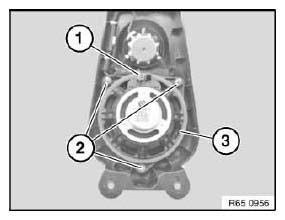
Fig. 21: Identifying Speaker And Screws
REMOVING AND INSTALLING/REPLACING SPEAKER CARRIER (D-PILLAR)
Necessary preliminary tasks:
- Remove panel for roof pillar at rear.
Release screw (1).

Fig. 22: Identifying Screw
Release screws (1).
Remove speaker carrier (2) and disconnect associated plug connection.
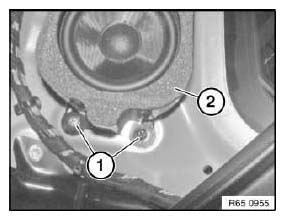
Fig. 23: Identifying Speaker Carrier
READ NEXT:
 Aerial-Antenna
REMOVING AND INSTALLING/REPLACING EMPTY HOUSING FOR ROOF-MOUNTED
AERIAL/ANTENNA
Special tools required:
65 2 010
WARNING: Danger of injury!
Special tool has sharp edges!
Adapt working height to veh
Replacing Trim For Central Information Display (CID)
Necessary preliminary tasks:
Remove Central Information Display.
Carefully release catches (1).
Installation:
Catches (1) must not be damaged.
Fig. 35: Identifying Catches
Carefully raise trim (2)
SEE MORE:
Springs With Suspension
MEASURING RIDE-LEVEL HEIGHT OF VEHICLE
Necessary preliminary tasks:
Move vehicle into normal position.
Determine actual ride height (A) - to do so, attach tape measure to rim
flange (2) at bottom middle and measure
to lower edge of wheel arch (1).
Fig. 123: Identifying Ride Height (A)
REMOVING
Oil Pump
REPLACING TORQUE CONVERTER SHAFT SEAL (GA6HP26Z)
Special tools required:
00 1 450
24 0 200
24 2 351
24 2 352
24 2 353
24 2 360
Necessary preliminary tasks:
Remove automatic transmission.
IMPORTANT: After completion of work, check transmission oil level.
Use only approved transmission oi
