
BMW X5: Stereo Radio, Amplifier
REMOVING AND INSTALLING/REPLACING LEFT OR RIGHT CENTRAL BASS SPEAKER
Necessary preliminary tasks:
- Remove front seat
- Lay floor carpet in working area to one side
Release screws (1) and remove trim (2).
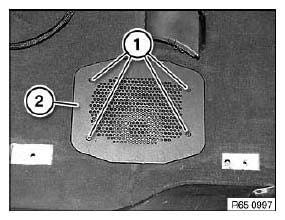
Fig. 5: Identifying Trim With Screws
Disconnect plug connection (1).
Release screws (2) and feed out central bass speaker.
Tightening torque.
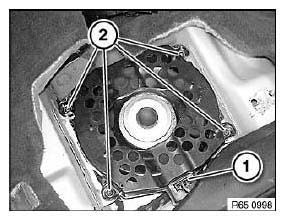
Fig. 6: Identifying Speaker Screws
REMOVING AND INSTALLING/REPLACING AMPLIFIER (HI-FI SYSTEM)
IMPORTANT: Read and comply with notes on protection against electrostatic damage (ESD protection).
NOTE: Comply with notes and instructions on handling optical waveguides.
Necessary preliminary tasks:
- Disconnect battery negative lead.
- Remove flap in luggage compartment panel on left.
Release screw (1).
Disconnect plug connection (2) and slide amplifier (3) in direction of arrow out of mounting.
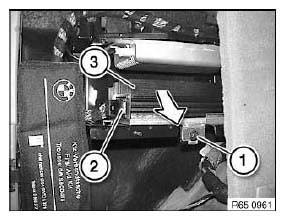
Fig. 7: Sliding Amplifier
Installation:
Lugs (1) must be correctly slid into guide (2).
Check that amplifier (3) is securely seated.
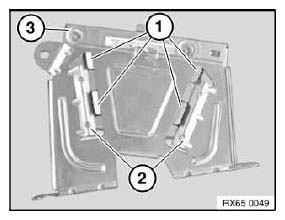
Fig. 8: Identifying Amplifier And Lugs With Guide
Replacement: Carry out programming/coding.
REMOVING AND INSTALLING/REPLACING AMPLIFIER (TOP HIFI SYSTEM)
IMPORTANT: Read and comply with notes on protection against electrostatic damage (ESD protection).
NOTE: Comply with notes and instructions on handling optical waveguides.
Necessary preliminary tasks:
- Disconnect battery negative lead.
- Remove flap in luggage compartment panel on left.
Disconnect plug connection (1).
Release screw (2) and slide amplifier (3) in direction of arrow out of mounting.
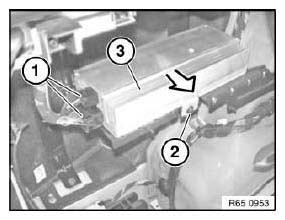
Fig. 9: Sliding Amplifier
Installation:
Lugs (1) must be correctly slid into guide (2).
Check that amplifier (3) is securely seated.

Fig. 10: Identifying Amplifier And Lugs With Guide
Replacement: Carry out programming/coding.
REMOVING AND INSTALLING/REPLACING DVD PLAYER IN REAR CONSOLE
Necessary preliminary tasks:
- Remove rear center console trim.
Release screws (1) on both sides.
Tightening torque.
Lift out mounting (2) on both sides over catch (3) and feed out DVD player (4).

Fig. 11: Identifying DVD Player Bracket
READ NEXT:
 Speaker And Cover
REMOVING AND INSTALLING/REPLACING SPEAKER (TWEETER, FRONT DOOR)
Necessary preliminary tasks:
Remove front door trim.
Detach cover on door window frame in front area.
NOTE: For purposes of clarity,
Aerial-Antenna
REMOVING AND INSTALLING/REPLACING EMPTY HOUSING FOR ROOF-MOUNTED
AERIAL/ANTENNA
Special tools required:
65 2 010
WARNING: Danger of injury!
Special tool has sharp edges!
Adapt working height to veh
SEE MORE:
Search for an upgrade
Standby must be turned on to search for a software
upgrade.
Automatic search
The vehicle regularly searches for updates in the
background.
Manual search
1. "CAR".
2. "Settings".
3. "General settings".
4. "Remote Software Upgrade".
5. "Search for upgrades".
6. Follow the instructions on the Cont
Information On Replacing Steering Gear After Accident Damage
Facts:
In the event of accidents or driving conditions similar to accidents,
shocklike loads can cause different types of
damage to steering gears. When a steering gear is externally undamaged, it is
sometimes only possible to
identify damage with great difficulty and with great effort. However, d
