
BMW X5: Headlights
REMOVING AND INSTALLING/REPLACING LEFT HEADLIGHT
Operation is described in:
Removing and installing/replacing left headlight (adaptive headlight).
REMOVING AND INSTALLING/REPLACING RIGHT HEADLIGHT
Operation is described in:
Removing and installing left headlight.
REMOVING AND INSTALLING OR REPLACING LEFT HEADLIGHT (XENON HEADLIGHT)
Operation is described in:
Removing and installing/replacing left headlight (adaptive headlight).
REMOVING AND INSTALLING RIGHT HEADLIGHT (XENON HEADLIGHT)
Operation is described in:
Removing and installing left headlight.
REMOVING AND INSTALLING OR REPLACING LEFT HEADLIGHT (ADAPTIVE HEADLIGHT)
WARNING: Follow instructions for handling light bulbs (exterior lights).
Necessary preliminary tasks:
- Remove front wheel arch cover front section.
N62 left side only:
- Release engine oil cooler.
Release bolts (1).
Disconnect plug connection (2).
Unclip wiring harness (3).
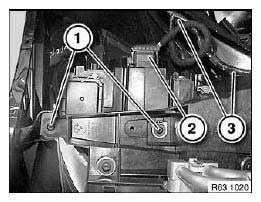
Fig. 4: Identifying Plug Connection, Wiring Harness And Bolts
Release bolts (1).
Press side panel (2) outwards slightly and feed out headlight towards rear.
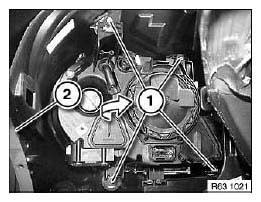
Fig. 5: Pressing Side Panel
Installation:
- Adjust. See PUNCH NUMBERS/LETTERS/SPECIAL CHARACTERS headlight to body by way of knurled screws (1)
- If necessary, remove headlight to improve access to knurled screws (1)
- Adjust headlight.
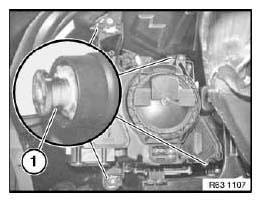
Fig. 6: Identifying Knurled Screws
Replacement:
- Remove ignition unit with bulb for xenon headlight.
- Remove control unit for xenon headlights.
- Remove drive unit for adaptive headlight.
- If necessary, remove bulbs.
REMOVING AND INSTALLING/REPLACING RIGHT HEADLIGHT (ADAPTIVE HEADLIGHT)
Operation is described in:
Removing and installing left headlight.
REPLACING DRIVE/ELECTRONICS BOX FOR RIGHT ADAPTIVE HEADLIGHT
Operation is described in:
Replacing drive/electronics box for left adaptive headlight.
REPLACING CONTROL UNIT FOR LEFT XENON HEADLIGHT
WARNING: Version with xenon headlights: Danger to life due to high voltage! Therefore, before removing, disconnect all components from the power supply (lighting system and ignition off).
Work on the entire xenon lighting system (control unit, ignition unit with bulb) may only be carried out by specialist personnel.
Necessary preliminary tasks:
Remove left headlight.
Release screws (1).
Lift control unit (2) off headlight.
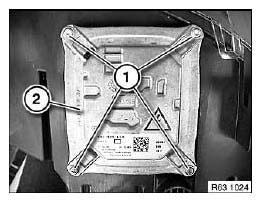
Fig. 7: Identifying Headlight Control Unit
Disconnect plug connection (1).
Remove control unit (2).
Installation:
Make sure sealing sleeve (3) is correctly seated.
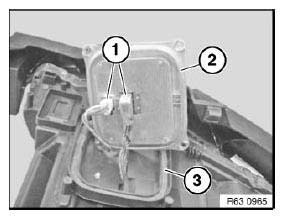
Fig. 8: Identifying Plug Connection, Control Unit With Sealing Sleeve
REPLACING CONTROL UNIT FOR RIGHT XENON HEADLIGHT
Operation is described in:
Replacing control unit for left xenon headlight.
REPLACING IGNITION UNIT FOR LEFT XENON HEADLIGHT (WITH XENON BULB)
WARNING: Version with xenon headlights: Danger to life due to high voltage! Therefore, before removing, disconnect all components from the power supply (lighting system and ignition off).
Work on the entire xenon lighting system (control unit, ignition unit with bulb) may only be carried out by specialist personnel.
Unlock retaining tab (1) and remove cover (2) from headlight.
Installation:
Make sure cover (2) is correctly seated on headlight.
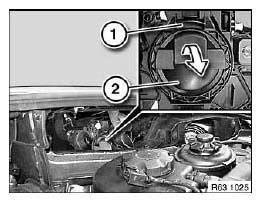
Fig. 9: Removing Cover From Headlight
Disconnect plug connection (1).
Unlock spring wire clips (2).
Remove ignition unit for xenon headlight (3) from headlight.
Installation:
Make sure ignition unit (3) is exactly seated in headlight.
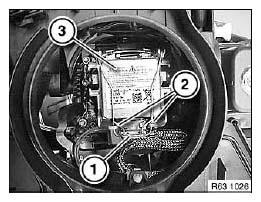
Fig. 10: Identifying Plug Connection And Wire Clips With Ignition Unit
REPLACING RIGHT IGNITION UNIT FOR RIGHT XENON HEADLIGHT
Operation is described in:
Replacing ignition unit for left xenon headlight.
REPLACING DRIVE/ELECTRONICS BOX FOR LEFT ADAPTIVE HEADLIGHT
IMPORTANT: Read and comply with notes on protection against electrostatic damage (ESD protection).
WARNING: Version with xenon headlights: Danger to life due to high voltage! Therefore disconnect all components from voltage supply before removal.
Work on the entire xenon lighting system (ignition unit, control unit and lamp) may only be carried out by specialist personnel.
Necessary preliminary tasks:
- Remove wheel arch cover front section at front.
Release screws (1).
Remove drive for adaptive headlight (2) from headlight.
Installation:
Fit drive for adaptive headlight (2) exactly on headlight.
Make sure pin housing (2) is correctly seated in plug housing (3).
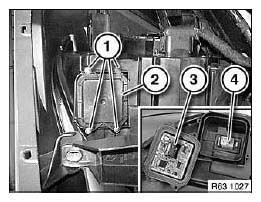
Fig. 11: Identifying Pin Housing, Plug Housing And Adaptive Headlight
Carry out coding/programming.
REMOVING AND INSTALLING/REPLACING RIGHT FRONT FOG LAMP
Operation is described in:
Removing and installing left front fog lamp.
REPLACING BULB FOR LEFT (OR RIGHT) PARKING LIGHT (XENON HEADLIGHT)
WARNING: Follow instructions for handling light bulbs (exterior lights).
Turn cover (1) in direction of arrow and remove from headlight.
Installation:
Make sure cover (1) is correctly seated on headlight.
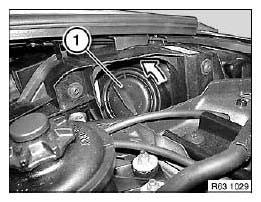
Fig. 12: Turning Cover
Disconnect plug connection (1).
Turn bulb (2) in direction of arrow and remove from headlight.
Installation:
- Make sure bulb (1) is exactly seated in headlight.
- Note bulb type.
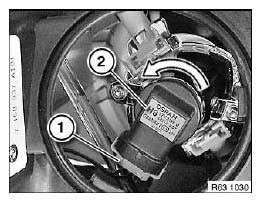
Fig. 13: Turning Bulb
REMOVING AND INSTALLING/REPLACING RIGHT HEADLIGHT VERTICAL AIM ADJUSTER
Operation is described in Removing and installing/replacing left headlight vertical aim adjuster.
READ NEXT:
 Turn Signal Indicator
REMOVING AND INSTALLING/REPLACING FRONT LEFT OR RIGHT AUXILIARY
DIRECTION INDICATOR
Special tools required:
00 9 340.
WARNING: Follow instructions for handling light bulbs (exterior
lights).
Fold
Clearance And Side
REMOVING AND INSTALLING/REPLACING FRONT LEFT OR RIGHT SIDE MARKER
Special tools required:
00 9 323.
Necessary preliminary tasks:
Remove front wheel arch cover front section.
NOTE: Minimum object
Fog Lights, Auxiliary
REMOVING AND INSTALLING/REPLACING LEFT FRONT FOG LAMP
Necessary preliminary tasks:
Remove left grille in bumper trim.
Grasp grille through opening.
Disconnect plug connection (1).
Release screws
SEE MORE:
Opening Adhesive Bonds
1. Opening spot-weld bonds
Set punch mark in center of weld spot. Set 8 mm dia. weld spot drill bit
on punch mark and drill
through top metal sheet.
Or open weld spot with Vario Drill spot welding cutter (refer to WORKSHOP
EQUIPMENT &
PLANNING CD, Chapter 7).
NOTE: Because the weld spo
Search for an upgrade
Standby must be turned on to search for a software
upgrade.
Automatic search
The vehicle regularly searches for updates in the
background.
Manual search
1. "CAR".
2. "Settings".
3. "General settings".
4. "Remote Software Upgrade".
5. "Search for upgrades".
6. Follow the instructions on the Cont
