
BMW X5: Exhaust System, Complete
REMOVING AND INSTALLING COMPLETE EXHAUST SYSTEM (N52K)
Special tools required:
- 31 2 220 31 2 220 SUPPORT PLATE
WARNING: Scalding hazard! Only perform this work after engine has cooled down.
Danger of injury! Removal of the exhaust system must be carried out with the assistance of a second person.
Support exhaust system with special tool 31 2 22 31 2 220 SUPPORT PLATE.

Fig. 1: Identifying Special Tool (31 2 220)
NOTE: Texts refer to and illustrations show the left side. The procedure is identical for the right side.
Unfasten screw connection.
Slacken ball band clamp (1) from exhaust pipe.
Installation:
- Replace ball band clamps.
- Apply a thin coating of copper past to contact surface between ball and socket.
- When tightening down ball band clamps, press exhaust system against both manifold flanges in order to achieve gap-free installation.
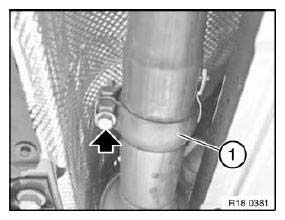
Fig. 2: Locating Screw
- Install ball band clamp at right angles to exhaust pipe.
- Tightening torque 18 31 1AZ.
Release screws and remove holder (1).
Tightening torque 18 20 1AZ.
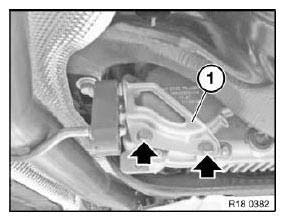
Fig. 3: Locating Screws
Release screws and remove holder (1).
Tightening torque 18 20 1AZ.
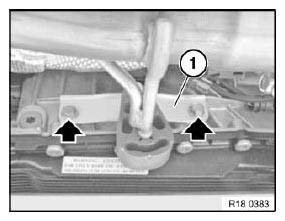
Fig. 4: Identifying Holder
Release screws and remove holder (1).
Tightening torque 18 20 2AZ.
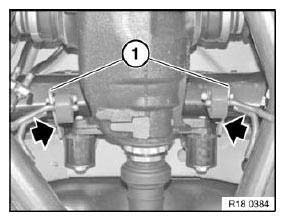
Fig. 5: Locating Screws
Release screws and remove holder (1).
Tightening torque 18 20 3AZ.
NOTE: Texts refer to and illustrations show the left side. The procedure is identical for the right side.
Lower and remove exhaust system with assistance of a second person.
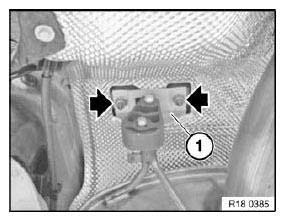
Fig. 6: Locating Screws
Installation:
Align both tail pipes (1) of rear muffler in each case centrally to openings in rear apron.
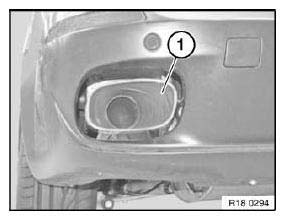
Fig. 7: Identifying Tail Pipes
Installation:
Check rubber mount for damage, replace if necessary.
Check exhaust system for leaks.
REPLACING EXHAUST PIPE WITH CATALYTIC CONVERTER, CYL. 1-3 (N52K)
Special tools required:
- 00 2 210
WARNING: Scalding hazard! These tasks should only be carried out on an exhaust system that has cooled down.
NOTE: If the cutting line is not marked by a punch mark in the pipe, determine the cutting line by means of the pipe length on the new exhaust pipe with catalytic converter (2). Carry over cutting line to faulty exhaust pipe with catalytic converter (2) and mark out.
Cut exhaust pipe at marked point with special tool 00 2 210 and deburr.
Release bolt and remove bracket (1). Tightening torque 18 20 1AZ.
Support exhaust system.
Release nuts and remove exhaust pipe.
Installation:
- Replace self-locking nuts.
- Replace seals.
- Tightening torque 18 31 2AZ.
Installation:
Connect exhaust pipe to centre muffler by means of clamp and align.
Centre clamp and tighten down.
Tightening torque 18 20 5AZ.
Installation:
Check rubber mount for damage, replace if necessary.
Check exhaust system for leaks.
REPLACING EXHAUST PIPE WITH CATALYTIC CONVERTER, CYL. 4-6 (N52K)
Special tools required:
- 00 2 210
WARNING: Scalding hazard! These tasks should only be carried out on an exhaust system that has cooled down.
NOTE: If the cutting line is not marked by a punch mark in the pipe, determine the cutting line by means of the pipe length on the new exhaust pipe with catalytic converter (1). Carry over cutting line to faulty exhaust pipe with catalytic converter (1) and mark out.
Cut exhaust pipe at marked point with special tool 00 2 210 and deburr.
Release nuts and remove exhaust pipe.
Release nuts and remove exhaust pipe.
Installation:
- Replace self-locking nuts.
- Replace seals.
- Tightening torque 18 31 2AZ.
Installation:
Connect exhaust pipe to centre muffler by means of clamp and align.
Centre clamp and tighten down.
Tightening torque 18 20 5AZ.
Installation:
Check exhaust system for leaks.
READ NEXT:
 Mufflers, Petrol
REPLACING REAR MUFFLER (N52K)
Special tools required:
00 2 210
31 2 220
WARNING: Scalding hazard!
Only perform these tasks after exhaust system has cooled down.
Support exhaust system with speci
Exhaust Manifold
REMOVING AND INSTALLING/REPLACING FRONT EXHAUST MANIFOLD (N52K)
Necessary preliminary tasks:
Remove rear exhaust manifold.
NOTE: The oxygen sensors are in danger of being damaged when the
exhaust
SEE MORE:
Replacing Socket Housing For Left Or Right Rear Light
WARNING: Follow instructions for handling light bulbs (exterior
lights).
Rear light in side panel:
Remove flap in luggage compartment trim panel.
Turn socket housing and pull out of rear light.
NOTE:
Bulb, adaptive brake light
Bulb, reversing light
Bulb, brake light
Bulb, turn indicator light
Installing Fan Connector For Retrofitting/Repairs
Special tools required:
61 9 040
61 9 041
61 9 042
NOTE: The repair range IV for vehicle electrical system contained the
required special
tools and individual parts for retrofitting and repair work with the aid of fan
connectors.
The case can no longer be ordered. Order individual parts for w
