
BMW X5: Exhaust Manifold
REMOVING AND INSTALLING/REPLACING FRONT EXHAUST MANIFOLD (N52K)
Necessary preliminary tasks:
- Remove rear exhaust manifold.
NOTE: The oxygen sensors are in danger of being damaged when the exhaust manifolds are removed and installed.
Remove control sensor from cylinders 1 to 3.
Remove monitor sensor from cylinders 1 to 3.
Unscrew nuts.
Remove exhaust manifold (1).
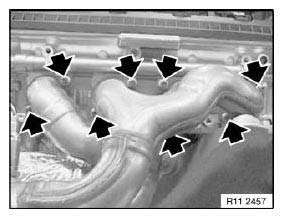
Fig. 15: Locating Nuts
Installation:
Clean sealing faces and replace seals.
Replace nuts.
Tightening torque, 18 40 1AZ.
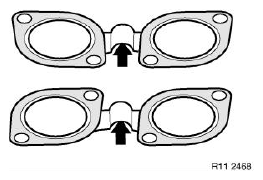
Fig. 16: Locating Seal Beads
REMOVING AND INSTALLING/REPLACING REAR EXHAUST MANIFOLD (N52K)
Necessary preliminary tasks:
- Remove front underbody protection
- Remove rear underbody protection
- Remove steering gear cover at top right
- Remove complete exhaust system
NOTE: The oxygen sensors are in danger of being damaged when the exhaust manifolds are removed and installed.
Remove control sensor from cylinders 4 to 6.
Remove monitor sensor from cylinders 4 to 6.
Unscrew nuts.
Remove exhaust manifold (1).
Installation:
Clean sealing faces and replace seals.
Replace nuts.
Tightening torque 18 40 1AZ.
READ NEXT:
 Exhaust System, Complete
REMOVING AND INSTALLING COMPLETE EXHAUST SYSTEM (N62TU)
Special tools required:
31 2 220
WARNING: Scalding hazard!
Only perform this work after engine has cooled down.
Danger of injury!
Removal of
Mufflers
REPLACING REAR MUFFLER (N62TU)
Special tools required:
00 2 210
31 2 220
WARNING: Scalding hazard!
Only perform these tasks after exhaust system has cooled down.
Support exhaust system with specia
SEE MORE:
Nozzles And Outlets
REMOVING AND INSTALLING/REPLACING LEFT OR RIGHT B-PILLAR AIR VENT
Necessary preliminary tasks:
Remove B-pillar trim.
Unclip retaining clip (1) and feed out air vent (2) in upward direction.
Installation:
Replace damaged retaining clips (1).
Fig. 61: Identifying Air Vent Upward Positions
REMOVIN
Replacing Front Axle Carrier
WARNING: Danger to life!
Mount securing fixture for vehicle on lifting platform to prevent the
vehicle from slipping off or tilting down.
Secure engine in installation position to prevent it from falling down.
Necessary preliminary tasks:
Lower front axle support.
Remove both lower control arms
