
BMW X5: Checking/Topping Up Fluid Level In Automatic Transmission (GA6HP26Z)
IMPORTANT: Use only the approved transmission fluid.
Failure to comply with this requirement will result in serious damage to the automatic transmission!
Installation:
Tighten down filler plug using
1. Hexagon wrench 8 A/F.
2. Torque wrench.
3. Socket 8 A/F.
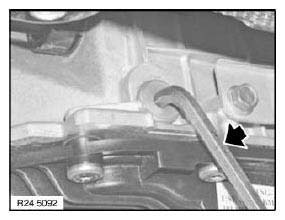
Fig. 1: Hexagon Wrench 8 A/F
Topping up transmission fluid after a repair:
Stand vehicle on a level surface and secure against rolling off.
Undo filler plug (1).
Installation:
Replace sealing ring.
Top up transmission fluid until it emerges from filling orifice.
Start engine.
Replenish transmission fluid until it emerges from filling orifice.
Screw in filler plug (1).
Tightening torque.
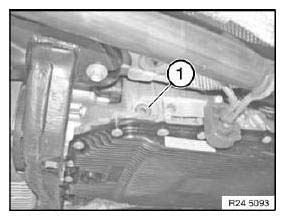
Fig. 2: Identifying Filler Plug
Press brake pedal to floor and shift through all gears several times at idle speed. Then shift to "P" position (Park).
Then check fluid level.
Checking fluid level:
- Call up Service functions (Drive) in BMW diagnosis system
- Carry out fluid level check in accordance with instructions
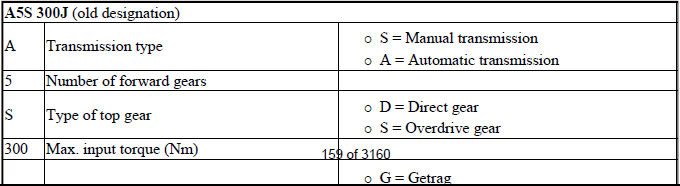
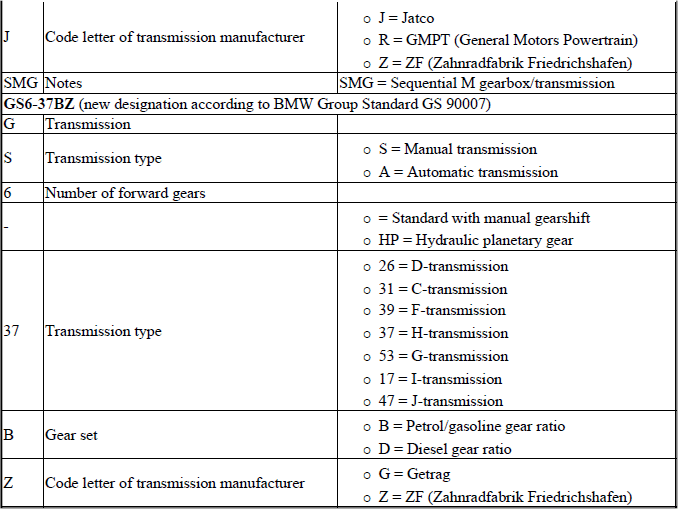
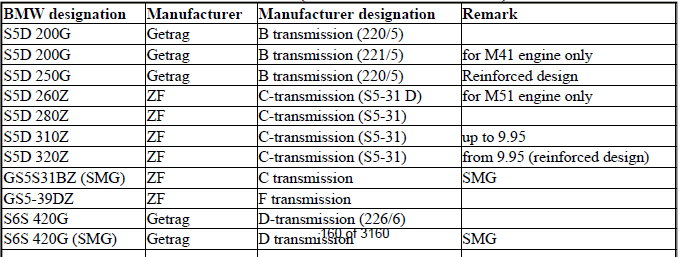
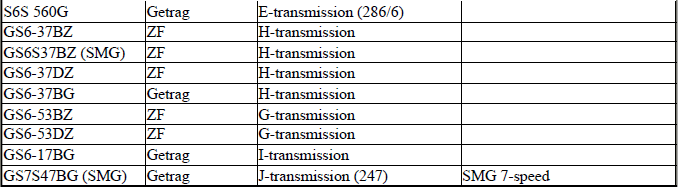
TRANSMISSION DESIGNATIONS
Breakdown of BMW designation:
BREAKDOWN OF BMW DESIGNATION
Manual transmission:
BREAKDOWN OF BMW DESIGNATION (MANUAL TRANSMISSION)
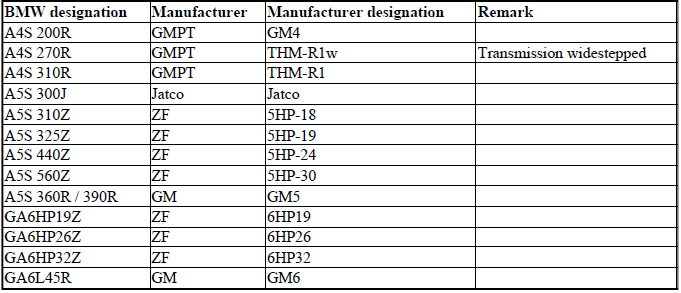
Automatic transmission:
BREAKDOWN OF BMW DESIGNATION (AUTOMATIC TRANSMISSION)
READ NEXT:
 Universal Transmission Bracket
Special tools required:
00 2 030
23 0 132
23 4 050
NOTE:
The universal transmission bracket is introduced for the E60 AWD
Suitable for manual and automatic transmissions
IMPORTANT: Front and
Removing And Installing Automatic Transmission (GA6HP26Z) N62TU
Special tools required:
00 2 030
23 0 132
23 4 050
24 1 110
24 2 390
24 4 160
23 4 161
24 4 165
IMPORTANT: After completion of work, check transmission oil level.
Use only the approved tra
Installing Replacement Transmission (GA6HP26Z)
Drain automatic transmission fluid at oil drain plug.
Tightening torque.
IMPORTANT: After completion of work, program transmission control unit.
Recycling:
Catch and dispose of escaping transmission
SEE MORE:
Exhaust System, Complete
REMOVING AND INSTALLING COMPLETE EXHAUST SYSTEM (N52K)
Special tools required:
31 2 220 31 2 220 SUPPORT PLATE
WARNING: Scalding hazard!
Only perform this work after engine has cooled down.
Danger of injury!
Removal of the exhaust system must be carried out with the assistance of a
second person
With Parking Assistant:
Reversing Assistant
Principle
The Back-up Assistant supports the driver when
driving in reverse, for instance when driving out
of tight or confusing parking or street situations.
The vehicle stores the driving movements of the
last route. This stored route can be driven back
with automated steering.
General informatio
