
BMW X5: Overview Of Airbag Modules, Airbag Control Unit, Belt Tensioners
BMW X5 (G05) 2019-2026 Service & Repair Manual / Audio, Navigation And Anti-Theft / Airbag Trigger Device / Overview Of Airbag Modules, Airbag Control Unit, Belt Tensioners

Fig. 64: Location Of Airbag Modules
- Safety battery terminal
- Side airbag, front seat, left/right
- Belt tensioner, front left/right
- Airbag unit, passenger side
- Airbag module, drivers side
- Head airbag, left/right
On-board Computer
REMOVING AND INSTALLING/REPLACING OUTSIDE TEMPERATURE SENSOR
Necessary preliminary tasks:
- Remove front bumper trim.
Disconnect plug connection (1).
Press out outside temperature sensor (2) in direction of arrow and remove.
Installation:
Outside temperature sensor must audibly snap into place.
Check for secure seating after fitting.
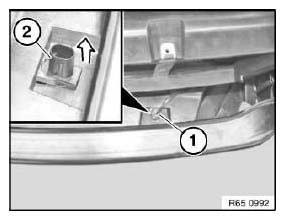
Fig. 65: Removing Temperature Sensor
READ NEXT:
 Removing And Installing/Replacing Car Communication Computer
IMPORTANT: Read and comply with notes on protection against
electrostatic damage (ESD
protection).
NOTE: Comply with notes and instructions on handling optical
waveguides.
Necessary preliminary task
Removing And Installing/Replacing Front Trim For Car Communication
Computer (Holder)
Special tools required:
12 7 192
IMPORTANT: Read and comply with notes on protection against
electrostatic damage (ESD
protection)!
Risk of damage!
Place Car Communication Computer on special too
SEE MORE:
Navigation Systems
NOTES ON HANDLING NAVIGATION COMPUTERS
All model series:
CAUTION: Risk of damage!
The navigation computer must not be disconnected from the power supply
while the LED on the computer remains lit (the LED goes out after approx.
1 minute).
NOTE: To ensure full operation of all the communications comp
Removing And Installing/Replacing Fluid Reservoir For Power Steering
Special tools required:
32 1 260
WARNING: Danger of poisoning if oil is ingested/absorbed through the
skin!
Risk of injury if oil comes into contact with eyes and skin!
IMPORTANT: Adhere to the utmost cleanliness. Do not allow any dirt to enter the
hydraulic
system.
Seal off hydraulic lines wi
© 2019-2026 Copyright www.bmwx5info.com
