
BMW X5: Replacing Sealing Sleeve For Transmission Housing (GA6HP26Z)
Special tools required:
- 24 2 390
IMPORTANT: After completion of work, check transmission oil level. Use only approved transmission fluid. Failure to comply with this requirement will result in serious damage to the automatic transmission!
Necessary preliminary tasks:
- Remove underbody protection.
- Remove transmission oil sump.
IMPORTANT: Support transmission with workshop hoist.
Unlock and disconnect plug (1) by turning.

Fig. 55: Identifying Plug
Insert special tool 24 2 390 in sealing sleeve (1).
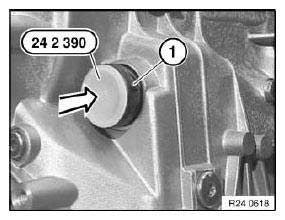
Fig. 56: Identifying Special Tool (24 2 390)
Unlock sealing sleeve with slide (1).
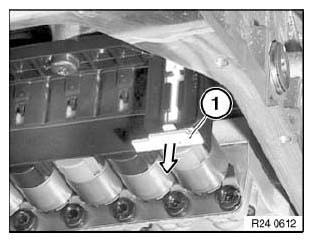
Fig. 57: Identifying Sealing Sleeve With Slide
NOTE: Note position of sealing sleeve.
Pull out sealing sleeve (1).
Installation:
Screw in sealing sleeve partially (lug in upper area). Turn until lug engages in groove of transmission. Slide in sealing sleeve.
Lug on sealing sleeve must not be damaged!
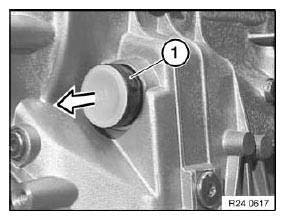
Fig. 58: Identifying Sealing Sleeve
REPLACING MECHATRONICS (GA6HP26Z/6HP32Z)
Special tools required:
- 24 2 390
NOTE: After completing work:
- Load specific data version with DIS.
IMPORTANT: After completion of work, check transmission oil level. Use only approved transmission fluid. Failure to comply with this requirement will result in serious damage to the automatic transmission!
IMPORTANT: Read and comply with notes on protection against electrostatic damage (ESD protection).
Necessary preliminary tasks:
E60/E61/E63/E64, E70 N62 only:
- Remove exhaust system at manifold and lower.
- Release crossmember from exhaust system on transmission.
- Remove left and right heat shields.
- Remove transmission crossmember.
Secure lever (1) with a cable tie (2) or wire in vertical position.
NOTE: Illustration shows E65.
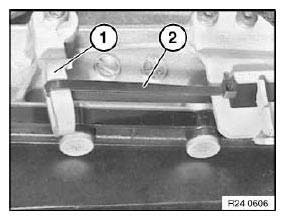
Fig. 59: Identifying Lever And Cable Tie
IMPORTANT: Mechatronics can be destroyed by static discharges. Therefore the contacts inside the plug must not be touched. Insert special tool immediately after work step.
Unscrew plug (1) and disconnect.
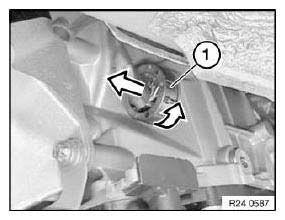
Fig. 60: Identifying Plug
Insert special tool 24 2 390 in sealing sleeve (1).
Remove transmission oil sump.

Fig. 61: Identifying Special Tool (24 2 390)
Unlock sealing sleeve with slide (1).
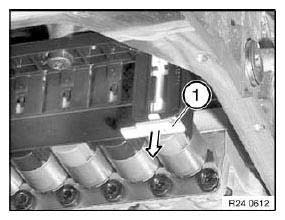
Fig. 62: Identifying Sealing Sleeve With Slide
Note position of sealing sleeve.
Pull out sealing sleeve (1).
Installation:
Screw in sealing sleeve partially (lug in upper area). Turn until lug engages in groove of transmission. Slide in sealing sleeve.
Lug on sealing sleeve must not be damaged!

Fig. 63: Identifying Sealing Sleeve
Release all screws (1 and 2).
- 1 = M6 x 58 mm
- 2 = M6 x 20 mm
Remove mechatronics.

Fig. 64: Identifying Screws
IMPORTANT: E65/66 only: Mechatronics without protective bar for solenoid valve must not be reused after removal.
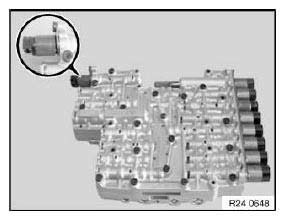
Fig. 65: Identifying Protective Bar And Solenoid Valve
IMPORTANT: E65/66 only: Fit/reuse only mechatronics with protective bar (1) for solenoid valve.
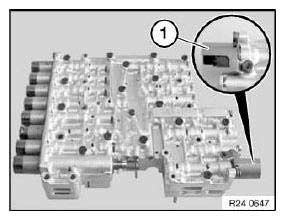
Fig. 66: Identifying Protective Bar
Installation:
Check gaskets (1 and 2) for damage, replace gaskets if necessary.
Coat new seals with automatic transmission fluid and install.
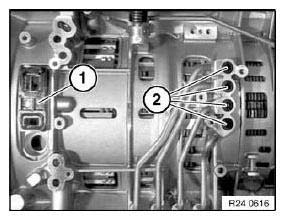
Fig. 67: Identifying Gaskets
Installation:
Insert screws (3) alternately until contact is made with each screw head.
Insert all further screws contact is made with each screw head.
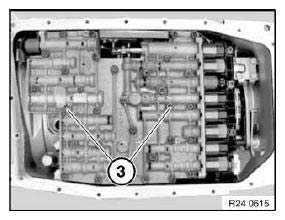
Fig. 68: Identifying Screws
IMPORTANT: Tighten down screws in order 1...10.
Failure to comply with this requirement will result in serious damage to the automatic transmission! Tightening torque.
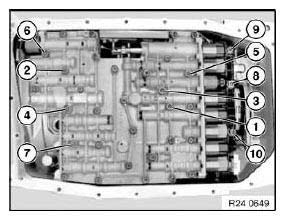
Fig. 69: Identifying Screws Tightening Sequence
READ NEXT:
 Torque Converter
REMOVING AND INSTALLING/REPLACING TORQUE CONVERTER (GA6HP26Z)
Special tools required:
00 2 550
24 4 000
IMPORTANT: After completion of work, check transmission fluid
level. Use only approved tran
SEE MORE:
Headlights
REMOVING AND INSTALLING/REPLACING LEFT HEADLIGHT
Operation is described in:
Removing and installing/replacing left headlight (adaptive headlight).
REMOVING AND INSTALLING/REPLACING RIGHT HEADLIGHT
Operation is described in:
Removing and installing left headlight.
REMOVING AND INSTALLING OR REPLACING
Replacing Left Support Carrier
Read contents of Body, General.
Remove or cover those vehicle components in the repair area which are
susceptible to heat or dust.
Use only approved spot-welding apparatus for repairs.
Place vehicle on straightening bench.
Following new body parts are required:
Support carrier, wheel arch, fro
