
BMW X5: Removing And Installing/Replacing Front Trim For Car Communication Computer (Holder)
Special tools required:
- 12 7 192
IMPORTANT: Read and comply with notes on protection against electrostatic damage (ESD protection)!
Risk of damage! Place Car Communication Computer on special tool 12 7 192 (antistatic mat) and earth/ground.
Necessary preliminary tasks:
- Remove front trim for Car Communication Computer.
Release screws (1) and remove holder (2).
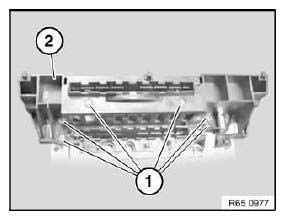
Fig. 71: Identifying Holder And Screws
Installation:
Retaining pin (1) must be adapted to fit in guide hole (2).
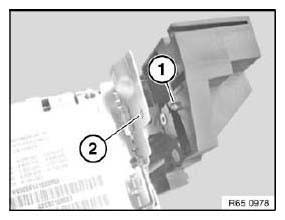
Fig. 72: Identifying Retaining Pin And Guide Hole
Installation:
Guide tabs (1) must be correctly inserted in front trim holder.
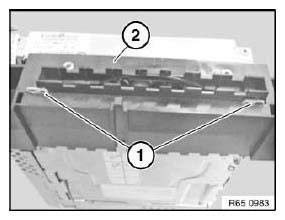
Fig. 73: Identifying Guide Tabs
REMOVING AND INSTALLING/REPLACING CD DRIVE FOR CAR COMMUNICATION COMPUTER
Special tools required:
- 12 7 192
IMPORTANT: Read and comply with notes on protection against electrostatic damage (ESD protection)!
Risk of damage! Place Car Communication Computer on special tool 12 7 192 (antistatic mat) and earth/ground.
Necessary preliminary tasks:
- Remove front trim holder for Car Communication Computer.
Release screws (1), remove CD drive and place to one side.
Installation:
Ensure correct routing of cables.
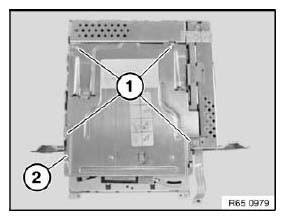
Fig. 74: Identifying CD Drive
Replacement:
Release screws (1) and remove cover (2) from CD drive.
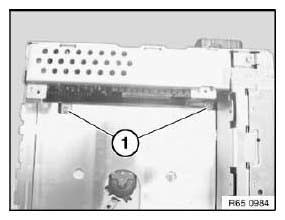
Fig. 75: Identifying Cover From CD Drive
Cut through warranty seal (1) at marked point.
Release screw (2).
Lift side cover out of mounting (3) and carefully place to one side.
Installation:
Replace warranty seal with supplied seal.
Warranty will be invalidated if seal is damaged!
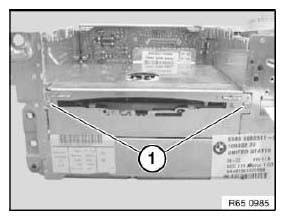
Fig. 76: Identifying Warranty Seal And Side Cover
Disconnect plug connection (1) and remove CD drive.
Installation:
Ensure correct routing of cables.
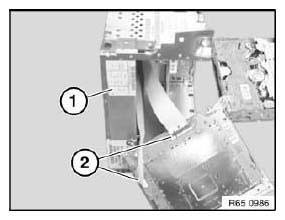
Fig. 77: Identifying Plug Connection
READ NEXT:
 Removing And Installing/Replacing DVD Drive For Car Communication
Computer (CCC)
Removing And Installing/Replacing DVD Drive For Car Communication
Computer (CCC)
Special tools required:
12 7 192
IMPORTANT: Read and comply with notes on protection against
electrostatic damage (ESD
protection)!
Risk of damage!
Place Car Communication Computer on special tool
Navigation Systems
NOTES ON HANDLING NAVIGATION COMPUTERS
All model series:
CAUTION: Risk of damage!
The navigation computer must not be disconnected from the power supply
while the LED on the computer remains lit (the
SEE MORE:
Vibration Damper
REMOVING AND INSTALLING/REPLACING VIBRATION DAMPER (N62/N62TU)
Necessary preliminary tasks:
Remove alternator drive belt.
Remove A/C compressor drive belt.
Remove fan cowl.
Release bolts and remove vibration damper (1).
Fig. 149: Locating Vibration Damper And Bolts
Installation:
Vibration dam
Approach control warning
with light braking function
Principle
The Forward Collision Warning warns of a possible
risk of collision and may brake independently.
In the event of an accident, the system may reduce
impact speed.
General information
Sensors detect the traffic situation.
The system issues a two-phase warning of a
possible risk of collisio
