
BMW X5: Removing And Installing/Replacing Car Communication Computer
IMPORTANT: Read and comply with notes on protection against electrostatic damage (ESD protection).
NOTE: Comply with notes and instructions on handling optical waveguides.
Necessary preliminary tasks:
- Disconnect battery negative lead.
- Remove middle trim for instrument panel.
Release screws (1).
Pull back Car Communication Computer (2) slightly.
Unlock associated plug connections and disconnect.
Remove Car Communication Computer (2).
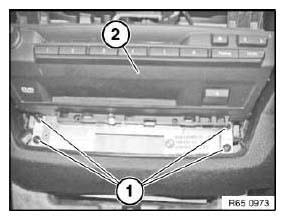
Fig. 66: Identifying Car Communication Computer
Replacement:
Carry out programming/coding.
REMOVING AND INSTALLING/REPLACING FAN FOR CAR COMMUNICATION COMPUTER
IMPORTANT: Read and comply with notes on protection against electrostatic damage (ESD protection).
Necessary preliminary tasks:
- Remove Car Communication Computer.
Raise retaining hook (1) and turn fan for Car Communication Computer (2) in direction of arrow.
Remove fan for Car Communication Computer (2) from Car Communication Computer (3).
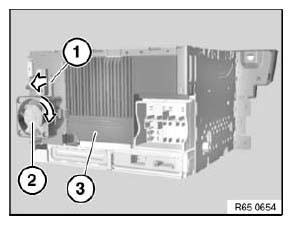
Fig. 67: Turning Fan For Car Communication Computer
REMOVING AND INSTALLING/REPLACING FRONT TRIM FOR CAR COMMUNICATION COMPUTER
Special tools required:
- 12 7 192
IMPORTANT: Read and comply with notes on protection against electrostatic damage (ESD protection)!
Risk of damage! Place Car Communication Computer on special tool 12 7 192 (antistatic mat) and earth/ground.
Necessary preliminary tasks:
- Remove Car Communication Computer.
Unlock retainer (1) and carefully raise front trim (2).
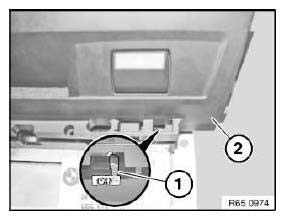
Fig. 68: Identifying Unlock Retainer
If necessary, unclip retaining lugs (2) and carefully remove front trim (1).
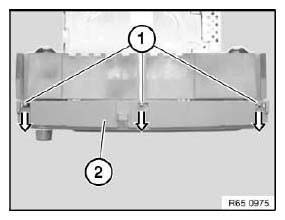
Fig. 69: Identifying Unclip Retaining Lugs
NOTE: "LIF" stands for Low Insertion Force.
Open catch of LIF plug (1) in direction of arrow and feed out LIF cable (2).
Remove front trim (3).
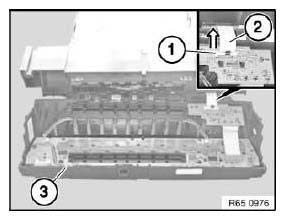
Fig. 70: Identifying LIF Plug
READ NEXT:
 Removing And Installing/Replacing Front Trim For Car Communication
Computer (Holder)
Removing And Installing/Replacing Front Trim For Car Communication
Computer (Holder)
Special tools required:
12 7 192
IMPORTANT: Read and comply with notes on protection against
electrostatic damage (ESD
protection)!
Risk of damage!
Place Car Communication Computer on special too
Removing And Installing/Replacing DVD Drive For Car Communication
Computer (CCC)
Special tools required:
12 7 192
IMPORTANT: Read and comply with notes on protection against
electrostatic damage (ESD
protection)!
Risk of damage!
Place Car Communication Computer on special tool
Navigation Systems
NOTES ON HANDLING NAVIGATION COMPUTERS
All model series:
CAUTION: Risk of damage!
The navigation computer must not be disconnected from the power supply
while the LED on the computer remains lit (the
SEE MORE:
Unlocking/Locking Airbag Plug Connections
WARNING: Read and comply with safety regulations for handling airbag
modules and
pyrotechnical belt tensioners.
IMPORTANT: An airbag plug connection must be replaced if it is damaged.
Sourcing reference for airbag repair instructions (with plug connection), refer
to BMW Parts Service.
Following ve
Removing And Installing/Replacing Drip Molding
Necessary preliminary tasks:
Remove complete glass slide/tilt sunroof.
Remove glass slide/tilt sunroof lid at rear.
Remove glass slide/tilt sunroof lid at front.
IMPORTANT: Risk of damage to drip molding carrier.
Carefully unclip drip molding (1) upwards out of carrier (2).
Fig. 65: Uncoupli
