
BMW X5: Oil Pump
REPLACING TORQUE CONVERTER SHAFT SEAL (GA6HP26Z)
Special tools required:
- 00 1 450
- 24 0 200
- 24 2 351
- 24 2 352
- 24 2 353
- 24 2 360
Necessary preliminary tasks:
- Remove automatic transmission.
IMPORTANT: After completion of work, check transmission oil level.
Use only approved transmission oil.
Failure to comply with this instruction will result in serious damage to the transmission.
Secure transmission with special tool 24 0 200 to assembly stand 00 1 450.
Remove torque converter.
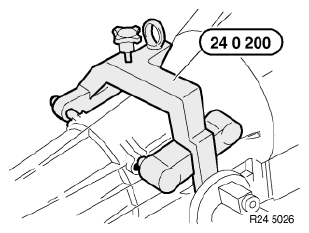
Fig. 40: Identifying Special Tool (24 0 200)
Attach special tool 24 2 353 to drive shaft (1).

Fig. 41: Identifying Special Tool (24 2 353)
Screw in special tool 24 2 351 until it is firmly connected with shaft seal.
Screw in special tool 24 2 352 to remove shaft seal.
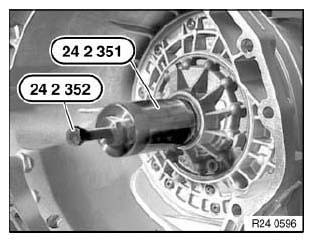
Fig. 42: Identifying Special Tool (24 2 351) And (24 2 352)
Oil sealing lip on shaft seal.
Drive in shaft seal (1) with special tool 24 2 360 as far as it will go.
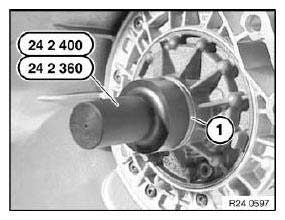
Fig. 43: Identifying Special Tool (24 2 360)
READ NEXT:
 Regulator
MANUAL EMERGENCY RELEASE OF TRANSMISSION LOCK
In the event of a power supply interruption, e.g. flat battery or electrical
fault, the transmission lock must be
manually released, otherwise the wheel
Manual Emergency Release Of Transmission Lock
In the event of a power supply interruption, e.g. flat battery or electrical
fault, the transmission lock must be
manually released, otherwise the wheel will be locked and the vehicle cannot be
move
SEE MORE:
Lane departure warning
Principle
The lane departure warning alerts when the vehicle
is about to run off the road or exit the lane.
General information
This camera-based system warns starting at a
minimum speed.
The minimum speed is country-specific and is
displayed in the menu for the intelligent Safety
systems.
Warning
Removing And Installing Complete Glass Slide/Tilt Sunroof
Special tools required:
54 1 110
Necessary preliminary tasks:
Remove roofliner.
Remove head airbag gas generator.
Open rear lid.
IMPORTANT: Two persons are required to help in removing the glass
slide/tilt sunroof.
Unfasten plug connection (1) and disconnect.
Installation:
Initialize glass
