
BMW X5: Removing And Installing/Replacing Trim For Rear Cabin Monitor Base At Rear
Special tools required:
- 00 9 340
Using special tool 00 9 340 , unclip trim (1) on both sides.
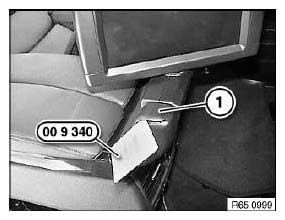
Fig. 43: Identifying Special Tool (00 9 340)
Unclip trim (1) with special tool 00 9 340 and remove.
Replacement:
Trims may only be replaced in pairs so as to avoid differences in color.
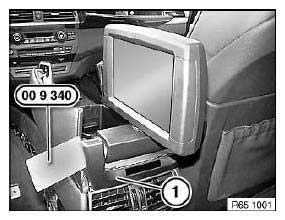
Fig. 44: Identifying Special Tool (00 9 340)
REMOVING AND INSTALLING/REPLACING TRIM FOR REAR CABIN MONITOR DISPLAY AT FRONT
Special tools required:
- 00 9 340
Unclip trims (1) on both sides with special tool 00 9 340.
Installation:
Make sure trim (1) is securely seated in rear cabin monitor trim at front.

Fig. 45: Identifying Special Tool (00 9 340) On Trims
Release screws (1).
Tightening torque.

Fig. 46: Identifying Trims Screws
Unclip trim (1) with special tool 00 9 340 and remove.

Fig. 47: Identifying Special Tool (00 9 340) On Trim
Release screws (1).
Carefully remove trim (2) and disconnect plug connection (3).
Installation:
Make sure ribbon cable is securely seated.
Replacement:
Trims may only be replaced in pairs so as to avoid differences in color.
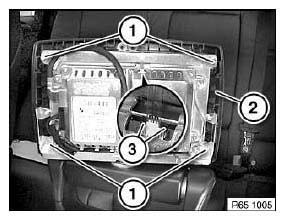
Fig. 48: Identifying Plug Connection
REMOVING AND INSTALLING/REPLACING TRIM FOR REAR CABIN MONITOR DISPLAY AT REAR
Special tools required:
- 00 9 340
Unclip trims (1) with special tool 00 9 340 from rear cabin monitor.
Installation:
Make sure trims (1) are securely seated in rear cabin monitor trim at front.
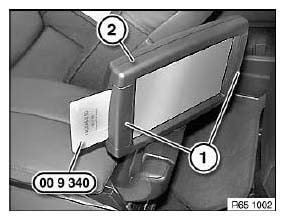
Fig. 49: Identifying Special Tool (00 9 340) On Trims
Release screws (1).
Tightening torque.
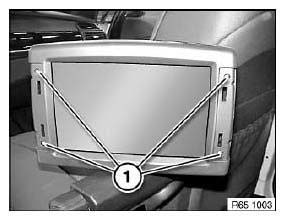
Fig. 50: Identifying Trims Screws
Unclip trim (1) with special tool 00 9 340 and remove.
Replacement:
Trims may only be replaced in pairs so as to avoid differences in color.
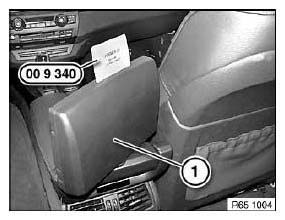
Fig. 51: Identifying Special Tool (00 9 340) On Trim
REPLACING REAR CABIN MONITOR DISPLAY
Necessary preliminary tasks:
- Remove trim for rear cabin monitor display at rear.
Disconnect plug connection (1).
Release screws (2).
Tightening torque. Release screw (3) and remove display (4) towards top.
Tightening torque.
Installation:
Remove protective film from replacement display.
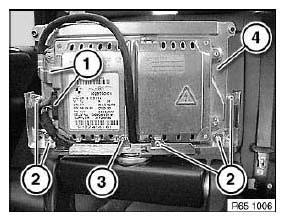
Fig. 52: Identifying Rear Cabin Monitor Display
READ NEXT:
 Notes On Scrapping BMW Vehicles With Gas Generators (Central Airbag
Control Unit, Airbag System)
Notes On Scrapping BMW Vehicles With Gas Generators (Central Airbag
Control Unit, Airbag System)
The gas generator is a pyrotechnic component of:
Airbag module
Driver's/passenger airbag
Side airbags
Head airbag
Knee airbag
Belt pretensioner
Belt buckle tensioner
Safety battery te
Overview Of Sensors For Airbag System
Fig. 53: Location Of Airbag System
Airbag control unit (under centre console)
Acceleration sensors, front (left/right)
Sensors, front door (left/right)
Sensors, B-pillar (left/right)
REMOVING A
SEE MORE:
Replacing Complete Rear Left Wheel Arch (Rear Left Side Panel
Removed)
Read contents of Body, General.
Spot-weld bonding is used on this vehicle. Observe specific procedure.
Remove or cover those vehicle components in the repair area which are
susceptible to heat or dust.
Use only approved spot-welding apparatus for repairs!
Place vehicle on straightening bench.
F
Removing And Installing/Replacing Front Compression Strut
IMPORTANT: Observe safety when raising the vehicle.
Driving without compression struts is not permitted!
Necessary preliminary tasks:
Remove underbody panelling (rear section).
Release screws (1).
Release screw (3).
Tightening torque.
Release screw (2) and remove compression strut (4).
Secure
