
BMW X5: Removing And Installing Rear Cabin Monitor (Complete)
BMW X5 (G05) 2019-2026 Service & Repair Manual / Audio, Navigation And Anti-Theft / Video And TV Equipment / Removing And Installing Rear Cabin Monitor (Complete)
Necessary preliminary tasks:
- Remove fresh-air grille in rear cabin.
- Remove trim from rear cabin monitor base at front.
Release screws (1) and remove rear cabin monitor with holder (2).
Disconnect associated plug connections and feed out leads.
Tightening torque.
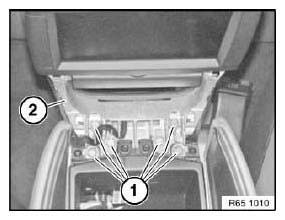
Fig. 39: Identifying Rear Cabin Monitor With Holder
Installation:
Make sure leads are correctly routed on both sides.
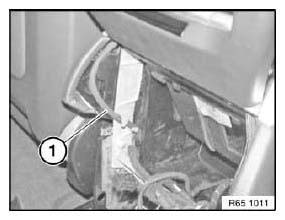
Fig. 40: Identifying Monitor Leads
REMOVING AND INSTALLING/REPLACING TRIM FOR REAR CABIN MONITOR BASE AT FRONT
Special tools required:
- 00 9 340
Using special tool 00 9 340 , unclip trim (1) on both sides.
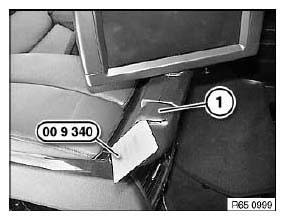
Fig. 41: Identifying Special Tool (00 9 340)
Open armrest (1).
Unclip trim (2) with special tool 00 9 340 and feed out.
Replacement:
Trims may only be replaced in pairs so as to avoid differences in color.
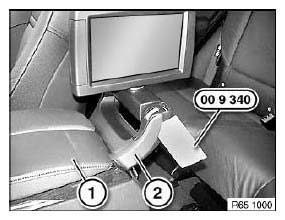
Fig. 42: Identifying Special Tool (00 9 340)
READ NEXT:
 Removing And Installing/Replacing Trim For Rear Cabin Monitor Base
At Rear
Removing And Installing/Replacing Trim For Rear Cabin Monitor Base
At Rear
Special tools required:
00 9 340
Using special tool 00 9 340 , unclip trim (1) on both sides.
Fig. 43: Identifying Special Tool (00 9 340)
Unclip trim (1) with special tool 00 9 340 and remove.
Re
Notes On Scrapping BMW Vehicles With Gas Generators (Central Airbag
Control Unit, Airbag System)
The gas generator is a pyrotechnic component of:
Airbag module
Driver's/passenger airbag
Side airbags
Head airbag
Knee airbag
Belt pretensioner
Belt buckle tensioner
Safety battery te
SEE MORE:
Removing And Installing/Replacing Eccentric Shaft (N52K)
Special tools required:
11 4 481
Necessary preliminary tasks:
Remove cylinder head cover
Remove intermediate lever
If necessary, move eccentric shaft (1) on twin surface to minimum lift (2).
Fig. 218: Eccentric Shaft
NOTE: All bearing caps (1 and 2) of eccentric shaft are marked with
number
Instrument Cluster
REMOVING AND INSTALLING (REPLACING) INSTRUMENT CLUSTER
IMPORTANT: Read and comply with notes on protection against
electrostatic damage (ESD
protection).
NOTE:
Comply with notes and instructions on handling fibre-optic cables.
Necessary preliminary tasks:
Extend steering wheel completely and
© 2019-2026 Copyright www.bmwx5info.com
