
BMW X5: Memory function
Principle
The following settings can be stored and, if necessary, retrieved using the memory function:
- Seat position.
- Exterior mirror position.
- Steering wheel position.
- Height of the Head-up Display.
General information
Two memory locations with different settings can be set for each driver profile.
The following settings are not stored:
- Backrest width.
- Lumbar support.
Safety information
Warning
Using the memory function while driving can lead to unexpected seat or steering wheel movements. Vehicle control could be lost.
There is a risk of accident. Only retrieve the memory function when the vehicle is stationary.
Warning
There is a risk of jamming when moving the seats. There is a risk of injury or risk of damage to property. Make sure that the area of movement of the seat is clear prior to any adjustment.
Overview
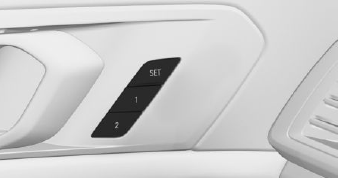
The memory buttons are located on the front doors.
Storing
1. Set the desired position.
2. .png) Press the button. The writing on
the
button lights up.
Press the button. The writing on
the
button lights up.
3. Press desired button 1 or 2 while the LED is lit. A signal sounds.
Calling up settings
Press the desired button 1 or 2.
The stored position is called up.
The procedure stops when a switch for setting the seat is pressed or one of the memory buttons is pressed again.
The adjustment of the seat position on the driver's side is interrupted after a short time while driving.
READ NEXT:
 Massage function
Principle
Depending on the program, the massage function
ensures relaxed muscles and better blood
circulation and can avoid fatigue.
General information
Eight different massage programs can be selecte
Seat and armrest heating
Principle
The system heats seats and armrests as
needed.
General information
Seat heating can also be used without armrest
heating. Deactivate the armrest heating as
needed.
Overview
Front
Seat and a
Active seat ventilation
Principle
Integrated fans in the seat and armrest areas
provide a comfortable seat temperature.
Overview
Active seat ventilation
Turning on
1. Press the button.
2. Select the ventilation level:
Pr
SEE MORE:
Replacing Rear Left Side Panel (Partial Replacement, Door Opening)
Read contents of Body, General.
Spot-weld bonding is used on this vehicle. Observe specific procedure.
Use only approved spot-welding apparatus for repairs!
Remove or cover those vehicle components in the repair area which are
susceptible to heat or dust.
Following new body parts are required:
Alternator With Drive And Mount
REPLACING ALTERNATOR BELT PULLEY
Special tools required:
12 7 110
Remove and install alternator drive belt.
Depending on alternator type, grip shaft with:
hexagon socket
multi-tooth socket or
Torx socket wrench
Release nut with special tool 12 7 110.
Installation:
Tightening torque, 12 31 2
